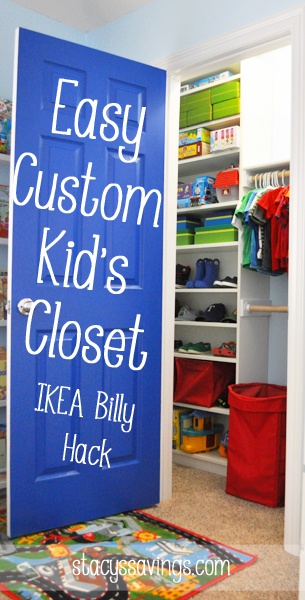
We’ve been in our new-to-us home for a few months now. Today, I’m super excited to show you the Custom Kid’s Closet that I did in my son’s room! Read on to see how I did it using an affordable IKEA Billy Bookcase!
The Before Closet
First, let’s look at the scary befores of this kid’s closet space.
The boy has a nice sized kid’s closet (bigger than his sister’s), but it was in really bad shape. The adjustable, metal closet rod was bent, the shelf board bowed a bit, and the supports were falling off the wall. I was afraid to hang his stuff up. So I knew that this closet needed to be tackled first before his room was really unpacked.
Looking around on Pinterest gave me some really great DIY closets. Shelving for storage of shoes, hats, toys and other items was a must-have. I also wanted 2 clothing racks to maximize the space. After measuring, I decided that I would use an 11″ deep Billy Bookcase + Extension from IKEA. This would act as my base of the custom closet construction, and then I would build off of that.
Kid’s Closet Construction
The first step in this Kid’s Closet is demo. I removed everything carefully and then repaired the wall. The shelf is getting cut down and reused, so I set that aside. I removed all of the old finishing nails & caulk, then patched the holes and sprayed with texture to match the rest of the closet. To do that, I used Homax Wall Texture in a spray can. It did a decent job matching the surrounding texture. You just have to be sure to keep your can moving and don’t over do it.
When all of that was dry, I scraped the texture a bit with a Drywall Joint Knife (this gets rid of any peaks and makes the texture more flat – like the rest of the wall), and then we painted all of the trim & the walls in the bedroom and closet. We used left over trim paint from the rest of the house (Benjamin Moore Advance Satin in Decorators White). We chose Benjamin Moore Light Blue (UltraSpec Eggshell Base) for the walls.
You might notice in the first photo, that the closet door is blue. My son (he’s 4) wants light blue walls and blue doors. I don’t know where he got the idea of blue doors, but whatever! So I painted both sides of his closet door, and the room-side of his bedroom door blue. I used Benjamin Moore Evening Blue (Advance Base in Satin) for the doors. It took 3 very light coats with a brush (over 3 days) to get a uniform shade.
Billy Bookcase
Once the room was put back together, and I had some space to work in, I built the Billy Bookcase according to the instructions. Only, I didn’t have a partner, I did it by myself (I’m such a rebel). After the shelf was together and I stood it up, I was a tiny bit worried that I wouldn’t be able to squeeze it through the doorway, but it was just right! Yes!
I pushed the Billy in the corner, and then carefully added the extension on top and secured it to the wall stud with the included bracket. That thing isn’t going anywhere!
New Closet Shelf
The original shelf was now too long and a bit too deep to fit next to the Billy, so I had a friend with a table saw help me get that cut to size, as well as some new MDF primed 1 x 4 support boards and 2 new wooden closet rods (similar to these). I splurged for the primed MDF to save me a step. We’ve got a lot of work to do in this house, and I didn’t feel like priming.
After the cuts were made, I measured and leveled where I wanted my kid’s closet rods & support boards, marked the wall, then used Liquid Nails and screws to secure the support pieces in place. I used 1.25″ wood screws in the support boards on the Billy, and 2″ drywall screws on the boards attached to the wall, securing to the studs for support. Next, I put a thin line of Wood Glue
on top of the support boards and laid the newly-cut-to-fit shelf down on top, then secured to the support boards with the same 1.25″ wood screws that I used with the Billy. I don’t think this shelf will be bowing/pulling out of the wall anytime soon.
These steps were a bit tricky alone, but it can be done. Its a little easier/faster with a partner.
Painting the Kid’s Closet Shelf
Once all of that was done, it was time to fill in with Wood Putty, caulk everything, and paint. I opted not to paint the Billy, but I did paint the support boards and the shelf so that all of that matched the trim. The Billy is “IKEA White”, which is not white, like the trim is. You can see the difference in the above photo of the shelf going in the closet. The Billy is slightly more yellow than the trim. Since this is my son’s closet, it doesn’t really bother me, but if I had to look at it all of the time, the fact that the bookcase doesn’t match might start getting to me. It’s a personal preference.
New Kid’s Closet Rods
I picked up 2 sets of Closet Rod Cups (similar to these) to attach the rod to the support brackets. I’ve seen several DIY custom closets and Billy Closet Hacks online, and no one ever talks about this part, so I’m going to tell you how I did it. I decided that the support board attached to the Billy not only was needed to support the shelf above, but also to support the closet rod cups. I wanted as few screws as possible to go into the actual bookcase, so the only ones that penetrate the side of the Billy are the 2 1.25″ wood screws that attach to the support board. This way, the cups are only secured onto the board, not the actual bookcase.
The last step is to slide in the closet rods and load up the kid’s closet!
The Finished Kid’s Closet
The Storage
I absolutely LOVE how much storage we have in here now! Two extra Billy Shelves make the space closer for small, little boy shoes & boots. There is no wasted space in this closet!
The red bins & laundry hamper were from Land of Nod. We used the bins in a different shelf at the old house, so I need to get a 4th bin. For now, we use them for winter hats & gloves and summer stuff (pool hats, flip flops, sunglasses). I’ve also stashed a few overflow toys & books on the bottom shelf.
I wanted to keep his shoes and hats at his eye level, so he’d help me put them on or put them away. So far, he loves to take his shoes off and take them to the “shoe house”, as he calls it. I guess that means my evil plan of getting him to put his stuff away is working…
I found the blue & green boxes on clearance at Target, and I thought they were perfect for collectibles and trinkets, as well as dangerous craft storage (non-washable markers & paints), since these are out of reach for now.
A few more overflow toys, games, Kiwi Crate Boxes with ready-to-go rainy day activities, and his baseball cards top off the Billy.
I love having the two clothing racks! They are so great for these tiny clothes! These rods will be able to grow with him, since I spaced them about 3′ or so apart. He’ll be able to put shirts on top and pants on the bottom. The rods are easily removed, so if he decides he just wants the top rod, he can take the bottom one out, too.
So far, I just have Holiday-Themed Books & some Mega Bloks taking residence on the top shelf, but I’m sure there’s some stuff we can stash up there soon. For now, there are things on the floor on the right side, but most of that is Mega Bloks and other toys that he plays with, and his bin where I keep his artwork & school stuff.
The Kid’s Closet Budget
Its a far cry from what it was before, and its the best closet in the house! The best part? It was super easy, and cost me less than $180 for a complete custom closet!
We already had most of the painting & hardware supplies on hand. The new items I had to get for this project include the Billy ($79), Billy Extension ($30), 2 Extra Shelves ($10 each), the MDF board ($4ish for primed), closet rods ($17.98 each – cut to size) and cups ($4.78 each). If you had to buy the rest of the supplies (paint, caulk, Liquid Nails/caulk gun, screws, wood glue, MDF board for the shelf), it would probably run you an extra $100 or so to complete the job starting from scratch.
I still want to change out the light fixture in this closet (its just a fluorescent tube light) and maybe add some trim around the top of the Billy to give it a more built in look, and possibly add a back support and a shelf top to the bottom closet rod, but its good for now. We’ve got so much to do in the rest of the house, those are going to have to wait for a while.
So, what do you think? Do you like the storage? What’s your favorite part? Have you done an IKEA Hack before? Do you love the Billy Bookcase? I’ve also done this trick in my daughter’s smaller closet using the skinny Billy bookcase! Make sure you’re following me on Instagram for the latest in our DIY Home Remodel!
Check out how we’ve updated all of the closets in our home on a budget in this post.
Check out all of the Stacy’s Savings Total Home Makeover posts here!



Leave a Reply