Want to organize your nail polish collection? I’ve got the perfect solution to keep your collection organized and easy to find the color you want to use. Find out how to organize and swatch your nail polish bottles with these easy steps!
IKEA Helmer
Like many other Nail Polish Collectors, I keep my polish collection neatly filed away in an IKEA Helmer.

The size is perfect for holding all of the polishes that I own, it fits in my closet, and the $40 price tag isn’t bad either. I may or may not have 2 3 of them. There is only one drawback to the Helmer: you can’t see the colors of certain brands of polish when you open the drawer. This happens when the lid and the bottle are the same size. In my collection, I have this problem with Julep and Butter London, but there are other brands with the same issue (Dior, Chanel, etc).
Swatch Me Stickers
In January, Julep started putting “Swatch Me Stickers” on the top of their bottle lids. They also included 1 sheet of additional stickers in each box that month. One sheet wasn’t going to cut it for my stash, so in April, I decided to fork over $3.99 to get an additional 3 sheets as an add on to my April Maven Box. I also swapped and bought some sheets on the Julep Swap Facebook Group (Thanks Ladies!). I love the look of the stickers, but I didn’t really like the look after I swatched them.
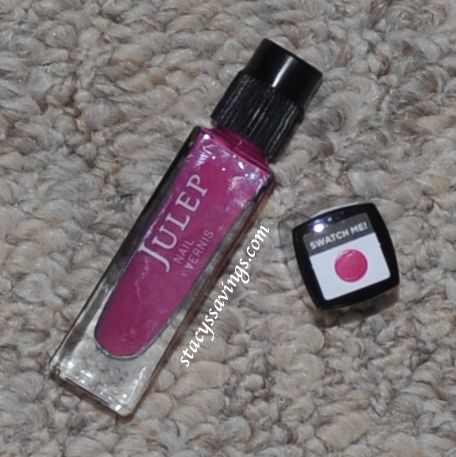
I’d read other Julep Fan’s experiences with the stickers. Some stickers curled up on the corners if they were too saturated. That scared me, so when I went to swatch my bottles, I tried to do a small mark with the end of the brushes. That didn’t turn out uniform, which bothered me, and I had trouble seeing finishes and colors without my glasses. I know I’m not the only one with OCD when it comes to the look of her polish collection, so I was determined to come up with a solution.
I’ve been thinking about how to get my swatches to look better for 4 months, and it finally came to me! I thought about how I did these nails, and tweaked that method for swatching by using materials I already had around my house.
Follow along as I teach you how to achieve perfectly swatch your nail polish bottles!
Supplies to Swatch Your Nail Polish Bottles

What You Will Need:
- White Sticker Pages
- 1/4″ Single Hole Punch
- Julep Swatch Me Stickers (Optional – No Longer Available)
- Nail Polish
The time needed to accomplish this project depends on the size of your stash. I did mine 36 at a time (Helmer’s fit 12 Julep bottles across in one row), and it took me a few hours, but most of that was drying time.
Step #1 – Lightly paint swatches on one label sheet.

You want to paint your swatch slightly bigger than the size of the hole that your hole punch makes. Make sure you have even coverage (or don’t if you want to see different coats/opaqueness). I painted two swipes and then kind of lightly patted the end of the brush in the middle to cover up any streaks. You don’t want your brush too saturated, or you’ll have trouble removing the backing. You may need to let it dry and do another coat to get the true color of the polish. For glitters, I found it easier to do it a little thicker, and kind of place a glob on the sheet. Just make sure you give it lots of extra dry time.
I also lined up my bottles next to their corresponding swatches so I would know which was which.
Step #2 – Let your swatches dry.
Give your swatches extra time to dry than you would to do your nails. Go watch a show on your DVR, clean something, take a bath, take a nap, whatever, just let it dry completely, and then let it dry some more. Even if they feel dry, they may leave fingerprints when you go to place them on your bottles. I say, give them an hour. More for glitter.
Step #3 – Punch your holes.
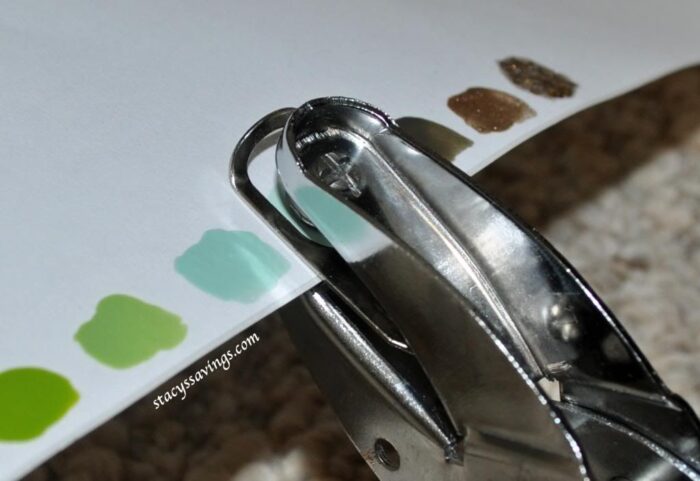
Remove the trap if your punch has one, and line up the hole punch so that your hole will be all polish and no white. If you use the hole punch upside down (not as shown above) and slowly punch your hole, you’ll be able to make sure that your entire swatch is paint AND your punched hole should stay in the punch. Just flip it on to your other hand. That way, you don’t lose it! I figured this out towards the end of my project, and it was much smoother.
Step #4 – Place Your Swatches
I just stuck my swatch right on top of the smaller, uneven ones I had done before. The reason that I like the removable labels is that you can apply slight pressure with your thumb and scoot the punched hole exactly where you want it.
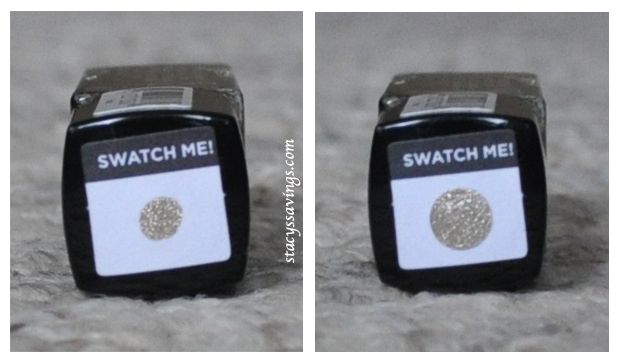
That’s it! Perfectly round, accurate color & finish swatches for your nail polish bottles! Now you can swatch your nail polish bottles perfectly!
A few notes:
- This method will work for any storage system where you have your bottles standing, not just the Helmer. A Melmer, a Shoe box, this method is fantastic!
- Using the Julep Swatch Me Stickers is totally optional. You can use any type of white label that you find at the store, or you can just stick your swatch holes directly on the caps! I personally like the white background and the look of the Julep Stickers.
- You can also get creative with your shapes! I liked the look of the circle punch, but you can also get stars and hearts! Check your craft box and see what you’ve got! You can get a lot of swatches out of one label page, but you need to leave yourself room to use your punch, or cut down your labels so it’s easier to access your swatch with the hole punch.
Here is my entire Julep Collection swatched with this method!
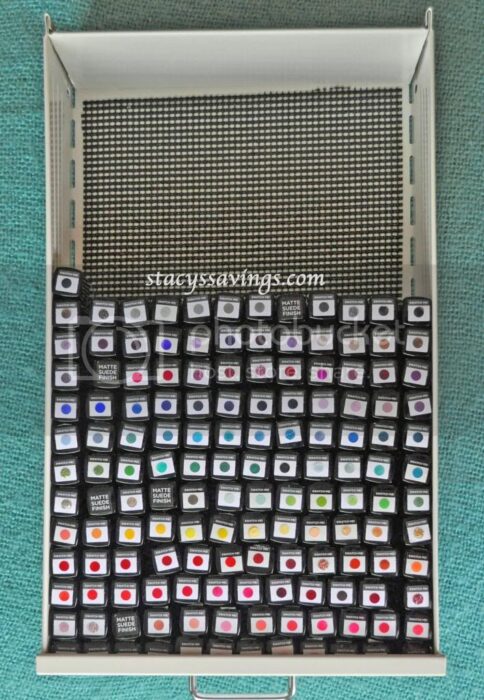
So much better! Notice how you can see them all? I love that I can see the different finishes between each polish. Plus, there’s still room for many more Juleps in this drawer!
How do you organize your nail polish bottles? Make sure you’re following me on Instagram for more organizational tips!
So what do you think? If you like this tutorial, please Pin to Pinterest by using the button above. Thank you!

Deb says
Thanks for this post. I got my first Julep polishes and saw the swatch it, and thought, hmm, how do I get a sample on TOP when it’s on the brush tool? Lol. I googled it, thinking, no one would write about this, and there it was! Makes perfect sense! Some of us need these things spelled out for us! Ha-ha.
Stacy says
Haha! No problem! That’s a common question with Juleps. Glad I could help!
Thanks for stopping by!
~Stacy
DEANNE says
Thank you i love this idea! Especially since my Julep bottle does not have a dual lid grr. PS. I thought you were joking about the ikea storage thing now I’m cracking up. Whoa girl your collection must be awesome!! 🙂
Stacy says
I need to update this post! This was so long ago, I probably have 3 full drawers now. Are you sure your Julep bottles don’t have dual lids? I’ve never seen any that don’t. Sometimes, I have to kind of rock the lid back and forth. They can be hard to separate.
Thanks for stopping by!
~Stacy
Katie says
Do they still sell the swatch me sticker sheets on the website? I’m in dire need of some!
Stacy says
I haven’t seen them in a while. Sometimes, they pop up as an add on or in the secret store. Items are always going in and out of stock on that website, so keep checking!
Thanks for stopping by!
~Stacy
Tiffany W. says
I just found this and I’m so thankful! This is a great idea! I’m going to work on it tonight while I watch some of my favorite T.V. shows! Thank you again!
Stacy says
I’m glad I could help! Have fun!
mimz says
OMG how do you have so many colors!! I am trying to collect them too but theyre pretty pricy so I only have 10 so far. Neat idea though 🙂
Stacy says
Haha! This post is old. I have about 3 times that many now! Julep has lots of deals and coupon codes from time to time. I only buy them when I can get them for $4.99 or less. Also, I’ve been collecting for a long time.
Have fun!
Shafeeqah says
I used my large dotting tool to make my swatches uniform! I like this idea as well! I’ve very artsy, craftsy and this is right up my alley!
Stacy says
Thanks! I seriously thought about that when I first got the stickers in January, but I didn’t think it would be big enough. I wanted to be able to see the different finishes without my glasses on, since I do my nails right after I get out of the bath.
Vanessa says
What an awesome idea – I’m definitely redoing my swatch stickers this weekend. Thanks so much for sharing!
Stacy says
Thanks! It was so much fun! Please take a pic and post it here or email it to me. I’d love to see your finished project!