We lived in our house for 5 years before we started this kitchen & laundry room remodel. So we knew what worked (not much) and what didn’t work (almost all of it) for our family. One of the biggest annoyances with our old kitchen was the pantry.
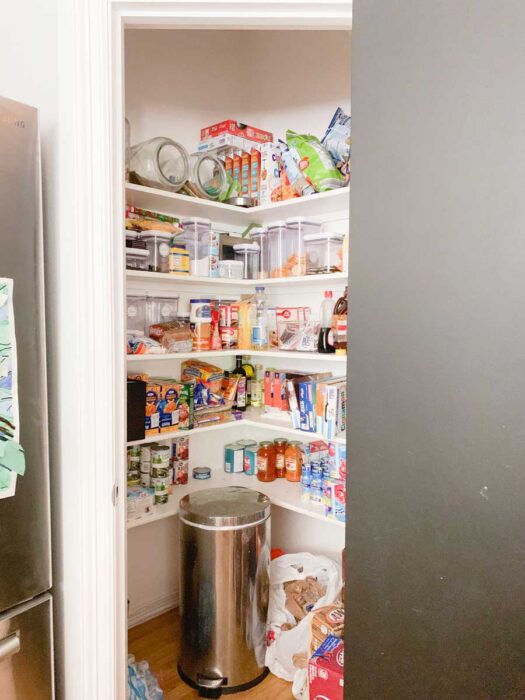
It wasn’t big enough, the shelves weren’t laid out properly, and there was a lot of wasted space. For example, the spacing between the shelves was too small to keep a cereal box upright or fit some of my containers. Yet, there was 4′ above the top shelf not being used.
In our last house, I added shelves to the pantry specifically to fit our needs, and it was wonderful! (It was a long time ago, at the beginning of my blogging journey, and the picture quality is awful!) I’ve really missed that functionality.
If you’ve missed the beginning of our kitchen & laundry room remodel using IKEA Cabinets here are all of the posts!
- Kitchen & Laundry Room Remodel Plans & Budget
- 3 Week Remodel Update
- 9 Week Remodel Update
- 13 Week Remodel Update
Designing the Pantry
When the kitchen designer that we hired initially saw our kitchen, her first suggestion was that we eliminate the pantry and go with pantry cabinets. Apparently, that is the cool thing to do in 2019. While I love the look of pantry cabinets in other kitchens, I knew those wouldn’t work for our family.
I had always dreamed of a walk-in pantry that not only stored food but was also a place to keep our small appliances, cookbooks, and maybe even have a little workspace. Sort of like a Butler’s Pantry.
Because I use coupons in combination with shopping the grocery ads, my pantry needs are drastically different than most of her client’s. I may have 20 boxes of Cracklin Oat Bran at any one time. It is the only cereal that my husband eats, and he eats it for breakfast every single day. That stuff is expensive, so I tend to stock up when it goes on sale and I have coupons for it.
With that in mind, she embraced my vision, and was able to fit it in her design. It’s basically what I saw in my head, but professionally drawn. I’m so excited to show you!
The New Pantry
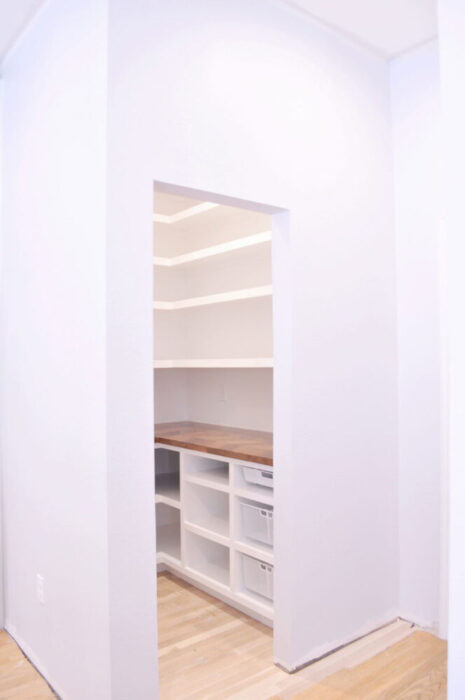
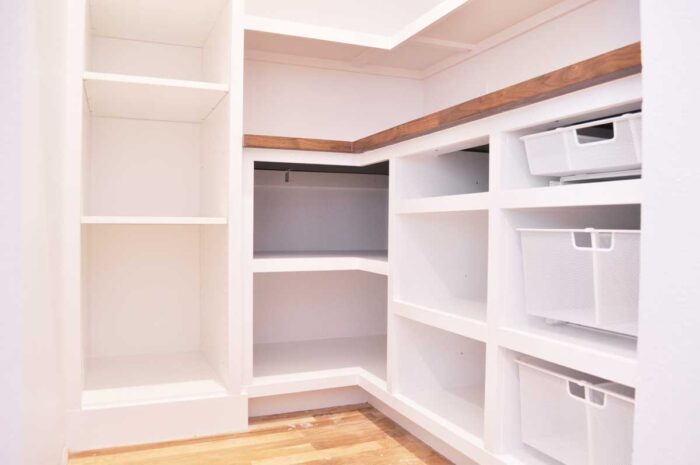
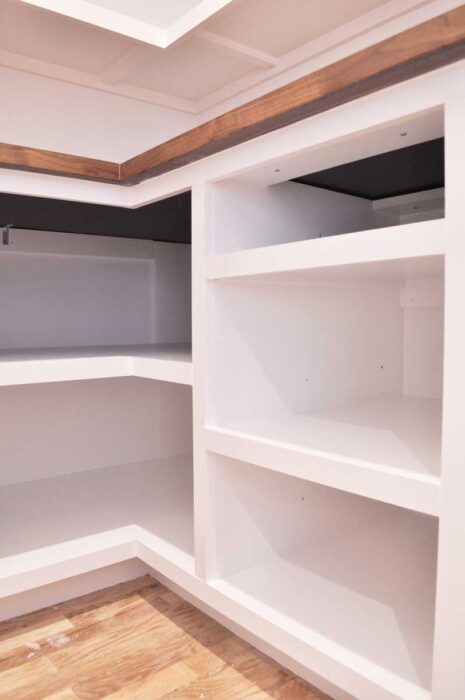
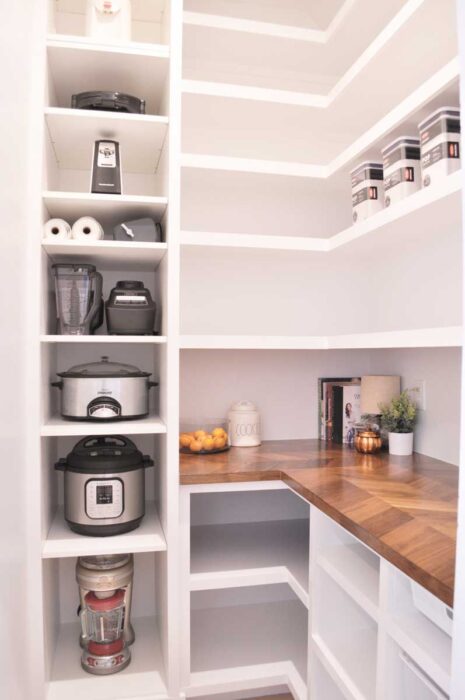
This pantry has everything I was looking for: open shelving, storage for small appliances, a workspace, and snack drawers. We took advantage of the 10′ ceilings, so its hard to get it all on one shot. The dimensions of the new pantry are 6′ x 5′.
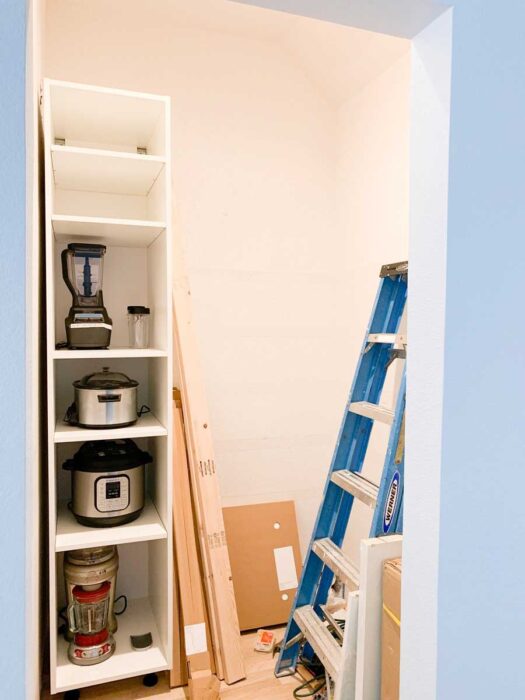
We only used one (really two) IKEA Sektion Kitchen cabinets in here: an 18 x 90″ pantry cabinet and an 18 x 20″ wall cabinet. Those are the components for the small appliance storage tower. I installed these when we installed all of the kitchen cabinetry. All of the shelving construction is built off this “unit”.
It looks like IKEA may not have the 18 x 20″ wall cabinet anymore. They do have a 24 x 20″ wall cabinet, and you could buy that plus an 18 x 30″ wall cabinet, then just use the top/bottom of the 18″ cabinet with the sides of the 24″ cabinet to make an 18 x 20″ cabinet. You’ll need to cut down the back of the larger cabinet to fit. The pieces are all modular and have the same holes, so you’d put them together the same way. It’s not as budget friendly, but it will get the job done.
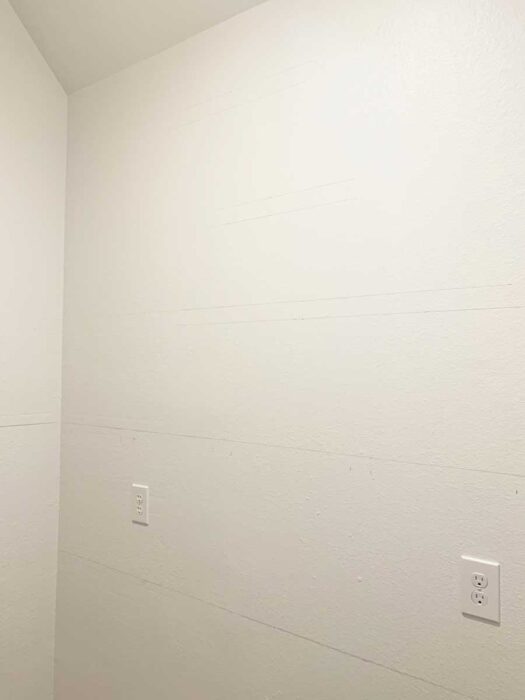
I custom built all of the other shelving with wood from Lowes. Before I built the shelves, I painted the ceiling with Valspar ceiling paint and the walls with Benjamin Moore Ultra Spec Eggshell in Decorator’s White.
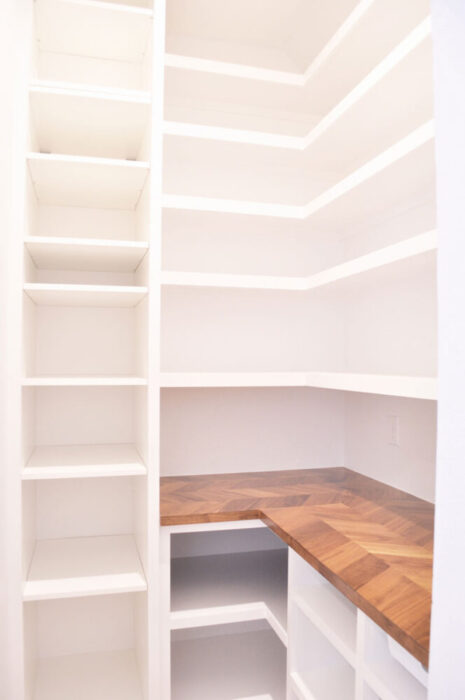
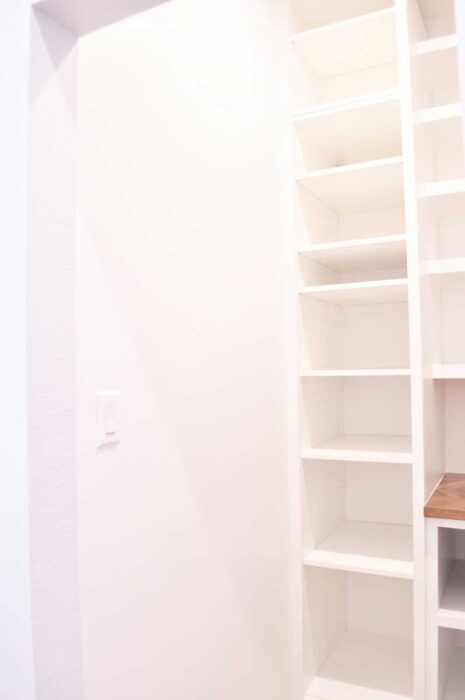
The Upper Shelving
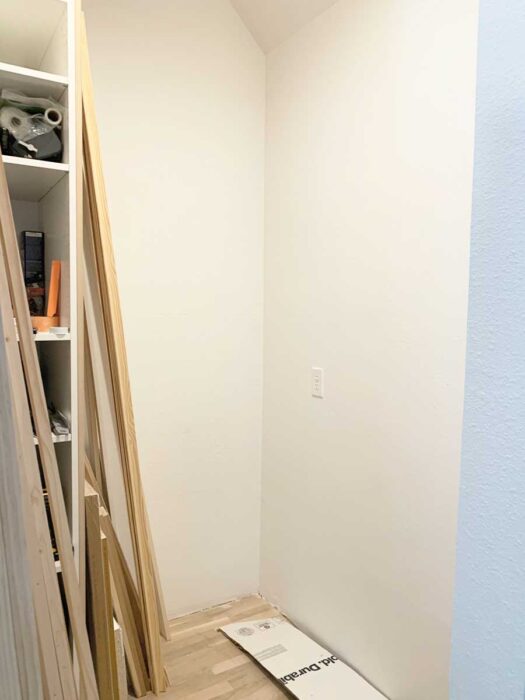
With the room freshly painted, I started with the upper shelving first. I wanted to finish those before building the bottom shelves, since those were going to be cabinet depth. It would be much harder to access the back of the upper shelves with the lowers in place.
After measuring my containers (and the containers I want to use), I decided on the height of my different shelves. We’re going with 1 14″, 2 10″, and 2 at 9″.
Since I’m going to have base cabinets & a counter top, I knew the first shelf needed to be the same as the bottom of my cabinets in the kitchen. That meant that I needed to put my first line at 19″ above my 36″ countertop line. For the rest of the shelves, I took into account the 2″ thickness of the shelf profile as I went up the wall and marked my lines.
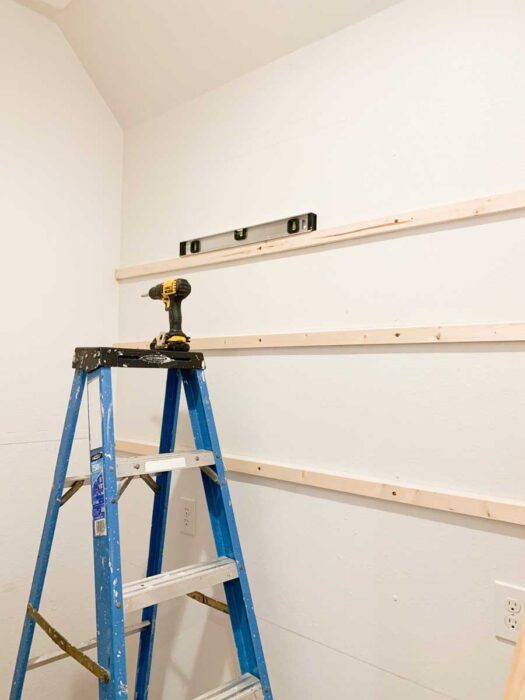
I used 1×2 pine to place level cleats on the wall, screwing into studs with 3″ cabinet screws. I used 1/2″ mdf for the shelves, and I nailed that into the cleats from the top using 1″ nails and my 18 gauge nail gun. This is similar to how I built the floating shelves in the Home Office and the built ins in the Guest Room/Craft Room.
We cut these shelves from the sheets of mdf into L shapes, which made the installation a little difficult. I thought by cutting them in Ls that the shelves would be stronger at the corner. I don’t know if that’s true or not, we’ll have to see how they hold up. If I had to do it again, I’d probably use 3/4″ plywood instead of mdf, but I used 1/2″ because I didn’t want my finished shelves to be too thick once the trim was installed.
The depth of the installed shelves is totally customizable. For me, I knew what containers I wanted to use, so I measured those first. That allowed me to make the shelves deep enough for to use those specific containers. My shelves are about 13″ deep. You can make your shelves as deep or shallow as you want to. Just measure your containers & make a custom fit!
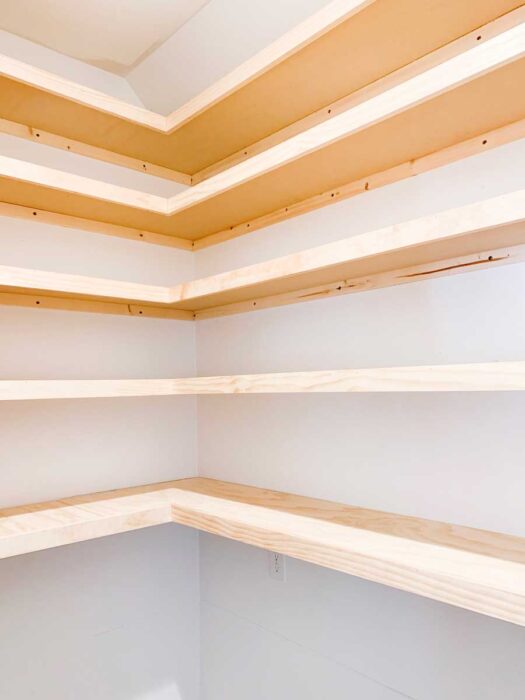
To finish off the fronts nicely, I used select pine 1x3s ripped down to 2″ and attached them with 1″ nails and my 18 gauge brad nail gun.
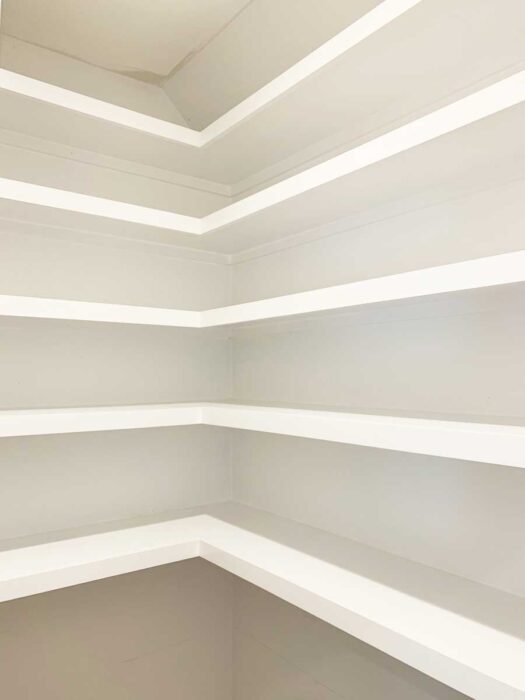
It only took a couple of days to build these shelves. I filled all of the holes with white wood filler, sanded and caulked. Then I primed them and painted them with two coats of Benjamin Moore Advance in Decorator’s White.
The Base Shelving
For the base cabinets, I used a combination of scrap wood I had in my garage and lumber from Lowes. The shelves are made out of 3/4″ mdf, since that’s what I had leftover from the kitchen project.
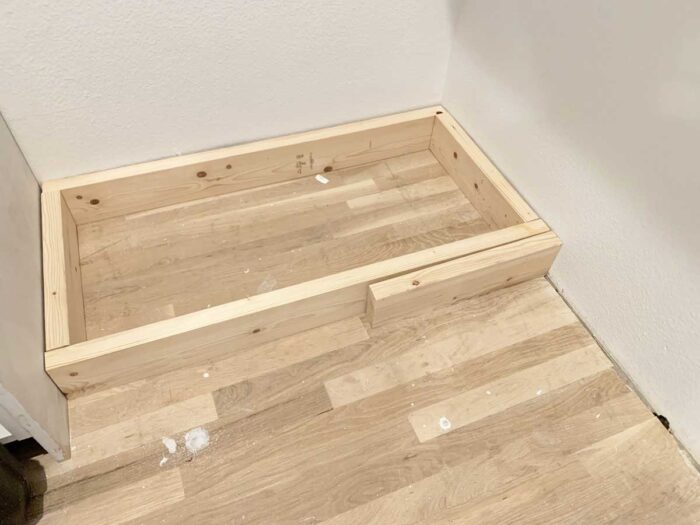
For these, we started out by building bases out of 2x6s ripped to 4.5″. This is similar to what we did for the island cabinets. The cabinet boxes will be 30″ tall, so with the toekick that’s 34.5″. The counter top is 1.5″ thick, so that finishes out at the standard 36″ high workspace.
Once we leveled those, we built the cabinet boxes with the mdf. These base cabinets will be a normal cabinet depth of 24″ when finished & trimmed out.
For the three base cabinets, we made 3 sided boxes (two sides and a base) and then used scrap mdf to square it with two strips across the top and one on the back (near the top). Then, we put a piece of 1/4″ plywood on the backs with small nails. The widths are custom for our space, but they are basically 2 19″ wide cabinets. The leftover space gives us room to get in the corner cabinet.
We chose 19″ wide because that would give us an opening of 17.5″. The elfa drawers we are using in the right cabinet are 16 7/8″ wide. Making the opening 17.5″ wide gives us some breathing room on each side of the basket drawers.

We installed these starting with the corner cabinet first. Then, we leveled the cabinets, and attached them to each other, then screwed them into the bases. I installed the shelves in a similar way as the upper shelves, only I ripped the 1×2 cleats in half first.
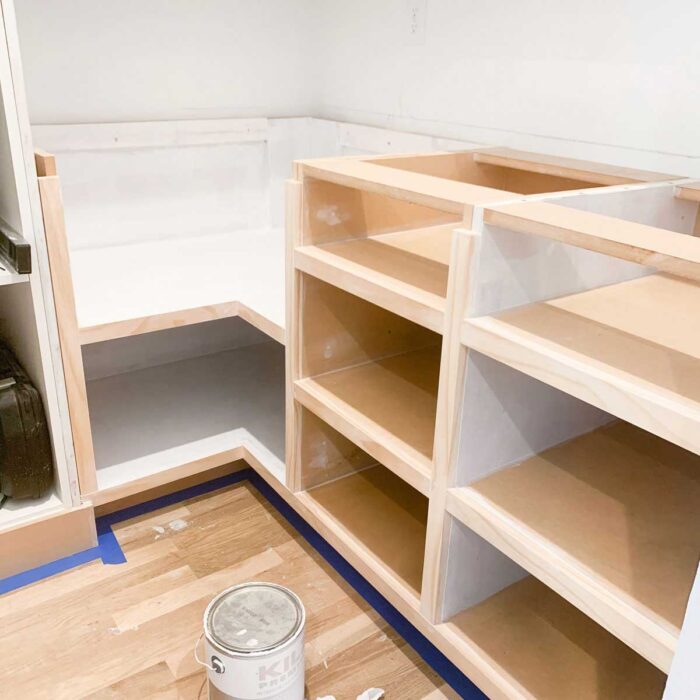
Once they were installed, I trimmed all of the fronts with Select Pine 1x2s. This is why I ripped the shelf supports for the bottom cabinets to 3/4″. At 3/4″, when you put the 3/4″ thick shelf on top, the whole thing is hidden by the 1×2.
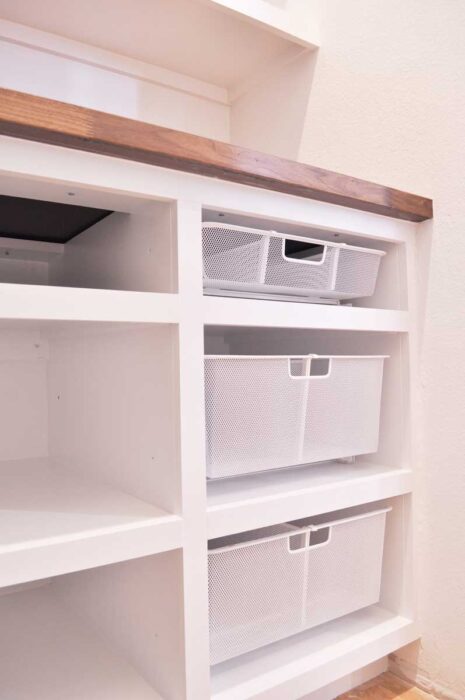

After I primed and painted the base cabinets, I installed the elfa mesh glider drawers in the first cabinet. I used 1 Medium 1 runner glider drawer and 2 Medium 2 runner glider drawers. Installation of the glider rails is very simple. It’s just 4 screws into the cabinet. This means, you can make this cabinet as wide as you want, as long as it is wider than the drawer. It is easier to install the top elfa drawer before the countertop is in place. These elfa drawers are going to hold bagged chips and snacks in an easy place for the kids to reach them. I also got elfa drawer dividers and labels so my family knows where things go.
These elfa drawers are on sale right now for their best price of the year! Save 30% on all things elfa, including these cabinet drawers! They work in any cabinet or on any shelf and come in several different sizes and widths. Don’t forget the accessories!
The Countertop
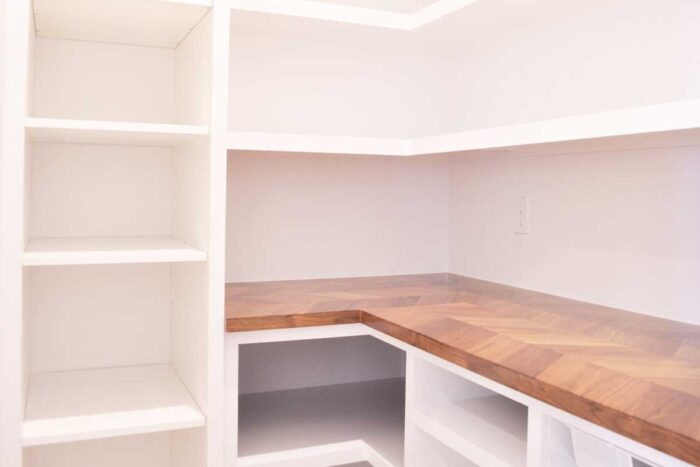
For the countertop, we used the large IKEA Barkaboda Butcher Block. This is the same countertop that we used in the Built In Bar Project in the living room. I love the Chevron look, its just so much more interesting than regular butcher block. We did not cut the depth down at all. The depth is 25 5/8″.
To protect it, I used 3 coats of Waterlox Original Sealer followed by one coat of Waterlox Satin Sealer. The original waterlox was a little too shiny for me, and the Satin requires 3 coats of the original first. I love Waterlox because it penetrates the wood to protect it. Its expensive, but worth it. Luckily, I had plenty leftover from the Guest Bathroom Remodel.
For the final steps, we caulked the countertop and touched up the wall & shelf paint. Then, I got to decorate!
The Decor (So Far)
It’s important to me that the pantry be just as pretty as the rest of my house, so of course I’m going to decorate. Pantry decorating is more about organizing and keeping things neat and tidy than pretty, but with a countertop, we can throw a little pretty in here too.
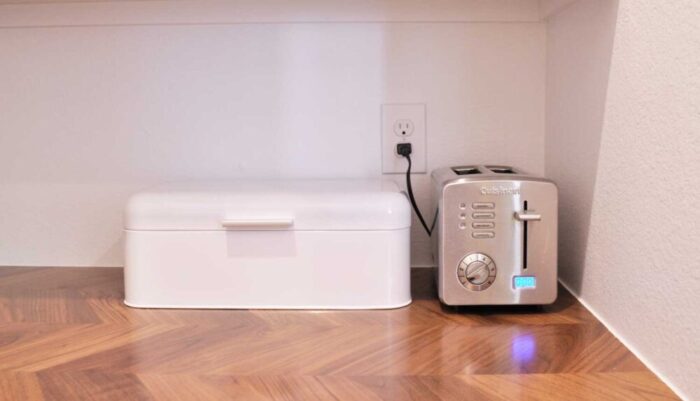
I was really excited to get the toaster out of the kitchen and in a spot where the bread is. I bought this bread box on Amazon and its so roomy! It fits all of our bread, english muffins, and tortillas easily. I think I may put some rub & buff on the handle in the future.
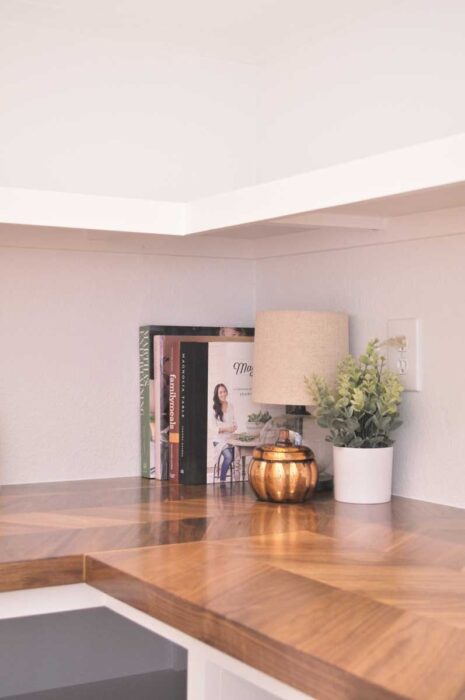
I also have a mini lamp in here, and we leave this on all the time. It’s totally not necessary, but I love it! Mini lamps are one of my favorite things and are usually under $15. I love to share them when I see cool ones on my Instagram Stories & the LikeToKnow.It App. Make sure you’re following me there so you don’t miss any! Any of those would be perfect in here, and honestly, I’m eyeing that navy one for this spot.
The corner of the countertop was the perfect place to put some of my larger cookbooks, and I’m thinking the rest will go on one of the pantry shelves. My cookbook collection is rather small because I kind of think they are outdated with Pinterest having any recipe at your fingertips, but I still like to look at them from time to time.
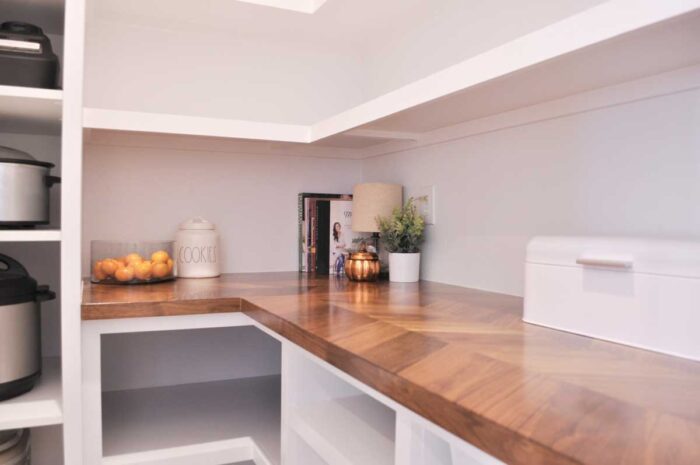
I also moved our fruit bowl to this space and added a Rae Dunn Cookie jar that I picked up at HomeGoods last month. I’m desperately searching for a Red version for Christmas, and I may or may not have spent 5 hours last Friday looking for one. #noshame
Can you imagine decorating this space for the holidays? I can’t wait! I have a funded Holiday Decor YNAB budget category just waiting for Target to drop their decor! Read more about how our YNAB budget changed our lives in this blog post.
The Appliance Storage
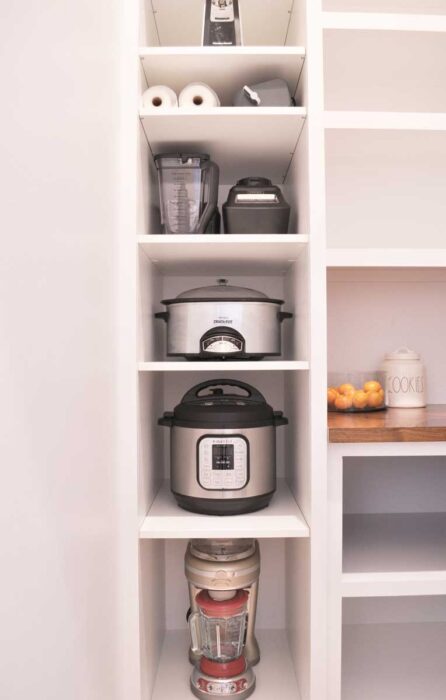
The appliance tower is working out nicely. A few years ago, I paired down our kitchen appliances when I Konmari’d the kitchen. I can honestly say that the only small kitchen appliances that are in the actual kitchen are the coffee maker and the stand mixer. I love having a defined space. It keeps you from buying unnecessary appliances.
The Snack Drawer
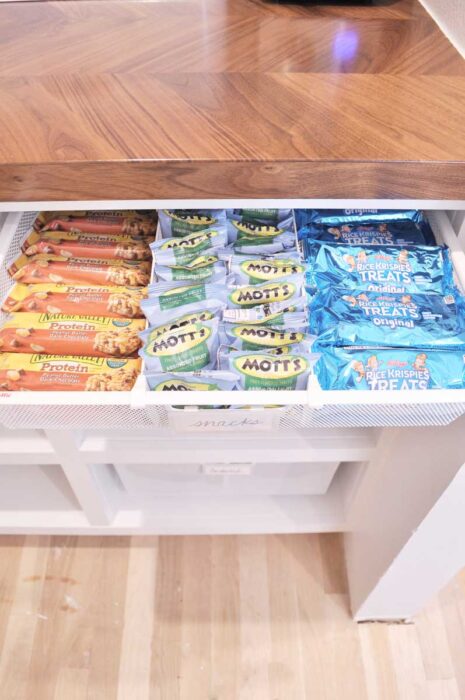
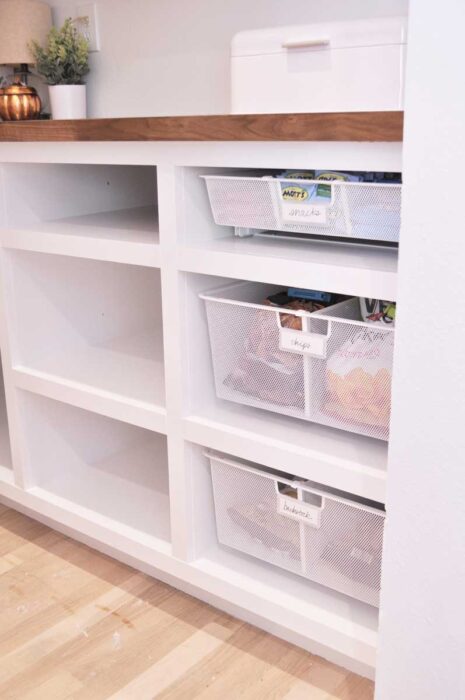
The kids of course love the snack drawer. They were shocked that mom bought individual sized snacks, but I had to make it look cute! Sometimes I buy them, if they’re on sale and I have a coupon, of course.
What’s Next?
I haven’t moved the rest of the food back in just yet for a couple of reasons. First, the Advance paint is amazing, but it takes 30 days to cure. I don’t really want to repaint these any time soon, so I’m giving them the full 30 days before I put them to use. Second, I’m going to add white contact paper before I put anything on them. I’ll probably do that next week. Finally, I’m still trying to figure out what containers I need to buy. So stay tuned for the organized reveal when I finally have that finished. The pantry is organized! Find out all of my favorite containers and how I organized the pantry in this post.
Finally, even though this pantry looks complete, there are a few projects left to be done. I’m going to add wallpaper to the blank wall to the left of the appliance storage. I haven’t figured out which one I want to get yet, though I have an idea in mind. I want something dramatic and colorful. Maybe with lemons. I’ve never done wallpaper before, so I’m trying to figure out if I want to do traditional wallpaper or peel & stick. Do you have a preference or any tips? I also have one farmhouse hook from my Amazon order last month leftover to use in here for aprons.
We still need to add the crown molding, and we’re going to put a barn door on at some point. In January, the floors are geting refinished, which is why we weren’t worried about them when painting, obviously. The flooring guys will also be putting in 5 1/4″ baseboards in here after the floors are done. I also really want to tile the backsplash area.
The Budget
I didn’t really have a set budget specifically for the pantry, as it was all rolled into the bigger Kitchen budget. Overall, we spent about $900 on this pantry. That sounds like a lot, but most of it is the countertop & the IKEA cabinets that we used. The wood for the shelving was about $250. The elfa drawers, dividers and labels were $116. I bought those during the shelving sale and they were 25% off. Elfa goes on sale for 30% off in January, and then a few more times during the year for 25% off.
I’m really happy with this pantry! It looks exactly like the pantry I was picturing in my mind. It’s going to be so much fun to fill it up with the awesome grocery sales that happen during the holidays! I’m also excited to get back to seriously Meal Planning, because that saves us so much money! Now, I need to get back to my Weekly Savings Challenge so that I can earn some cash to go buy stuff to organize it with!
The Elfa Sale at The Container Store is when the pantry glider drawers are 30% off – and it’s happening right now! That’s the best sale all year and its usually in late December into February. They also go on sale in June with a buy more, save more sale, and then again in the Fall, but those two sales are usually 25% off. While you’re shopping, make sure to pick up some of The Home Edit products that I used to organize the Medicine Cabinet!
Want to see how I organized this pantry? Check out the Pantry Organization Reveal! After that, don’t miss the Laundry Room Organization Post for tips & products to inspire you to get organized!
What’s your favorite part of the pantry? How would you organize it? Do you have any favorite organizing products or maybe a wallpaper suggestion? Let me know in the comments!
Don’t miss Your Top 7 Pantry Questions Answered!
IKEA Kitchen Remodel
The remodel is done! Check out the rest of the posts to watch our vision come to life!
- It’s Kitchen Remodel Time! The Budget, The Plans & The Laundry Room
- 3 Weeks Into Kitchen Remodel
- 9 Weeks Into Kitchen Remodel
- 13 Weeks Into Kitchen Remodel
- Our IKEA Kitchen Remodel Reveal!
- Our Laundry Room Remodel Reveal!
Want to see the rest of what we’ve done in this house?
Check out all of the Stacy’s Savings Total Home Makeover posts!

Jaime says
Hi! My new pantry is very similar to this! My shelving is painted with an eggshell white that matches my walls. I want to protect the shelves and saw that you were using contact paper. What was your reason for using contact paper? And what kind did you get? Do I want it to peel and stick to the wood or something that is removable? Thanks!
Stacy says
Hi!
I usually use regular old contact paper, but decided not to. I used Satin finish paint, and it cleans up really well.
~Stacy
Megan Mc. says
Hello. Was the ikea sektion 90” with or without the legs?
Thank you.
Stacy says
Hi Megan,
IKEA cabinets are sold without legs, as the legs are sold separately. So the dimensions are just the cabinet frame itself.
Hope that helps!
~Stacy
Laura Villalobos says
I really love your snack drawers and I can’t seem to find them can you guide me where to find?
Stacy says
Hi Laura,
They are linked several times in this post, you must have missed them! Scroll up to The Base Shelving section. They’re linked there a couple of times.
They are on sale at their lowest price of the year right now, but only for a few more days.
~Stacy
Justin says
Did you Sand the countertop before applying the sealer or just placed it directly on from the store?
Stacy says
Hi Justin,
No I didn’t because this is veneer not, true butcherblock, so sanding would have ruined it. You could do a light hit with 320, but you don’t want to ruin the veneer.
Hope that helps!
~Stacy
Jason Nelson says
I’m confused why it has to be sealed at all. Doesn’t it come already sealed from Ikea?
Stacy says
Hi Jason,
It’s laminate. I just wanted to waterproof it for added security.
Hope that helps!
~Stacy
Amanda says
Hi! Do you have a link for the black and white wallpaper you used?
Stacy says
Hi Amanda,
Yes, that is in the Pantry Organization post that’s linked at the bottom of this post. I didn’t install the wallpaper for 6 months after the pantry was finished. It’s actually navy and white peel & stick wallpaper.
Thanks,
Stacy
Ryan says
Hi Ms. Stacy,
I love your pantry update! I might have missed it in your post or in the questions, but did you attach cleats to the ikea unit to hold that “end” of the shelving?
Thanks!
Stacy says
Hi Ryan,
Yes, we did, however, there’s a cover panel on the outside of the IKEA unit too, so I used slightly longer screws on those cleats.
Hope that helps!
~Stacy
shirly schvartzman says
Hi, love the inspo. You might have answered this already but there are way too many comments. What depth are your counters? Also, do you have the dimensions of the actual pantry space?
Stacy says
Hi Shirly,
The dimensions of the pantry are in the actual post, not the comments. The countertop depth is how it comes from the store. We did not alter the depth.
Hope that helps!
~Stacy
Stephanie says
Beautiful pantry! Would it be possible to get the link for the Ikea Sektion 18 x 20″ wall cabinet? The link doesn’t appear to be working. Thank you!
Stacy says
Hi Stephanie,
Thank you for letting me know. Unfortunately, it looks like IKEA is no longer selling the 18 x 20″ wall cabinet. You can still make it work, you just have to buy 2 cabinets. They do still have a 24×20″ wall cabinet, so you’d buy the cheapest 18″ wide cabinet and the cheapest 20″ tall cabinet, then just use the top/bottom of the 18″ cabinet and the sides of the 20″ cabinet. You’ll need to cut down the back of the bigger cabinet to fit. Kind of a pain, but totally doable.
I’ve explained this and linked the new cabinets in the post.
Thanks!
~Stacy
Kirsten Tageant says
Hi Stacy,
I love your pantry! I’m having trouble figuring out how you used the pantry cabinet and the wall cabinet to create your appliance tower. Can you give me a little more direction?
Thank you,
Kirsten
Stacy says
Hi Kirsten,
The wall cabinet goes on top of the pantry cabinet.
~Stacy
NIcole says
Hello. I am using your amazing pantry design as a guide for my pantry. My ceilings are also 10″ High. The Ikea High Pantry Cabinets come in 80″H or 90H”. I am struggling to figure out how to take them to the ceiling. Ikea does not make a 24″ deep wall cabinet. What did you do to take it to 10′?
Thank you for sharing all of your amazing projects!!!
Stacy says
Hi Nicole,
I used the 20″ wall cabinet, so it’s only 15″ deep. I just set it flush with the front. We only keep small things up there. If I had to do it again, I’d probably just build a custom cabinet to eliminate dead space.
Hope that helps!
~Stacy
Janice Whitaker says
Do you happen to have a step-by-step tutorial, plans, instructions, etc., other than what you posted? Material list? I want to make at easy as possible for my husband to get it done. 🙂
Stacy says
Hi Janice,
Unfortunately, I do not have specific plans for my pantry. My blog is more about inspiration. I want to provide people with ideas that they can use in their own homes, and adapt them to their spaces. Everyone’s space is different, but the different elements in my pantry can be used in any size pantry closet.
Good luck with your build!
~Stacy
Dom C says
Hello (again),
I am using your pantry design as inspo and I love the designated space for small appliances. My question is about the counter top. How did you join the counter in the corner? Did you get it cut in a L shape or did you join two pieces together?
Stacy says
Hi Dom,
We just cut the one piece of countertop into two and attached them to the cabinets. We used brown caulk on the seam.
Hope that helps!
~Stacy
Cassity c says
Love this! How did you make the tower look seamless with the wall? Did you nail into the wall and fill the holes? Also do the shelves meet up with it perfectly? Are they connected to the tower somehow?
Stacy says
Thank you!
The appliance tower is screwed into the wall. I put caulk along the front to hide the seam. The shelves on the right side are attached like they are to the rest of the wall. There’s the 3/4″ cabinet side, 3/4″ cover panel, and a 3/4″ cleat. That’s 2.25″ of wood. I used 2″ wood screws to adhere the cleats to the side of the cabinet.
Hope that helps!
~Stacy
Cassity says
Thanks Stacy. Looking at the pictures it looks like you added something over the top of the mdf. Did you add plywood over all of the mdf? I know you added pine fronts but I swear I see wood grain on top as well.
Stacy says
Nope! I did not!
Devin Merrill says
Hi Stacy, love these cabinets.
Given they don’t have any brackets underneath, and don’t have any vertical dividers, do they sag in the middle?
If not, how do you prevent sagging/bowing?
Thank you!
Devin
Stacy says
Hi Devin,
We haven’t had any issues with sagging. They don’t have much weight on them.
Thanks,
Stacy
Brandy B says
Wow! Really nice job on this whole project! I’m considering using the Ikea Barkaboda countertop for some built in shelving in our family room. I would have to join two pieces because of the length. Although your seam is in the corner, would you recommend putting two finished ends together and the cut ends to the wall? Or did you find that it cut cleanly and with caulking kept the seam less noticeable? Thanks!
Stacy says
Hi Brandy,
I would recommend putting the two finished ends together and the cut ends on the wall. Unless you have a straight end & can match up the pattern perfectly and have an extremely clean cut. There is a little easing of the manufactured edges that show when you put the finished ends together.
Hope that helps,
~Stacy
Sabrina says
Did you just caulk the back of the shelf to the wall to make it look continuous? Or did you just sand, fill and caulk the nail holes?
Thank you
Stacy says
Hi Sabrina,
Everything is caulked and the holes are filled.
~Stacy
Dom C says
Hello,
I love this and planning to do something similar. Can you share the depth of your cabinets? Are they the sektion cabinets from Ikea?
Stacy says
Hi Dom!
Just the appliance tower is an IKEA cabinet. All lower cabinets + the appliance tower are standard 24″ depth.
Hope that helps!
~Stacy
Kim says
Hi – could you link the appliance tower from ikea that you used? I’m having a hard time finding it.
I’m planning to do a similiar pantry. Yours looks AMAZING!!!
Stacy says
Hi Kim,
I went back and linked it in the post. Scroll up.
Thanks!
Stacy
Dana says
How many lights did you put in the pantry? Did you install recessed lighting?
Stacy says
Hi Dana!
There’s only 1 recessed can in the ceiling in the pantry. I use a mini-lamp from Target on the countertop for additional light. They have a great selection of affordable styles –> https://rstyle.me/+Tq34yuoQCIOd74jwBVyFMw (affiliate link).
Hope that helps!
~Stacy
Tina says
Hi Stacy, have you any pictures of your pantry stocked please? Thank you Tina
Stacy says
Hi Tina!
Yes I do! If you click on the link in this post for the Pantry Organizational Post, you can see stocked pantry photos.
There are also more recent ones on my Instagram page. Just click https://www.instagram.com/stacyssavings
Thanks,
Stacy
Chantale Coulombe says
Hi, your project is amazing and we are doing something similar in ours. My husband is wondering if the Ikea cabinet as been paint and so to be the same aspect as the other components that you paint ? If not, do you ses the différence beetween the both shelves ?
Sorry for the English, coming from Quebec City !
Stacy says
Bonjour Chantale!
Chantale was my French Name when I took French in Middle School 😉
I did not paint the IKEA cabinet at all. However, there is a cover panel of mdf on the outside right side of the IKEA cabinet. In order to cover the crack between the cover panel and the cabinet side (since there’s no door), I attached a 1×2 along the front, and that piece IS painted the same color as the shelves.
Unlike other IKEA furniture, the Sektion cabinets are actually a real white, not creamy. You can’t really tell the difference between that and the Decorator’s Whte paint, especially since the cabinet is covered in trim. Its only the inside that is IKEA, if that makes sense.
Merci!
~Stacy
Kati says
I can’t find where to add a new comment so I’m sorry for doing it here. I’m getting ready to redo my walk-in pantry, and I’m trying to compare the cost of just buying cabinets versus making them myself like this. Obviously making them yourself is harder more time consuming, stressful, etc., But if the cost is significantly cheaper it would be worth it. What would you say your overall cost for this pantry was roughly, minus the accessories like the baskets? So like just for the cabinets and shelving and main stuff?
Stacy says
Hi Kati,
When I built my pantry, the cost of materials was much lower than it is now. Also, I had a ton of MDF leftover from the kitchen, so most of the wood for the lower cabinets and the cover panel for the tower was “free”. My cost is going to be much different than yours.
What I suggest is planning out your materials list and then checking the current prices for those materials at your local Home Improvement store in order to get an idea of the budget.
Good luck with your project!
~Stacy
Amisha says
We are looking to do something very similar with our pantry. Would you mind sharing the dimensions of your pantry?
Stacy says
Hi Amisha!
Congrats on planning your new space! The dimensions are in this very blog post under the heading The New Pantry.
Good Luck with your project!
~Stacy
Kelley says
Hi Stacy,
This is a beautiful pantry and the exact size of mine (which is on the list for remodel). I may have missed it but I’m curious the weight supported by the shelves?
Thanks,
Stacy says
Hi Kelley!
Thank you! I have no idea of the exact amount of weight supported by the shelves. We don’t put the heavy things on the top shelves. Cans go under the countertop.
~Stacy
Anna says
We are building a home and I’ve been looking all over Pinterest for a pantry design that would make the most of our space. Thank you for the link to those drawers, there are perfect!! Exactly what I was looking for but haven’t been able to find.
Stacy says
Hi Anna,
You are so welcome! We love our Elfa drawers! They have come in so handy!
~Stacy
Lizzie says
Hello! I absolutely love your pantry and it is inspiring me for our new pantry in the home we are building. I have a question for you.
You mentioned: “The elfa drawers we are using in the right cabinet are 16 7/8″ wide.” However, the link took me to drawers that are 9” wide by 16-7/8 deep by 4-1/2 high. Are these drawers you used not available anymore? Any information would be helpful!
Thank you!
Stacy says
Hi Lizzie,
If you click on that link and scroll down, the options get wider as you move toward the bottom of the page. They have 3 different widths.
Hope that helps!
~Stacy
Corinne says
Hi! I followed your design and I am about to go buy paint tomorrow. I didn’t see you mention what sheen you used for the Benjamin Moore Advance. Can you tell me whether you used semi-gloss or satin for the cabinets and shelves? Thank you!
Stacy says
Hi Corinne,
For cabinets, doors & trim I always use Benjamin Moore Advance in Satin.
Hope that helps & good luck with your project!
~Stacy
Joe P. says
Hey, Stacy!
I made the mistake of showing your project to my wife. Now I’m on the hook to actually do it! Of course, I don’t mind–it looks great and our pantry is similar.
I wanted to ask about the IKEA cabinet. You told someone this was the cabinet you used–https://www.ikea.com/us/en/p/sektion-high-cabinet-frame-white-00265439/. Is that correct? So did you order shelves for it? Are they difficult to put in?
We can’t wait to get started. I think the IKEA cabinet is going in first and then we’ll build the rest of the pantry around it, just like you did. Right now it’s all wire shelves and looks pretty depressing.
Thanks!
Stacy says
Hi Joe,
Sorry for the late reply. I was on vacation last week.
Yes that is the cabinet that I used for the appliance tower, and I also added a 20″ wall cabinet on top since my ceilings are 10′. We installed it per the IKEA directions, and it isn’t hard. When you meet with the kitchen designer at IKEA (they have to place the order for the items and then you pick it up in the furniture pickup area), they will make sure you have the rail, feet and shelves that you need. It’s all sold separately.
IKEA cabinets are pretty easy to install, but they can be a bit tricky the first time you do it. It’s not hard.
Good luck with your project!
~Stacy
Audrey B Poche says
Have you had any problems with your shelves sagging? I showed the design to my husband and was concerned that there were no extra support for the long shelves.
Stacy says
Hi Audrey,
Nope! No problems at all!
~Stacy
Kathy says
Beautifully done! I have a similar size pantry and I really like the idea of the base cabinets.
When you attached your 3/4″ shelf cleats, what size screws did you use? Do they hold in the MDF?
I would think you would have to have one along the back wall too?
Thanks so much! Love your work!
Stacy says
Hi Kathy!
Thank you!
There are cleats on all of the walls and on the side of the appliance tower. I use whitewood 1x2s for my cleats and secure them to studs with 3″ cabinet screws. For the cleats in the appliance cabinet, I used 1.5″ wood screws.
Thanks!
~Stacy
Heather says
HI, I love your pantry. Do you have the dimensions of the corner base? Also, the dimensions of the opening for the corner base?
Thanks!
Stacy says
Hi Heather!
The corner base cabinet is just whatever was left over after I built the side two cabinets. This is meant to be more of an inspiration post, not an exact build plan post. I knew that I wanted to use those elfa drawers in the right cabinet, so I made the middle cabinet the same dimensions as the right one so that it would look right, and then whatever space was leftover became the corner cabinet. Everyone’s pantries are different dimensions, and the elements of my pantry can be adapted to fit all different kinds of pantries.
Thanks!
~Stacy
Tammy says
Thank you for the inspiration! We used your plans, but built our tower and did shiplap on the back. Appreciate the help!
Stacy says
Hi Tammy!
So glad you were inspired!
Enjoy your pantry!
~Stacy
Jordan says
What dimensions did you use for your built in cabinet?
Amanda says
Hi Stacy!
I am currently working on my pantry shelving layout design. We just remodeled and I have a completely blank sheet. I was curious what are the dimensions of your corner base cabinet?
Like so many commenters before me, your pantry is the inspiration for our design!
Thank you!
Stacy says
Hi Amanda,
All of the base cabinets are standard 24″ deep. The size of the corner cabinet was custom to what was left over in my space.
Hope that helps!
~Stacy
Christy Evans says
It’s probably answered somewhere in all the post but how deep are your shelves? I see the depth of the countertops but not the actual shelves. I’m sure I just missed it. Everything looks great and I’m trying to sell this project to the hubby!! Wish me luck!
Stacy says
Hi Christy,
The upper shelves depth are totally up to you. I made mine about 13″ deep because of the specific containers I knew I was going to use. Measure your containers and see what you need! That’s the beauty of DIY, you can make it fit your specific needs.
Good luck!
~Stacy
Melody Hicks says
Where do you keep onions and potatoes and cases of bottled water. I want a place for everything and everything in its place. Your pantry is awesome and I would like your thoughts on this.
Stacy says
Hi Melody!
You can see where I keep all of that stuff in my Pantry Organization Post
Hope that helps!
~Stacy
Brendan says
Hi Stacy!
We are wanting to remodel our pantry and we loved your design so much!
I had a question on the shelving above the countertop. What depth did you use for all of those? And same question for the countertop.
Also, did you have to cut your butcherblock in an L shape as well?
Stacy says
Hi Brenden,
I measured the containers that I wanted to used and made sure the depth would work for those. It’s totally up to you. I believe they are about 13″ deep. The countertop was cut one time to make the L shape, but not otherwise cut down. I think the IKEA website says its 25ish” wide.
Hope that helps & good luck with your project!
~Stacy
Erika M says
What tools were a must have for your project? I’m looking to build a pantry very similar to yours and I am just starting off with tools. As a single mom with no handyman experience I just figured I’d ask!! Thanks! Your pantry is gorgeous.
Stacy says
Hi Erika!
Thank you so much for the love!
I would say the very least you could get by with as far as power tools would be a drill, impact driver, and circular saw. Those three things will allow you to cut the wood & install things into studs. You can usually find a kit with a drill, impact driver & charger, and then you can get a circular saw that uses the same battery as the drill & impact driver to save some money. For hand tools, you definitely need a 2′ level at least, if not a 4′ level & a stud finder.
Here’s some links for you to shop if you’re interested in my recommendations (affiliate links).
Drill & Impact Driver Combo
Circular Saw
2′ Level
Stud Finder (also a laser level)
Hope that helps & good luck with your project!
~Stacy
JoAnn says
Stacy – I used your design for our pantry remodel – it looks amazing and it’s so much better looking and useful vs just the standard boring shelving. We spent right at $600 – didn’t but anything premade – my husband built everything, except the butcher block counter space.
Stacy says
Hi JoAnn,
I love that you were able to take inspiration from my pantry and make it your own – and for only $600! Way to go!
Enjoy!
~Stacy
Tina says
This is wonderful and is serving as inspiration for our pantry we are about to start.
My question for you, the Ikea cabinet you used for the appliance storage. Do you find you need the full 24” depth for it or would the shallower cabinets at 15” deep be deep enough?
Thanks!
Stacy says
Hi Tina,
Thanks for your question. It’s really a personal preference. I’d start with measuring the items that you want to store in those shelves and how you want to store them.
For me, I have an 8qt Instant Pot & a large Margarita blender to store, so I needed the extra depth. Plus, I had the space for the 24″ depth. Some of my small appliances have accessories, like my Ninja Grill, so I keep those accessories in a small acrylic box hidden behind the appliance.
I hope that helps!
~Stacy
Chris says
“ If I had to do it again, I’d probably use 3/4″ plywood instead of mdf, but I used 1/2″ because I wanted to use a 1×2 for the front trim so that we wouldn’t have to rip anything to a specific size.”
Hi, I’m still trying to figure out if you were to use 3/4” ply for the shelves, why would the 1×2 face frame not work? What size face frame would you rip for 3/4” shelves?
Many thanks
Stacy says
Hi Chris,
If you use a .75″ shelf + the 1.5″ of the 1×2, that equals 2.25″. So your 1×2 face frame would not cover the cleats on the side. With a .75 thick shelf, you could buy a 1×3 & it would cover everything because it’s only 1/4″ longer than the shelf + cleat.
Hope that helps. I need to fix that part as its confusing. It’s on the to do list!
Thanks,
Stacy
Chris says
Thank you for taking the time to answer. This makes sense.
Stacy says
You’re so welcome! Thanks for asking!
Tisha says
Hi Stacy,
Your pantry design is gorgeous! I am currently attempting to replicate many aspects into my pantry design. Today is paint day!
My wondering….how did you secure the floating shelves to the tall IKEA cabinet? I have been racking my brain in ways to make it stable and secure knowing that attaching it to a thin cabinet base may not be strong enough. Can you provide information on what you did?
Thank you for sharing your design. It looks amazing and look forward to seeing the follow up with wallpaper.
Stacy says
Hi Tisha!
The side of the IKEA cabinet is 3/4″ wide, and then the cover panel that covers it up is also 3/4″ wide. I screwed a 1×2 cleat just like I did on the other sides of the shelves for support.
Hope that helps!
~Stacy
Stacy says
I forgot! You can see the update with the wallpaper here: https://www.stacyssavings.com/our-farmhouse-pantry-organization-reveal/
Carla says
Hi Stacy,
I love your pantry so much! We are doing something similar sans the butcher block because our space is smaller. We got the tall SEKTION cabinet and are going to build from there. Did you put cleats on the side of the IKEA cabinet to support the shelves y’all built? If so, how did you attach them? And if not, what did you do?
Thank you!
Stacy says
Hi Carla,
Thank you!
Yes, I did install cleats on the Sektion side for the shelves. The side of the Sektion is 3/4″, and then I have a 3/4″ MDF board covering that as my cover panel, and then I used a 1×2 for my cleat which is actually 3/4″ thick as well. So I made sure to use a screw that was less than 2.25″ so that it wouldn’t show through in the Sektion. I think I just used 1 1/4″ or 1.5″ screws.
Hope that helps! Good Luck with your project!
~Stacy
Carla says
Thank you so much!!
Ryan Scott says
Your pantry looks great and seems very easy to build. We are going to be doing something very similar but with 18in deep cabinets. I did have a question on how you mounted the cabinets to the wall and the 2×4.5 base? Did you use a cleat to month the cabinets to the wall?
Stacy says
Hi Ryan,
We used 3″ cabinet screws and screwed the base into the wall studs & used some L brackets and screwed it into the hardwood floor. When we built the cabinets, we used a cleat across the top backside, and screwed that into the studs, and then the bottoms into the bases to secure the cabinets.
Hope that helps & good luck with your project!
~Stacy
Ryan Scott says
Thank you for the help. We finished up our pantry. Would love to share some updated photos for you to see. We put our own touch on it but overall based on your design.
Stacy says
I would love to see it!
ReGina Quarles says
Helo Stacy,
Thanks for sharing you pantry build out! You solved a quandry for me. We just purchased a home that has a nook in the laundry room that would make a perfect butlers pantry and you design is perfect springboard for what I want to do! Thanks again for shareing.
Stacy says
Hi ReGina,
Thanks for the link! Those are so pretty!
I actually did the wallpaper back in February. Check it out in this post –> https://www.stacyssavings.com/our-farmhouse-pantry-organization-reveal/
~Stacy
Lynne says
Love your post and hope to do something similar. Don’t know if you want to splurge, but I found some interesting wallpaper at muralswallpaper.com
Mike says
Stacy, my lovely wife and I are copying your pantry but a bit shorter on each wall. The ikea cabinets we purchased were the exact ones from your blog. They did not however come with those adjustable feet in the tower. I assume I can just use the same 2″ x 6″ cut down to 2″ x 4.5″ for the tower as well to keep everything on the same plane? Also. Did you just caulk and paint the face of those 2″ x 4.5″ or did you add thin cabinet like backing for the toe kick?
Stacy says
Hi Mike,
Yes, the feet are separate and you order them in the kitchen department. However, you don’t need them. You can totally make a box from 2x6s ripped down to 4.5″! I added a toe kick on the front of the base boxes. It was just some 3/4″ plywood that was ripped to 4.5″ and nailed to the front. I filled the holes, sanded, caulked and painted so it all blends in.
Hope that helps & good luck with your project!
~Stacy
Denny ODonald says
Stacy we have the same size space so ordering supplies today. I think you said the shelves above the countertop are 13″ deep. Was that all of the shelves or was the first one a bit longer? I saw how you spaced them bit was not sure on depth.
Thanks again for sharing…..one of many following your lead. We can’t wait to see it in our pantry.
Stacy says
Hi Denny!
The upper shelves are all the same depth, but yes, are spaced differently. I picked those based on the containers that I wanted to use. It’s totally a personal preference.
Good luck with your pantry & thanks for checking out the blog!
~Stacy
Trisha says
Hi, I love your pantry! I want to duplicate it but am having trouble finding the 18×20
Wall cabinet (I found the 18×90 pantry cabinet). Would you have the name of it exactly at IKEA? I’m wondering if they don’t sell it any longer. Thanks!
Stacy says
Hi Trisha!
They list them as width x depth x height, so it’s the 18x15x20. All wall cabinets are 15” deep, which is why we couldn’t get an 18” wide 20” tall cabinet the same depth as the tall pantry cabinet. https://www.ikea.com/us/en/p/sektion-wall-cabinet-white-haeggeby-white-s29338586/
Good luck with your project!
~Stacy
Jill Salmon says
I love this pantry! I am having a hard time finding the exact SEKTION Ikea cabinet you used for the appliances. Would you be able to provide a link? Also, are the shelves in the appliance cabinet adjustable? Thank you!
Stacy says
Hi Jill,
The Sektion cabinets for the applicances is just a 90″ x18″ high pantry cabinet, with a 20″ x 18″ wall cabinet on top. The shelves are adjustable except for one fixed middle shelf for stability in the tall cabinet. https://www.ikea.com/us/en/p/sektion-high-cabinet-frame-white-00265439/
Hope that helps & thanks for checking out the blog!
~Stacy
Mikaela Soto says
Roughly how much weight can the shelves hold? Also is the shelf sitting on the cleat or are they mailed as well.
Stacy says
Hi Mikaela,
I’m not sure exactly how much weight each shelf can hold. I don’t really know exactly how you would calculate that, to be honest. I screwed the cleats into the studs with cabinet screws, and the shelves are nailed into the tops of the cleats.
Hope that helps & thanks for checking out the blog!
~Stacy
Lisa says
Stacy,
Like so many others I’m copying your brilliant pantry design. My pantry is smaller but overall I can still create similar features (appliance tower is my favorite). I’m curious how tall are each of your three cubbies on the lower cabinets? I’m guess 6″, 12″ and 10″ from top to bottom?
Thank you for sharing you work and helping those of us who need visual inspiration.
Stacy says
Hi Lisa!
Yes, the elements of my pantry can totally be used in all different sized spaces. The appliance tower is also my favorite!
The cubbies were built so fit the Elfa drawer units that I used. There are several different widths. The ones I chose were about 16″ wide, so I made my cabinets 19″ wide, and with the 1×2 trim, the opening was 17.5″ wide. For the height, they’re not exact, but they’re about 9.5″, 9.5″ and 5.5″ tall. Again, I wanted to use two medium depth (size 2) drawers and 1 small depth (size 1) drawer. I just made sure that the opening was about 1-1.5″ bigger than the total height of each unit, if that makes sense. The 1×2 horizontal trim overhangs on the bottom of each piece.
That might be more than you needed, but that’s my way of saying I built them to fit the drawers that I chose. Choose the drawer units first, and then design your openings around that, leaving a little room on the top and the sides.
Hope that helps & good luck with your project!
~Stacy
Kelli says
I’m so glad I found an image of your pantry on Pinterest. I used it as inspiration for my pantry remodel, which my husband brought to life. I could not love it more!
One thing I’m curious about though is how you managed to cut the IKEA countertop without ruining it? We destroyed ours and had to buy real butcher block and stain it dark.
Stacy says
Hi Kelli!
Glad you love the pantry, but sad about your countertop!
Whenever we cut anything IKEA down, we always put painter’s tape along where we want to cut, and we use our circular saw. The tape keeps the veneer from chipping.
Thanks for checking out the blog! Make sure to follow me on Instagram at http://www.instagram.com/StacysSavings
~Stacy
Kyle says
Love the pantry, we just ripped out our hideous wire shelving and are attempting do do roughly the same as yours, with just weirder dimension! Just bought the ikea tower, and will build from that. For the end cover to the tower, did you just use a 1/4 inch piece of plywood or something more substantial?
On the cleats – do you notice them hanging down a little from looking at them straight on? Did you give any consideration to ripping the cleats down a half inch? I bought 3/4 plywood for the shelves, so when i put the cap on the front, i feel like the extra 3/4 inch will be a bit more dramatic. Maybe I should just go buy some 1 x 1s instead of ripping down the cleats. thoughts?
Thanks!
Kyle
Stacy says
Hi Kyle!
We used. 3/4” piece of cover panel that we had purchased with our custom doors & drawerfronts for the kitchen. You could just use plywood since I put a 1×2 in front to cover the seam.
For the fronts of the shelves, we actually ripped a 1×3 down to two inches, so there’s no overlap. You’re always going to see the cleats anyway because you’re looking up at the shelves.
Hope that helps & good luck with your project!
~Stacy
Marly says
That’s very good nice to meet you
MaggieHenry says
I love the elfa drawers! Are they gliding!? Were they expensive?
Stacy says
Hi Maggie,
I love the Elfa drawers! They come in a bunch of different sizes and are easily installed into any existing cabinet!
They are under $50 each, depending on what size you get. But, they regularly go on sale 25-30% off when elfa goes on sale, so wait for a sale!
Thanks for checking out the blog!
~Stacy
Emily Fikes says
Hi!
We are in the middle of a new construction build, and I love your pantry! Our pantry dimensions are the exact same, along with the ceiling! Questions though. How deep are your countertops and the appliance tower? I feel like if I make them 24” it would take up so much walking space, and not leave a lot of room to live around. But I love your Elfa drawers, and would want them to fit as well. Thank you so much!
Stacy says
Hi Emily,
How exciting getting to build from scratch!
Our cabinets and appliance tower are 24″ deep. We have plenty of floor space, it’s about 4′ x 3′. 24″ cabinet depth comes in really handy for the appliances, and the Elfa drawers are for 24″ cabinets.
Hope that helps & thanks for checking out the blog!
~Stacy
Hope that helps!
Paul says
Hi Stacy,
love the design and I am actually around 3/4 of the way done with our new pantry using your design. one question i have is… since you installed the cabinet shelves and gliders before the countertop how did you screw in the countertop from the bottom? Thank you! 🙂
Stacy says
Hi Paul!
The basket drawers are a separate piece. So you just install the frame on the bottom of the cabinet, and you still have room to use and impact driver to screw in the countertop. Then, just slide your basket back on the base frame.
Good luck with your project!
~Stacy
Dawn says
Hi Stacy pantry looks beautiful!
Did you sand the butchers board counter top before painting and sealing them?
And if so what size of sandpaper did you use? Thank you
Stacy says
Hi Dawn!
Thank you! No, because this countertop is actually veneer. I also used Waterlox which doesn’t require sanding.
Hope that helps & thanks for checking out the blog!
~Stacy
Madison says
HEy! I absolutely love this pantry layout! I have been trying to find a DIY layout I could do for our pantry to maximize the space and make it look nice. I had a question about the ikea pantry cabinet and the wall cabinet. How were they placed in the pantry? Are they one on top of the other? Did you buy both because you wanted to utilize the 10′ ceilings? Just trying to figure out how I would install them in the pantry correctly, like you have done! Thank you!
Stacy says
Hi Madison,
The two IKEA Sektion cabinets are stacked on top of each other in order to maximize the 10′ ceiling clearance.
Hope that helps & thanks for checking out the blog!
~Stacy
Bianca says
Great!!! I like this!
Stacy says
Thank you so much Bianca!
~Stacy
Kim Jones says
Hi Stacey!
Just curious if you painted the Ikea cabinets or if you matched your paint to them? If you painted them, is it holding up? Looks great!
Stacy says
Hi Kim!
We did not paint the IKEA cabinet frames themselves. We covered the side of the IKEA with a cover panel like we did in the kitchen, and I added trim to the fronts. The white paint we use in our house is Benjamin Moore Decorator’s White, which isn’t exactly the same as IKEA white kitchen cabinets, but it’s really hard to tell since we covered everything up with trim.
Hope that helps & thanks for checking out the blog!
~Stacy
Katrina says
Hello! I have a suggestion for the wallpaper. I use Spoonflower for fabric and wallpaper. You can choose from thousands of designs or you can create your own. When you create your own, you can make it accessible to others and when someone else purchases your design you receive a small commission. They print everything to order and you can order a swatch prior to your actual order so that you can make sure it is absolutely perfect before the larger order.
The pantry is absolutely beautiful and I’m excited to read some of your other posts that you’ve mentioned. We bought our house two years ago and now I’m starting to update and remodel different rooms to suit us better. It’s time consuming but so satisfying when I complete each project.
Have a great day and keep publishing your amazing content!
Stacy says
Hi Katrina!
I recently wrote an updated post about how I finished out the pantry & organized it, including what wallpaper I used. You can find it here: https://www.stacyssavings.com/our-farmhouse-pantry-organization-reveal/
~Stacy
Mandy says
Stacy, beautiful!! Is the IKEA piece on casters and then cased in? What did you use to elevate the IKEA shelving? Thanks so much and you are thebomb.com, so glad I found you!!
Stacy says
Hi Mandy,
The IKEA kitchen cabinets come with adjustable feet to get them 4.5″ above the floor. Then, you use a toe kick to cover that up. Hope that helps & thanks for checking out the blog!
~Stacy
Sarah says
Hi Stacy,
Love your pantry! How did you handle the IKEA cabinets being two different depths?
Stacy says
Hi Sarah,
The top 20″ cabinet is only 15″ deep, whereas the pantry cabinet is 24″ deep. We just pulled the top cabinet flush to the front of the bottom cabinet, and screwed them to each other & to the wall to secure. We place smaller appliances that we don’t use often in the top cabinet, like our juicer.
Thanks for checking out the blog!
~Stacy
Deana V says
Hello! And thank you so much for sharing the details of your project. We purchased our home almost 2 years ago and have struggled with the look and feel of our pantry. I searched and searched, and when I saw yours I KNEW it was the one I wanted to have in our home! Our pantry is smaller, but after finishing it over the weekend and filing it up this afternoon, we love it! Thank you for sharing!
Stacy says
Hi Deana!
I’m glad you found my pantry so inspiring! Good luck with your project!
~Stacy
Misty M says
Pantrys are THE BEST. I totally get where you’re coming from regarding the built in cabinet pantrys. I just like a separate pantry as well.
I realize you’re probably done putting the finishing touches on by now, but I wanted to throw it out there for others considering doing a similar setup…you mentioned wallpaper as an accent. I don’t have a countertop in my pantry, but I did put a row of backsplash tile on one shelf just to jazz it up a bit. It really kicks it up a notch. I think a pretty subway tile, or even something a little crazy that you wouldn’t necessarily use in a larger space would look awesome above your butcher block.
It all looks great- love your space!
Stacy says
Hi Misty!
The pantry wallpaper and organization is now complete! You can see the after pics in this post: https://www.stacyssavings.com/our-farmhouse-pantry-organization-reveal/
I have totally thought about bringing the kitchen backsplash tile in here for over the countertop. Maybe someday!
Thanks for checking out the blog!
~Stacy
Swooz Brazzell says
Congratulations, it looks really great.
What are you going to put in that cubby next to the Instantpot, under the fruit? It looks cavernous!
Stacy says
Hi Swooz!
Thank you for the kind words. I talk more about how I organized the pantry and where I put everything in this post: https://www.stacyssavings.com/our-farmhouse-pantry-organization-reveal/ That corner cabinet is for bulky things like onion & potato baskets, and backstock of large cereal boxes. Someday, I may put a large lazy susan under there.
The bottom corner cubby is for heavy drink storage. We keep 12-packs of soda, cases of Pediasure, and shelf stable juice under there.
Thanks for checking out the blog!
~Stacy
Liliana says
Hi Stacy!
I love your pantry and we are using it for inspiration. What kind of paint did you used for the shelves and did you used the spray gun or did you do it with a brush? I just started with the gun but not happy at all with the texture I’m getting so I wonder might be the wrong paint. Some advice would be great. Thank you for sharing all your experiences!
Stacy says
Hi Liliana,
So exciting about your project! I only use water-based alkyd paint for trim, built ins, cabinets and doors. There is an extended cure time – 30 days – but it’s super tough after that. The longer cure time allows the paint to self level and the bubbles to go away. I love Benjamin Moore Advance, but I know the big box stores have some water alkyds that may be a bit cheaper. Totally worth it. Don’t forget to do a very light sanding with 220 grit after each coat except the last coat. This will give you a much better finish.
For the pantry, I used a brush to cut in and a cabinet roller for smooth surfaces to roll the flats and bleach brush strokes. I could have used my sprayer to get a better finish, but taping/hanging plastic would have been a killer since I wanted regular eggshell wall paint on the walls.
I hope that helps! Thanks for checking out the blog.
~Stacy
Liliana says
Thank you so much! This super helped. I’m excited now that our project is getting shape.
I’m also buying some of the products you mentioned on your other blog about how you organized it. Thanks again for your inspiration and help!
Nina L Parker says
Hi Stacy.. we are in the process of a pantry remodel and after seeing your project, I want the butcher block!
My husband is on the fence because its veneer…..he also has concerns about how to handle the seams….we would need three large pieces so he wants to make sure he can work with it….was it difficult to work with? Is the seam noticable? An do you have any negatives for the butcher block?
Thanks!!
Stacy says
Hi Nina!
I love the chevron butcher block, but yes, it’s a veneer. It’s soft and shows dings. We have one seam, and you have to just cut a straight seem, not mitered, because the chevron looks weird mitered. My husband bought two different brown caulks, one brown and one dark brown, and we picked the regular brown to caulk the seem. It’s noticeable, but it just looks like a seam. If you want a true butcher block with that kind of durability, IKEA has some great options.
Since ours is in the pantry, and it isn’t used all the time, its more for looks for us and this is fine. If you want something super durable that isn’t going to get a ding if you drop a container on it, go with real butcher block.
Hope that helps! Thanks for checking out the blog!
~Stacy
Dan says
Great Job!
I see the pantry cabinet holding the appliances, Where was the second purchased cabinet used?
Dan
Stacy says
Hi Dan!
The top of the applicance cabinet is the second cabinet. The tall cabinet is only 90″ tall, but our ceilings are 120″, so we bought a 20″ cabinet and put it on top.
Hope that helps and thanks for checking out the blog!
~Stacy
Elizabeth Andersson says
I just want to say how absolutely fabulous it all looks! I am inspired to try to build something similar.
Stacy says
Thank you so much! I’m glad you are inspired! Good luck with your project & thanks for checking out the blog!
~Stacy
Donna says
We followed this to make our pantry and I must say it’s perfect!!!! IMG_0078.MOV
Stacy says
Thank you so much! I’m glad you found it inspiring!
Thanks for checking out the blog!
~Stacy
Kari Beth says
You’re pantry is absolutely drool worthy! Thank you so much for taking the time to share how you accomplished it. My pantry is too small to accomplish this but I was wondering what dimension you used for the depth of your upper shelving?
Stacy says
Hi Kari!
Thank you! We’re loving the pantry.
I made the upper shelves deep enough to take the containers that I wanted to use. I believe it’s around 13” deep. The best part is that I couldn’t make them as shallow or deep as I wanted!
Thanks for checking out the blog!
~Stacy
Lisa Bedard says
I Love it! We plan to do something very similar! How deep are the upper shelves?
Stacy says
Hi Lisa! I made them deep enough to fit the acrylic containers that I wanted to use. I believe the exact measurement is in the blog post, but I believe they are around 13” deep if I remember correctly.
Thanks for checking out the blog!
~Stacy
Julie K says
Stacy, since the barkaboda has a veneer on it, did you sand it first before you put the Waterlox on it?
Thanks. Beautiful pantry. We are in the planning stages and I love a butcher block look.
Stacy says
Hi Julie!
No, I didn’t sand it. I also have the Barkaboda in our built in bar, and I think I did lightly sand that one with 220. I don’t think that step is necessary. I will tell you, because the Barkaboda is veneer, its very soft unlike regular IKEA butcher block. So when my son doesn’t have a good grip on the Cheez It bin, and it falls and hits the counter, it leaves a ding.
Good luck with your pantry! Make sure you check out how I organized our pantry (along with the finishing touches) here –> https://www.stacyssavings.com/our-farmhouse-pantry-organization-reveal/ That post has some great tips for planning shelf depth.
Thanks for checking out the blog!
~Stacy
Laura Cleveland says
Beautiful. It’s 6’x5′ but which is length and which is width. IOW, is the tall Ikea shelf on the 6 foot wide wall or the 5?
Stacy says
Hi Laura!
The ikea cabinet is on the 5’ wall.
Thanks!
~Stacy
Karen says
Thank you for the inspiration. We are looking at putting two of the Sektion high cabinets side by side for our pantry. Did you anchor yours? If so, what did you anchor them with?
Thanks!
Stacy says
Hi Karen!
I’m so glad you gathered inspiration from our pantry!
We installed the IKEA High Cabinets via the manufacturer instructions using the IKEA rail system. I think its always best to try to install them using the rail since that is the tested method. For the 20″ cabinet above the high cabinet, since it isn’t as deep as the high cabinet, we just screwed that one into the wall and the cover panel since the cover panel was also screwed into the high cabinet.
I hope that answers your question. Good luck with your pantry project!
Thanks for checking out the blog!
~Stacy
Leann says
I’d love to see your pantry as it looks now. I had an unintentional remodel… we had a water disaster. One of the areas that is a “clean slate” is my 115” by 63” pantry. I am trying to figure out some sort of layout, useful areas…. but pretty too. I am so glad I found your blog, great ideas, and beautiful remodel info.
Stacy says
Hi Leann!
So sorry about your water disaster. I know how difficult that can be. Super exciting about that huge pantry! I haven’t taken a picture lately, but that’s about to change now that my pantry is fully stocked due to the COVID-19 quarantine. I’m planning on doing an organization post here in the next few weeks. In the meantime, I may post a sneak peek on my Instagram page, so make sure you’re following at https://www.instagram.com/stacyssavings so you don’t miss it.
Thanks for checking out the blog!
~Stacy
Nicole says
Hi Stacy! We are using your beautiful pantry as inspiration for the design of our own. I would love to see an updated picture of where you ended up putting food and other things! Thank you so much for sharing this and future updates!
Stacy says
Hi Nicole!
Thanks for the pantry compliments! I’m glad you like it!
I do plan to do an updated, organized post in the near future. Now that my pantry is all stocked up & we’re stuck at the house (thanks COVID-19), you may see it sooner rather than later! Make sure you follow me on Instagram (@stacyssavings) so you know when that post is live!
Thanks for checking out the blog!
~Stacy
Rachel Stieferman says
Beautiful. I am hoping to do something very similar as we are attempting the Konmari method as well. Do you have a link to those two IKEA cabinets you used?
Thank you!
Stacy says
Thanks Rachel! It’s sort of hard to order IKEA kitchen cabinets online, since all of the components you need are sold separately. We used the 18x24x90″ high cabinet with an 18x20x14″ cabinet on top. https://www.ikea.com/us/en/p/sektion-high-cabinet-frame-white-00265439/ & https://www.ikea.com/us/en/p/sektion-wall-cabinet-frame-white-50265465/ Good luck with your project!
~Stacy
Vangie says
Hi! Love your pantry! How did you put the additional shelves on the 18x24x90 cabinet?
Stacy says
Hi!
I screwed them into the wall and the side panel.
Hope that helps!
~Stacy
Julie says
I’m so excited to have found this!! As others have said, this is pretty much exactly what I have in my head for a similar space adjacent to our current kitchen! Thanks so much for posting all the photos, can’t wait to see the wallpaper, etc…
Stacy says
Hi Julie,
Thank you for your kind words! I wish you luck on your project. I’m hopeful that the wallpaper will get done in Q1 2020, though I haven’t decided on a print yet. Stay tuned!
Happy New Year!
~Stacy
Shalee says
Hello! Can I ask how deep your countertops are?
Stacy says
Hi Shalee!
These are out of the box counters from IKEA. The IKEA website says they are 25 5/8” deep.
~Stacy
Brenda says
Love this! You literally built the vision I have in my head for my butlers pantry. The exception is that mine will have the door in the side with the appliance tower to the left of the door. I am converting what is currently space used in the living room as a media cabinet and just reversing it. Thanks for giving my minds idea a concrete plan, right down to the counter tops!
Stacy says
Hi Brenda!
You’re so welcome! I actually drew this pantry on a piece of graph paper several years ago. I was frustrated with our old kitchen, and I had to draw it to show my husband what I was thinking. It turned out almost exactly as I’d planned. The elfa drawers were something I added to the design just before I built it. Now, I need to get the wallpaper ordered so I can hang my step ladder and a hook for my aprons!
Thanks for commenting!
~Stacy
Amy says
What is the name of the IKEA shelving unit you are using. Specifically the tall one?
Stacy says
Hello!
There are only 2 IKEA pieces in the pantry. The rest is custom built. We’re using an 18″ wide/24″ deep SEKTION kitchen pantry cabinet with an 18″ x 20″ tall SEKTION cabinet on top. Hope that helps!
~Stacy
Justine Warne says
Great job looks fabulous and completely functional. Love the bench top.
Stacy says
Thank you so much!
Lindsey says
Hi. I love the butcher block countertop and we’ve used them before from ikea. Just curious if you noticed a difference in the new version that is now a “veneer”. The version we used previously was solid wood.
Stacy says
Hi Lindsey,
I have used this specific version before on the Built In Bar Project, but I’ve never used the other, regular kind of butcher block from IKEA. So I can’t answer your question. However, I haven’t really had any problems with this either here or in our bar. I don’t know that you could sand it if you got scratches, though. I did poly the pantry counter with Waterlox (3x regular, 1x satin), and I plan on doing that to the one on the bar sometime in the next few months.
Thanks for the question!
~Stacy
Jennifer says
I’ve never investigated buying shelving made of MDF. I can’t wrap my head around the idea of buying an L-shaped panel. And I’ve certainly been around the Home Depot and Lowe’s block. Is it L-shaped when you buy it or is it a massive sheet that you cut to an L-shape?
Stacy says
We cut the L shapes out of a 4×8 sheet of mdf. We got two shelves per sheet with scrap leftover. Hope that helps!
Jennifer says
Got it! Thanks so much!
Stacy says
You’re welcome!
Stacy says
Beautiful! How are your shelves supported? Is the wall piece sufficient?
Stacy says
Hello & Thanks! The shelves are supported by the cleats in the back and on the two sides. I don’t plan on putting a ton of canned goods or juice bottles or other heavy items on them. Also, the shelves are made out of L-shaped sheets of MDF or plywood instead of two rectangle pieces. So the only sides of the Ls that aren’t supported are the fronts. The other 4 sides are supported on the cleats into the studs with 3″ screws. I don’t think they’re going anywhere anytime soon.
If your pantry isn’t a corner pantry, having cleats on the back and both sides is plenty.
Thanks for the question!
~Stacy
Judith Dunwoodie says
Hi Stacy,
We are starting your pantry remodel project today! My husband wants to know if the shelves you built were screwed into the side of the appliance tower. Other than the cleats on the walls, how was the end of the shelves next to the appliance tower supported? Thanks so much.
Judy
Stacy says
Hi Judith,
Thank you for the question. There are also cleats screwed into the appliance tower. The wall of the appliance tower is 3/4″ thick. Then, there’s a 3/4″ cover panel attached to it. Next is the 3/4″ depth of the cleat. So you have 2.25″ to screw your cleat into. I used longer screws, I think 1 3/4″, on that side.
Hope that helps & Good luck with your project!
~Stacy
Katy says
I was coming here for this same question- thanks for already asking and answering! The cover panel you mention, did you make the cover panel from wood at lowes or did you buy the Ikea cover panel?
Cherryl Ehlenburg says
I love the pantry! I wish I had the space for something like that!
Stacy says
Thank you so much!
Liz Osterhues says
Hi,
I love your pantry! What is are the dimensions of the room? Wondering if I can copy this for our space 🙂
Stacy says
Hi Liz!
Our pantry is 72” deep and about 58” wide. We built it that way to accommodate the counter top & base cabinets, plus have the door opening be at least 28” wide. Our daughter uses a walker, and it’s 26” wide.
Thanks for your question!
~Stacy
Tia says
Hi Stacy,
My husband and I are redoing our pantry during this quarantine. Can you share what wood did you use from Lowe’s?
Stacy says
Hi Tia!
I just used mdf sheets and poplar 1x2s. You can use whatever kind of wood that you want from plywood to mdf to select pine or poplar. It’s totally up to you!
Hope that helps & thanks for checking out he blog!
~Stacy
Julie says
Hi Stacy, I just found you and am busy reading about your remodels. Great job! I can’t imagine doing any construction work so I am super impressed you can do that! I am loving your pantry! It looks amazing! Question, are you adding a door to the pantry or leaving it open? It’s so beautiful that you don’t even need a door but I was just wondering. Thanks!
Stacy says
Hello Julie! Thanks for your sweet words! Yes, we are planning a barn door, though I’m still on the hunt for the perfect one. For now, it will just be open.
Thanks for your question!
~ Stacy
Lee Ann Walker says
Make one!!! You do all this, you can certainly make one, I am making one now. $37 in wood and about $100 for the hardware!
Stacy says
Thanks! I might!