It’s been a while since I’ve been able to update you on the Kitchen & Laundry Room remodel. We have a few more items on our punch list to make it “look” complete. I don’t want to spoil it before the big reveal! One thing that I did finally get done is the Farmhouse Vent Hood Cover. It is a showstopper in the kitchen. Today, I’m going to show you how I built my DIY Farmhouse Vent Hood Cover. If I can do it, you can too!
I knew from the very beginning stages of the design that I wanted a Farmhouse Vent Hood Cover. Remember when Joanna Gaines started doing rustic stained wood chimney-shaped Farmhouse Vent Hood Covers on Fixer Upper? I’ve wanted one since then.
Our new kitchen has so much white and stainless steel, that it desperately needs something to warm it up. I also knew that I wanted to tile to the ceiling. Having a stained wood farmhouse vent cover would be the perfect accent.
When it came time to figure out how to DIY the farmhouse vent cover, I hit a wall. There are tons of gorgeous farmhouse vent covers on Pinterest but not many instructions on how to actually build one from scratch. I found some kits that you could buy online that were over $500, even over $1,000. That is way out of my budget. I spent less than $200 on this DIY Farmhouse Vent Hood Cover, and that was all wood & stain.
I used the following tools for this project:
- compound miter saw
- table saw or circular saw – for one cut. See if a friend can help you with this.
- nail gun, air compressor with accessories (or use this battery-powered nail gun alone)
- angle finder
- tape measure
- stud finder
- level
- tack cloth
This DIY Farmhouse Vent Hood Cover can be built for an installed vent insert or over an already installed vent hood. The basics are the same: a frame with attached cover boards, and trim hiding the seams. Every vent is different, and each one has different installation instructions, angles and shapes. You’ll need to figure out the particulars as far as size, angles, and dimensions based on your vent hood.
Planning Our Farmhouse Vent Hood Cover
The first step in building our DIY Farmhouse Vent Hood Cover was figuring out where our vent hood insert would go. I wanted it about 36″ above the stove, which is a little higher than our insert’s directions recommended. Living for so long with a microwave over the stove that didn’t allow us to cook with a stockpot, I was overcompensating with more headroom.

We used a cardboard template of the back of our insert to trace the shape on the wall. From there, we sketched some different shape options for our Farmhouse Hood Vent Cover directly onto the wall. I knew I wanted it to be about 1/3 chimney and 2/3 base. The width and height we chose was due to the angles on our vent hood insert and the eyeball test.
Drawing your shape on the wall, then standing back to look at it really helps visualize your plan.
36″ cuts in the middle of a row of tile on the backsplash. So, we measured the width of the insert plus 3″ (the width of 2 2x4s). Then we made our tile cuts accordingly. We only installed the backsplash up to that row of tiles. Making sure it was level in all directions, we mounted our vent hood insert to the wall. We used a 2×4 frame and a ton of 3″ cabinet screws into multiple studs. This insert isn’t going anywhere.
Framing the Farmhouse Vent Hood Cover
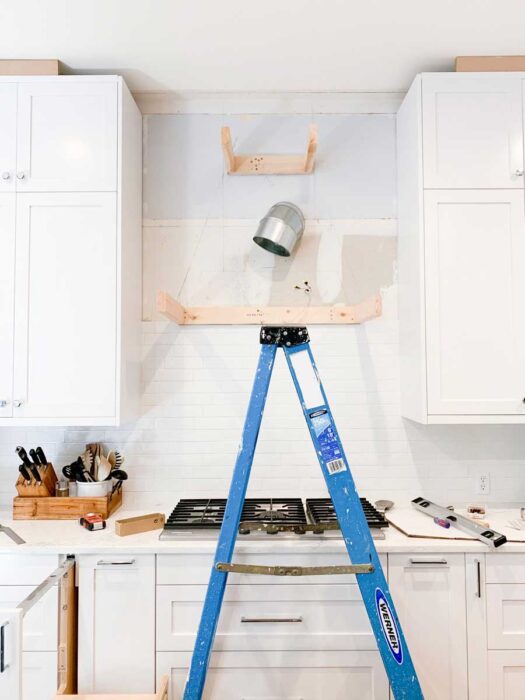
Once we finalized the shape, it was time to build the farmhouse vent hood cover frame. This frame isn’t structural for the insert itself. It is just a way to attach our cover boards. The frame is basically 3 2×4 boxes connected by more 2x4s. The boxes are the insert frame at the bottom, and then two smaller, identical boxes. The identical boxes were placed at the base of the chimney and at the ceiling. The boxes need to be connected to each other at every corner. We had add to add scrap to the front corners to make them the same height of our horizontal lines on the wall. We used 3″ wood screws to connect all of these 2x4s to the frame boxes.
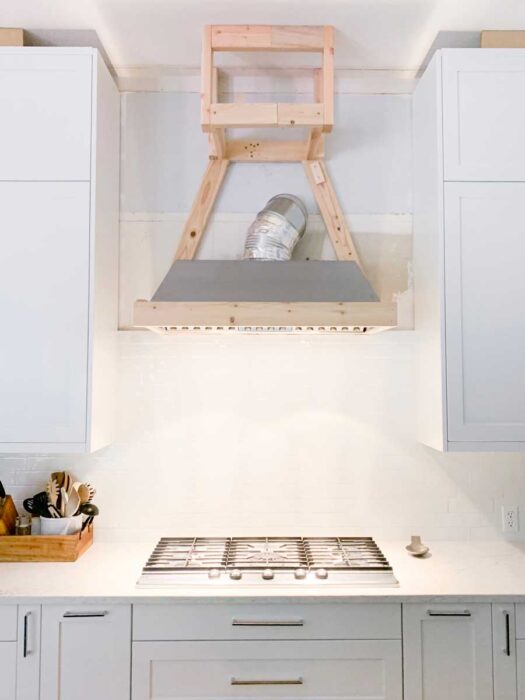
Then, we connected the bottom of the vent hood cover frame to the chimney with 2x4s. These don’t have to be perfect because they aren’t structural. Doug wanted them to be close, so he used compound angles to cut the front pieces. Compound angles (where you have a side to side angle and a front to front angle) are really confusing.
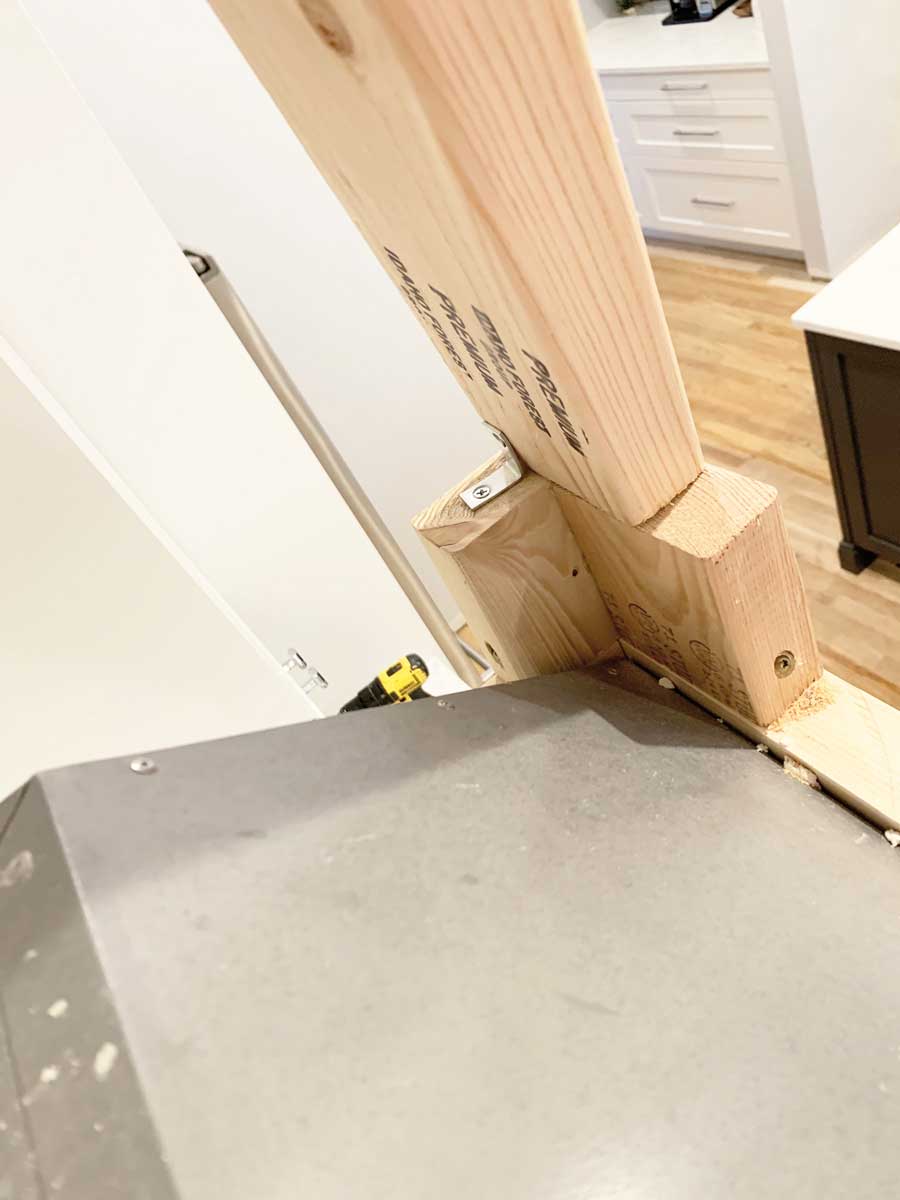
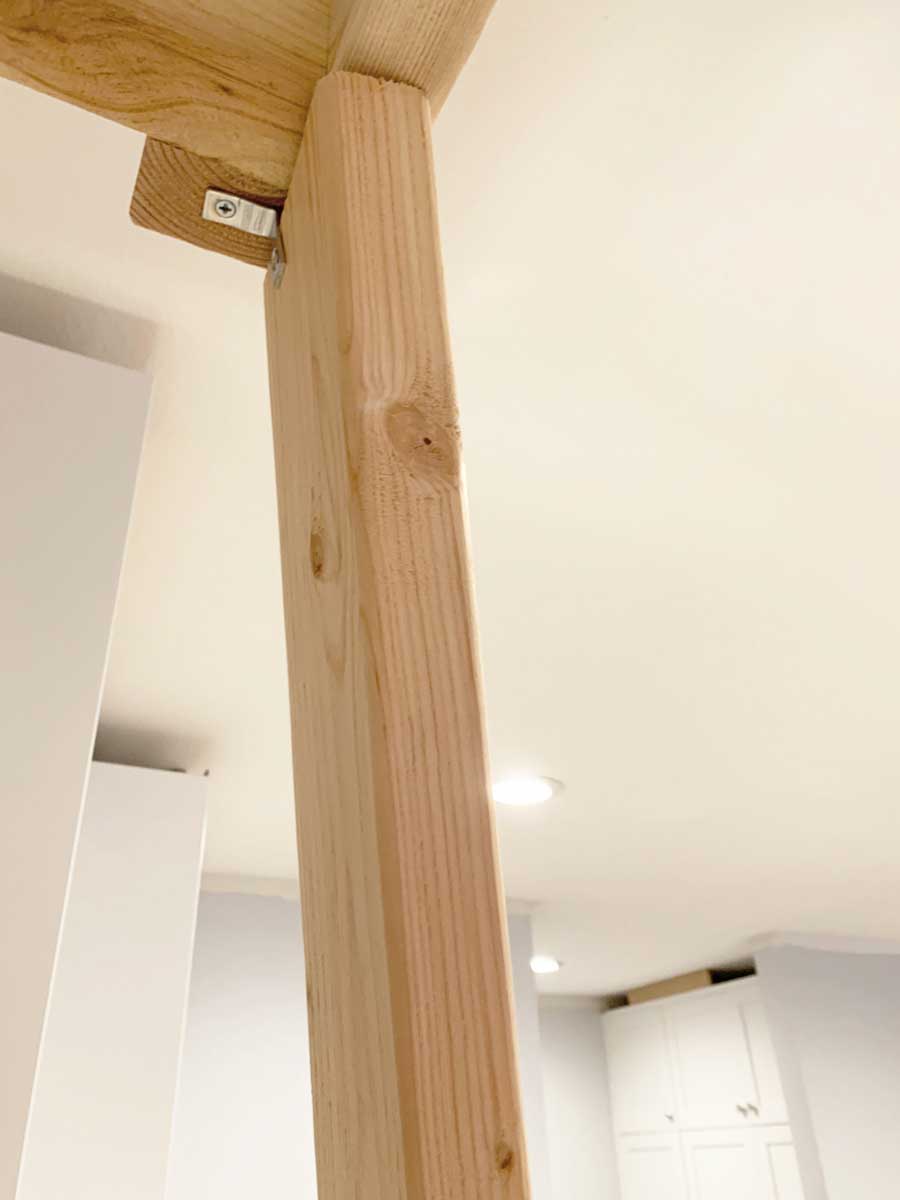
For these two studs, our angles weren’t exactly perfect. So we used L brackets on the back of the studs to connect them to the frames. Using an angle finder helps a lot. We have a manual one that came with our crown molding jig. I like this angle finder because it has a precise digital output.
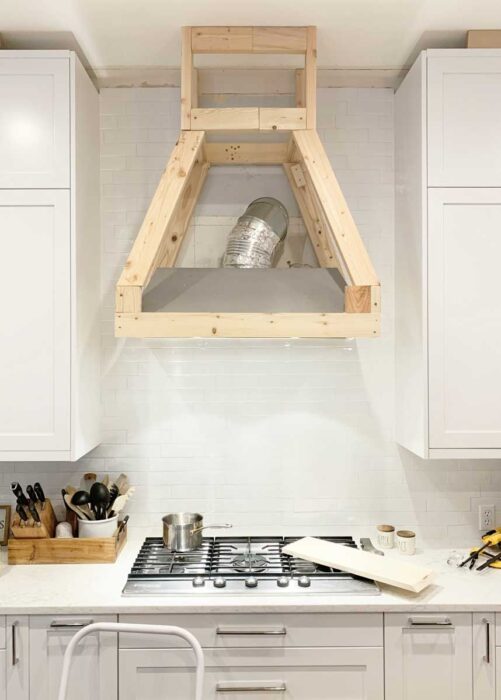
With our frame built, it was time to finish the tile backsplash and then cover up the frame. It’s definitely easier to tile without the vent hood frame covered up. The angled frame shows you where your tile needs to end. Then you can cover up the tile cuts perfectly with your vent hood cover without much mess.
Selecting the Wood for My Farmhouse Vent Hood Cover
For the cover, I ended up using #2 Select whitewood boards from Lowe’s. I tried to pick boards that were straight, clear, not too red, and without many knots. It’s really hard to find straight boards with few knots, but I did the best I could. You want them to look like they were milled from the same tree, not a different species. That way the stain takes more uniformly.
For our farmhouse vent hood cover, I used the following sizes of lumber:
- 1×8 board for the bottom – 8′ board
- 1×6 boards for the shiplap – needed about 8 8′ boards
- 1×4 boards for the crown and most of the under side surrounding the vent – 2 8′ boards
- 1×2 for the transition boards laid horizontally – 2 8′ boards
- Corner molding for the trim – 3 8′ pieces
Before cutting and installing a single board, I made sure to sand everything down. I used my mouse sander with 120 grit and then 220 grit sandpaper. I figured it was better to sand this in longer pieces on the driveway than doing it in the kitchen on a ladder after the construction was complete.
Sanding helps open up the pores to accept the stain. It also gets some of the shine and redness off the surface of the wood. When sanding with a sander, make sure you don’t press too hard. If you do, you’ll get spirals in your wood that will show up in your stained finish. I learned that the hard way with another project. You also want to make sure that you spend a little more time sanding the knots. That way, the stain will take more evenly.
Once I finished sanding the wood, I cleaned it all off with a damp paper towel. I then went over everything again with a tack cloth. The tack cloth gets every last bit of dust off your wood.
Building the Farmhouse Vent Hood Cover Base
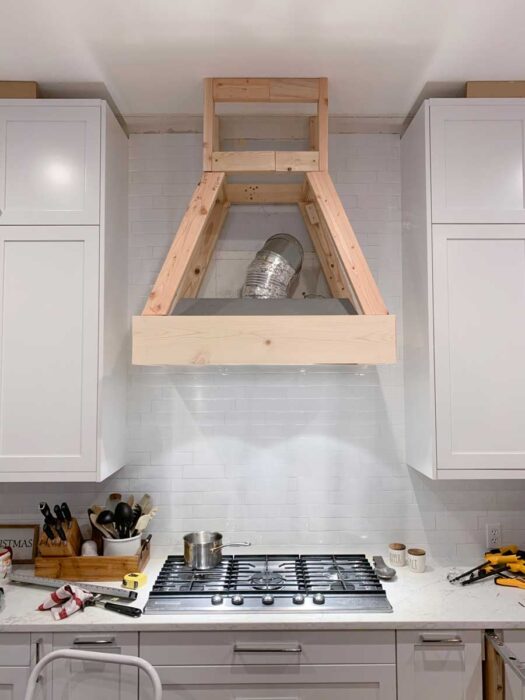
To build my DIY farmhouse vent hood cover, I started with the base and built my way up. I had to measure my insert frame and then add 1.5″ to get the full length of the front board. I only added .75″ to the length for each of the side boards because the wall ends are flat cuts. The extra length for the miter cut covers up the board next to it. When I cut the pieces from the 1×8, I cut them with my miter saw with the bevel set at a 45 degree angle so that the corners were mitered. I was originally going to just have mitered corners all the way up. However, my wood was curved a bit, so the miters were never going to be tight. That’s when I decided I was going to use the corner molding to cover up the ugly corners.
Once I leveled the front piece of 1×8, I installed it to the frame using my brad nailer. I then installed the side pieces by making sure they were level and in line with the front piece. With the 1×8 in place, I installed the 1×2 on top of the frame. This piece lays on its side so that the short side is what you see from the front.

I pushed the 1×2 all the way back against the frame, ensuring that it was sticking out the same on all sides. Then, I cut the 45 degree angles on the long side so that they would have a tight miter joint. 1x2s are a bit easier to find straight. Since these would have no trim to cover the corner, it was very important that the miters be tight. You must find the straightest boards you can find. I installed these 1x2s into the top of the 1×8 board with my brad nailer.

You also want to make sure you drive your nails in space that will be covered by your trim. If you’re using corner trim, you want to keep your nails within the first 3/4″ of the edge. You may need to angle your nail gun if you’ve mitered your corners. This will help to get a good grip on the frame. Another solution is to use 1 1/4″ corner trim instead, but it costs a little extra. That would give you more room for your nail holes.
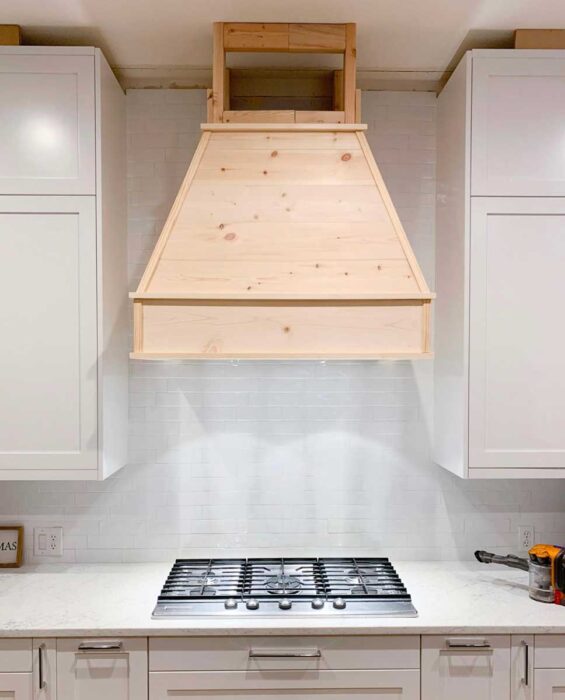
Building the Farmhouse Vent Hood Cover Angled Body
Now it was time to start building up the body on the angled frame. This meant that I needed to cut the bottoms of the first boards at an angle so there wasn’t a gap at the front. I cut the lengths that I needed. Then, I ran them down my table saw with the blade set to the angle that I needed. You could also use a circular saw, but your cut won’t be as straight.
Use an angle finder again to figure out what your angles are on the front and the sides of the cover. Ours were two different angles. You can figure out where to set your miter saw by subtracting your angle from 90. For example, our angles were around 77 and 70. So I set it to 13 and 20 depending on what angle I was working on.
The angles are the hardest part. It helps to draw a model on paper and write down the angles & measurements for the cuts. We also had a lot of trial and error with scrap wood cuts to get it just right.

I did each level one at a time, because the board length changes as the hood gets smaller. One mistake I made was doing butt joints going up the angles. Because my trim is only 1 1/16″, it barely covers a butt joint. A butt joint is just one board against another in the corner. If I could do it again, I would miter every corner. That way, you don’t have to worry about your joints not being covered by the trim. You can also hide all of the nail holes with the trim.
I didn’t use any spacers between the boards. I just stacked them on top of each other going up the hood. This ended up with the shiplap line not being the same on the side as on the front. I don’t think its that noticeable unless you’re really looking for it. When I got to the top of the angled part, the two side pieces needed to be slightly thicker than the front piece. It’s off by about 1/4″. I guess its because of the bottom angle on the first board being different on the sides than the front.
Building the Farmhouse Vent Hood Cover angled body is the hardest and most time-consuming part of the project.
Building the Farmhouse Vent Hood Cover Chimney
Once I finally got the angle part of the Farmhouse Vent Hood cover done, it was time to install the next horizontal 1×2. I laid these the same way as before with tight mitered corners. Then, I finished covering the chimney with 1×6 shiplap. To finish the Farmhouse Vent Hood Cover, I used a 1×4″ with mitered corners as the crown for the top. My 1×4 was a bit curved, so the miter isn’t very tight. This is not as noticeable after staining. Call it rustic.

The last part before the trim is to finish out the underside of the Farmhouse Vent Cover. This covers the framing around your insert and makes the finished width the same as the 1×2 above the 1×8 base board. You basically want those to both stick out the same amount. I used a 1×2″ piece along the wall, since that was only sticking out by 1 2×4. For the rest, I ripped a 1×4″ down a bit to make it the correct finished width without covering any of the vent insert. I just nailed those into the frame from the bottom.
The last piece is installing the trim to cover up your seams and nail holes. The only complicated cut for this part is the compound miter on the front two pieces. That will give you a migraine. You want to make sure you don’t nail too close to the end of this trim. This molding is fragile and can split easily. I tried to keep my nails about 3″ from the ends to prevent splitting.
As you can tell from the pictures, I put the angled trim pieces on first before I finished the shiplap. The reason is, I ran out of wood to finish the chimney, but had the trim. I also I wanted to see what the trim was going to look like finished.
Congratulations! The build is complete & the hardest part is done!
Staining the Farmhouse Vent Hood Cover
To finish my DIY Farmhouse Vent Hood Cover, I started with Minwax Conditioner and let that sit for 15 minutes. After that, I put on a quick layer of Minwax Stain in Classic Grey. This tone is very translucent, if you do it very thinly with a brush, but it removes some of the red undertones a bit.
I followed the grey up with one coat of Minwax Provincial. I stained the farmhouse vent hood cover in sections, starting with the top right of the chimney and working my way around. When I finished staining the top front of the chimney, I wiped off the top right part with my rag. Following that, I stained the top left. When that portion was done, I wiped off the top front.
I used this method so on and so forth, splitting the farmhouse vent hood cover into 9 sections. This way, the stain wouldn’t sit on any one section for longer than 10 minutes or so. I didn’t want the hood cover to be too dark or uneven. I also didn’t want the stain to dry on the hood before I could wipe the excess.
Before staining, I put painters tape along the Farmhouse Vent Hood Cover, but that was futile. 😉 The stain ended up under the tape and in the grout. Just make sure you have some magic erasers to clean it up really fast. I like these cheaper versions on Amazon. They work exactly the same & you get a ton for the price!
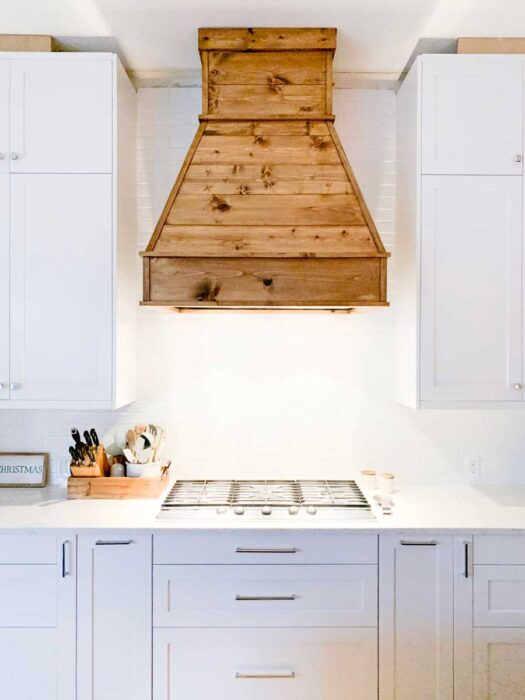
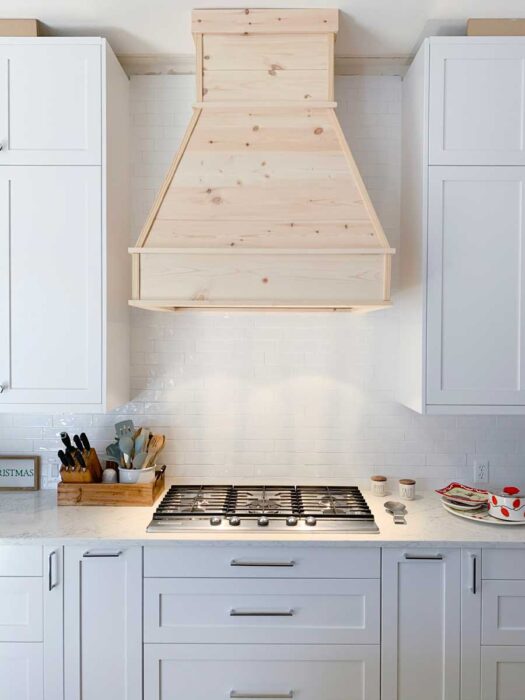
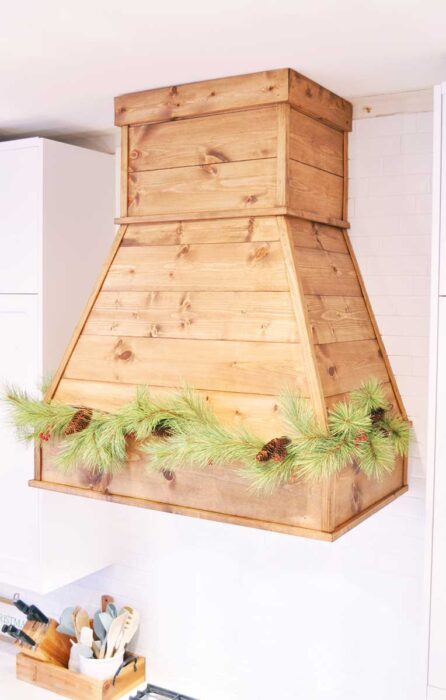
The Finished DIY Farmhouse Vent Hood Cover

This is what my DIY Farmhouse Vent Hood Cover looks like now! I still have to put three coats of ultra flat polycrylic on it, but I couldn’t wait to get some Christmas decor on it. The poly step is going to have to wait until after Christmas. I found this Hearth & Hand by Magnolia Home Christmas Garland on sale at Target, and I hung it up withe clear command hooks. You have to have something Magnolia with a Fixer Upper-inspired DIY Farmhouse Vent Hood Cover, right?
I never filled my nail holes because wood filler, even “stainable” wood filler, doesn’t stain well. It usually stains darker and is really noticeable. I could use color matched wood putty to fill the holes before applying the last coats of poly. After staining and looking at it for a few days, the nail holes don’t really bother me at all. I can’t see them, and the ones I can see, they just look rustic. I may not fill the nail holes at all. We’ll see.
So, do you think you can build your own DIY Farmhouse Vent Hood Cover! The hardest part is cutting all of the angles. If you can handle that, you can do this, and then all of your friends & family will be super impressed! Plus, less than $200 in materials is WAY cheaper than those kits or one custom made & you get some nail gun fun in too.
Make sure you check out the entire Kitchen & Laundry Room Remodel!
- Plans & Budget
- 3 Week Kitchen & Laundry Room Progress
- 9 Week Kitchen & Laundry Room Progress
- 13 Week Kitchen & Laundry Room Progress
- Sink Cabinet Farmhouse Peel & Stick Tile Installation
- DIY Custom Walk-In Pantry Construction & Reveal

Maybe we can get the crown molding installed over the next couple of weeks so I can show you the final Kitchen & Laundry Room? We’ll try!
Here’s a pin for later!

So what do you think of my DIY Farmhouse Vent Hood Cover? Think you could build one? Let me know your favorite part in the comments!

Check out all of the Stacy’s Savings Total Home Makeover posts!


Gail Weiss says
Hi Stacy,
I’ve been searching all over the internet and your design AND certainly your tutorial is the BEST I have found anywhere.
Kudos!
But before we go too far down the road, I just wanted to make sure that it is possible to build this OVER a HOOD (not just an insert)??
Just as long as we build in enough room to operate the controls, which of course are on the front of our builder-installed stainless steel vent hood, correct??
(We have the same issue that inspired you to do this project – a kitchen that is all white and ss)
We also will not be able to build boxes of wood to completely encircle the vent, or going up the wall since the ss cover already abuts the wall.
Do you think using L-brackets (or whatever they’re called) to affix the 2x4s to the wall studs will suffice?
Anything else we need to change if we need to hang this OVER a vent hood that is already in place??
Thanks in advance!!
Stacy says
I don’t see why you couldn’t!
Tifanie says
Hi! How did you cut the corner trim pieces for the middle section? I can not figure out how to get the right angle! Thank you:) love the idea, we just did in our kitchen. Just doing the finishing touches!
Stacy says
Hi Tifanie!
You’re not going to like this, but lots of trial and error. I used a lot of scrap wood and a piece of scrap from that trim to get it right. It was the hardest part, but I figured it out in the end.
Good Luck!
~Stacy
Stephanie Hill says
Thanks for taking the time to make this video! We plan on making our range hood ourselves. Our contractor was concerned about using wood near heat and humidity. How did you combat this? Any suggestions help : )
Stacy says
Hi Stephanie,
Never had an issue with it. Ask your contractor how many people have wood cabinets above their stoves. Same thing.
Good Luck!
~Stacy
Johnna Sigmon says
Is the video for the Hood Range Cover? If so can you please link it in the comments?
Stacy says
Hi Johnna,
This project was completed before social media consumers required videos for everything.
Sorry about that!
~Stacy
Caroline says
This is amazing. Do you have a photo of what it looks like from underneath?
Stacy says
Hi Caroline,
Thank you! You can kind of see what it looks like from underneath in the close up picture with the Christmas garland on it in this post. I just trimmed it out and the rest is the vent. You may also be able to see some of it on my Instagram feed, but I do not have a direct shot from underneath.
Hope that helps!
~Stacy
Nikki says
Wow, that hood is amazing. Which vent did you end up use?
Thank you!
Stacy says
Hi Nikki,
Thank you! We purchased one from an appliance showroom in Dallas, and I’ve never been able to find it online. The key is to get an insert, not just any range hood. You want the insert. Inserts are meant to be covered by custom cabinetry, range hoods are not.
Hope that helps!
~Stacy
Meghan says
Thanks for the great tutorial! My husband followed it exactly and it well written. However, we did the same stain and application process and ours came out much more brown while yours is a golden/honey color. A tad disappointed but I can live with it.
Stacy says
Hi Meghan,
That’s a bummer! I went really light with the grey & didn’t mix it up too much. I didn’t want a ton of the grey pigment, more like a wash of the grey, so I didn’t stir it much before I stained that layer. I really just used the grey to neutralize the red from the wood.
~Stacy
Cathey Davis says
I’m trying to find a stain for my vent hood cover my filter has done. Could you take a picture of yours and let me see it since you said it much brown or I like the golden honey color I don’t like to see your brown color also. Thanks a bunch Cathey.
Stacy says
Hi Cathey,
I don’t have a can of this stain since I made a custom mix. I basically did a light wash of the Minwax Classic Grey WITHOUT mixing it first, and wiped it off really quickly. Then I used Minwax Provincial. Test out a few different ways on your scrap wood first to ensure it looks right in your space.
Hope that helps!
~Stacy
Kelly says
Hi Stacy!
This is my DREAM hood and I am determined to make it happen, it’s just gorgeous! I wanted to ask how is the grease factor on the wood from cooking, that would be my only concern having a wooden hood. Thanks!!
Kelly
Stacy says
Thank you Kelly!
To be honest, we haven’t sealed it, and we’ve had no grease issues.
Hope that helps!
~Stacy
Amanda C says
You said the frame wasn’t structurally holding the insert- how did you support the vent insert? I am in the process of building the same type thing and my vent insert has nothing to attach it to the wall. As it is meant to be put in a cabinet. I screwed my 2×4 frame into the wall studs but I’m worried it’s not enough to hold this heavy vent insert.
Stacy says
Hi Amanda,
Our vent insert is supported by the frame around the unit itself at the bottom. The vertical angled pieces & top pieces are not supportive of the insert itself. We chose a vent insert that is meant to be covered by a custom hood. We followed the instructions that came with our insert. If your insert was meant to be put in a cabinet, it may not have the same attachment points that ours did, since ours is meant to be covered up. I would refer to the manual for your insert, and google for it if you don’t have a hardcopy.
Hope that helps! Good luck!
~Stacy
Kristin says
This has inspired me to do one for our kitchen so we have started the work. We ordered a vent insert but it doesn’t taper on the front, only on the sides. Our opening is 30″ and the vent we got has a width is 28″. Not sure how we will do the framing, but I am now on the hunt for a different vent insert that tapers on the front and the sides so I can have that look. Guessing I need it to also be a smaller width to accommodate framing. There aren’t many choices out there. Definitely hard to order on line when just having pictures. Hopefully mine will turn out just as beautiful! Thank you for your design inspiration!
Stacy says
Hi Kristin!
Hopefully you figured it out! Good luck!
~Stacy
Joyce says
*Apologies if this was already answered*
What size is your range cook top and hood insert? I have 41 inches from cabinet to cabinet to work with and that means I need to downsize the hood vent. I know you mentioned that you like your vent, so I was just curious what size the vent hood is in comparison to the range.
Thanks in advance… I am been stuck on having this done for well over a year now!
Stacy says
Hi Joyce,
Ours are both 36″.
~Stacy
Traci says
I recently had almost the exact hood installed. The carpenter left it unfinished so I had to stain it. I used Minwax Driftwood and got a similar look. My question is – How many coats of polycrylic did you use? I did two in a matte finish becuase I didn’t want shiny, but am wondering if I should do more.
Stacy says
Hi Traci,
That’s so exciting! I actually have never put poly on my hood. It’s been on my to do list since I built it, but I really love the way it looks & I didn’t want any shine at all. So I just never did. That’s bad, I know.
I would do however many coats the cam says. I know there’s so ultra flat finishes now, so maybe I’ll test one of those out & finally poly my hood.
~Stacy
Shannon says
Now that you’ve had your exhaust fan for awhile, how do you feel about it? Im looking to purchase an insert to build a hood around but do not want to buy a bad insert (loud, not powerful enough, etc). Thank you!!
Stacy says
Hi Shannon!
We love our insert! We did purchase this one through a vendor where we were allowed to see it in the store to know how loud it was. If purchasing online, I would definitely check the reviews. Ours is not available online, but it is a Best brand insert. Best and Broan/Nutone are the same company.
Hope that helps!
~Stacy
Misty says
How tall were your ceilings? Just trying to look at how to adjust the measurements
Stacy says
Hi Misty!
My ceilings are 10′.
Good luck with your build!
~Stacy
Rebecca says
Just wanted to say thank you for this article. I followed your instructions on the stains and it turned out amazing! Wish I could post a picture of my finished results as well. Thank you so much for taking the time to write this article!!!!!!
Stacy says
Hi Rebecca,
Thank you so much! I’m so glad you found it helpful!
Have a great day!
~Stacy
Maggie says
What kind of wood is this? Pine? How is the wood holding up after a few years?
Stacy says
Hi Maggie,
It’s just #2 Whitewood from Lowe’s. It’s perfect! I tried to find pieces that were similar in color and grain. Whitewood is a mixture of different species of woods, usually pine and fir.
~Stacy
Emily says
Hi,
We are planning on doing this project, but we’re wondering what insert you used? Do you have a link?
Thanks!
Stacy says
Hi Emily,
Unfortunately, I can no longer find my exact insert for sale anywhere online. I did find this one (affiliate link) & it has a similar look & similar controls on the bottom. However, I cannot speak to its performance as I’ve never used it.
My advice is to research vent hood performance and figure out what specs you need & want. Then, look for inserts made by NuTone, Best or Broan (they’re all the same company). They are the leaders in ventilation. Our insert is Best brand. If you can find an insert that is as powerful as you need, made by one of those brands, that’s in your price range, that’s the insert for you.
Hope that helps!
~Stacy
Tara says
Hi! I love this hood cover. I started building mine today and got the frame up. Quick question- how did you handle the trim pieces against the wall? Did you cut a piece of trim down the middle at the angle? Or did you just use a piece of wood cut to the same width as the front trim pieces? Thank you!
Stacy says
Hi Tara!
Thank you & congratulations on your hood build!
We carefully ripped a piece of the corner molding down on our table saw.
Hope that helps!
Thanks!
~Stacy
Donna says
Gorgeous! Was wondering if we can do this with a vent that vebts outside but in the lower part of the wall. It used to be under a cabinet.
Stacy says
Hi Donna!
If you move the vent to the top of the wall you can!
~Stacy
Hoodsly says
Good job!! Keep it up!
Stacy says
Thank you!
Tonya says
It looks amazing! I also love the color of your cabinets. Do you happen to know what color they are?
Stacy says
Hi Tonya,
Thank you! They are Benjamin Moore Decorator’s White.
Thanks,
Stacy
Diane Blanchard says
What is the brand of insert you used for the farmhouse hood project?
Stacy says
Hi Diane,
Ours is made by Best brand, but is not available online.
Thanks,
~Stacy
Cassie says
This is perfect! How many inches is the distance between your cabinets and the hood on either side of the base?
Stacy says
Hi Cassie,
Thank you so much! The space between the hood and the cabinets is about 6.5″.
Thanks,
~Stacy
Mary Lou McMillen says
Hi Stacy,
First I want to tell you how fabulous I think this kitchen vent is; I plan on attempting to duplicate this for my daughter as a birthday gift. I do have a question which I can probably try to figure out but to save time, I’m going to ask you instead. On the 2×4 insert frame, you have a piece of 2×4 scabbed on which you use as the base pieces to attach the 2×4’s with the compound angle cuts. The cut sides are up so can you tell me what the height of these pieces is please
Stacy says
Hi Mary Lou,
So exciting about your vent hood project!
Honestly, I don’t know what the height is. These were just scrap pieces that we used to mount the angled pieces to. I think that we just measured the leftover vertical part of our vent hood insert after the horizontal frame piece and used that measurement. It didn’t really have to be perfect since it was getting covered up. The face boards are more important than the frame.
I’m sorry I’m not more help! Good luck with your project!
~Stacy
Elizabeth Nitcher says
Could you tell me what type of insert you used?
Stacy says
Hi Elizabeth!
Unfortunately, I can no longer find my exact insert for sale anywhere online. I did find this one (affiliate link) & it has a similar look & similar controls on the bottom. However, I cannot speak to its performance as I’ve never used it.
My advice is to research vent hood performance and figure out what specs you need & want. Then, look for inserts made by NuTone, Best or Broan (they’re all the same company). They are the leaders in ventilation. Our insert is Best brand. If you can find an insert that is as powerful as you need, made by one of those brands, that’s in your price range, that’s the insert for you.
To build a cover like mine, just make sure the controls are on the bottom.
Good Luck!
~Stacy
Darin says
Just curious what angles are the front and back two 2×4’s cut at bottoms and top? It’s hard to tell from pictures.
Thanks
Stacy says
Hi Darin,
They are custom angles, and they’re not perfect. They were done just enough to make it a stable place to nail the finish boards into. We tried to follow the vent hood’s angles, but those front two are complex since they have an angle both ways. We just cut scrap pieces until we got it right and then blacked that exercise out from our memories. 😉
We used a manual angle finder to get close, and then just experimented with our saw until we got one that was close-ish.
Sorry I’m not much help! Good luck finding your angles!
~Stacy
Netty says
Hello Stacy,
Beautiful hood vent cover! Thank you so much for sharing your plans and step by step tutorial. We are looking to build one ourselves as well, and would like to know how you get the insert out (for maintenance/repair or replacement)? Do you have to take the hood vent cover apart? Or did you build in a way of “slipping” the insert out?
Thank you again!
Stacy says
Hi Netty,
Thank you! We love the warmth that the hood brings to our kitchen!
We are able to access the vent through the bottom for maintenance & repair by removing the vents. If we needed to replace it, we’d have to deconstruct it a bit, but it would be easily put back together. Hopefully, the vent insert lasts a very long time!
Hope that helps!
~Stacy
Angie says
I love your hood! I am getting ready for a kitchen remodel and have always wanted one. However, how difficult is the wood to clean and keep clean?
Stacy says
Hi Angie!
We don’t really cook a lot of greasy food. I actually need to seal it with Matte Polycrylic. That’s been on my list for a while. I haven’t seen any discoloration or anything. I’m going to do 3 coats of polycrylic at some point.
~Stacy
Kevin says
Beautiful hood I want to do something similar. What I’m wonder is did you use a standard range vent from HD/Lowe’s and how do you turn it on? Thanks so
Much.
Stacy says
Hi Kevin,
Thanks you! We used a vent insert similar to this one https://rstyle.me/+I0nT8OPrqvxreirMDmdVjg (affiliate link). These inserts are meant to be covered up, and the controls are on the bottom.
You could do this over any hood. If the controls are on the front, just make your frame a little deeper than your vent hood so that you can still access the controls.
Hope that helps & thanks for checking out the blog!
~Stacy
Sindy says
Stacy! I think your range hood cover is fabulous. Your instructions/tutorial is beyond fabulous. I read it through twice and then followed it step by step, constantly referring to your photos to build my own! Mine is a bit different in that it touches the sides of the cabinet at the bottom and has two corbels for a little support. I couldn’t have done it without you. You are right about there not being much on the internet that is really specific and answers all the questions! The hardest part for me was building the frame–yep!–I have an angled/vaulted ceiling and those angles were fighting me all the way, but I won! Once I got the frame built, adding the shiplap and transition pieces was the fun part for me–seeing it really take shape and knowing what a cool focal point it is going to be in my little kitchen makes me so happy. I decided to use Annie Sloan Dark Wax to finish the wood instead of a stain–I find it easier to handle the wax. I had to order more wax, so I’m not quite done, but soon! Thank you so much again for sharing all the information and as you said: if I can do it, you can, too! And I did!
Stacy says
Hi Sindy!
So glad you found my tutorial helpful!
Enjoy your kitchen!
~Stacy
Mariam Clift says
Sindy,
I to have a angled/vaulted ceiling and my hood with touch the sides of my cabinets… do you have any tips….
thanks
Stacy says
Hi Mariam,
For the angled ceiling, I would just angle the side boards and keep going up, then run the 1×3 at the top along the vault. I think it’s ok if the hood cover touches the cabinets, as long as the proportions look ok to you since its your house.
Hope that helps!
~Stacy
Dawn says
How many hours would you say you have into the building of this?
Stacy says
Hi Dawn!
We did this a little bit at a time over a couple of weekends. If you have the plans ready to go, all supplies on hand, and no children interrupting you, this can be built in 1-2 days. It’s totally a weekend project. We didn’t really have plans and built as we went, so it took us longer.
Hope that helps & thanks for checking out the blog!
~Stacy
Heather Gutierrez says
I am wanting to do this project with my dad but don’t have a vent/fan at all. I am not sure where to even start looking. Can you tell me what type/style you have for me to look at? Thank you
Stacy says
Hi Heather,
Ventilation is important in the kitchen. You’ll need to decide what kind of ventilation you want first, external or recirculating. If you can’t easily vent outside, that eliminates external ventilation. From there, you’ll then need to pick out whatever vent you want. You can use this method to create a cover for any type of vent. We used a vent insert, but you can cover up any type of vent. They range in price significantly, so you need to narrow down what you’re looking for first.
I’m sorry I don’t have more insight for you, but would be happy to help once you’ve figured out what you’re looking for.
Good luck!
~Stacy
Ally says
Can you tell me if this is heat and fire resistant? Is it safe to have wood above the stove? And how to make it safe?
Stacy says
Hi Ally!
Its just a cover for an insert. The vent insert is the appliance that pulls everything out of the house. While the cover is built from wood, it is flammable, but no more so than a cabinet or any other custom hood built out of wood.
Hope that helps!
~Stacy
Whitney says
Do you have an example of what vent hood you used?
Stacy says
Hi Whitney!
We purchased our vent hood insert at a local Appliance Showroom with the rest of our appliances. I haven’t been able to find the exact one we used to link it for you. If I knew more about vent hoods, we could have saved a ton of money because the one we bought was really expensive. However, it’s quiet and powerful.
I want to preface all of this by saying that I don’t know a whole lot about vent hoods and CFMs and all of the particulars. There’s a ton you’ll need to figure out first, like is it ducted or recirculating, how much power do you want, does it make a lot of noise, etc. Without comparing the particulars, this one is similar to what we have. I don’t know if its as quiet or as powerful, I just know that it is a 36″ ducted vent hood insert with lights and controls that are on the bottom. I also haven’t read the reviews so it might be a piece of crap, I have no idea. Here’s an affiliated link: https://rstyle.me/+I0nT8OPrqvxreirMDmdVjg
The biggest thing is that the controls for the vent be on the bottom, or that you build your cover in a way to be able to access them easily if they are on the front. You can cover up any vent hood, some just take a little more creativity than others.
Hope that helps and thanks for checking out the blog!
~Stacy
Be says
Hi Stacy! Beautiful build! I’m starting the project in the morning. Can you tell me the width of the top portion? I noticed you said the bottom was around 40”. Just trying to determine the width of the top so that it looks proportional and not to stumpy!! After I nail down my bottom and top I can then figure out my angles! Thanks so much!!!
Stacy says
Hi Ben!
This project was fun and I’m so excited for you!
I don’t know the exact measurement without dragging out the ladder and tape measure, but I want to say it was around 15” or so. The best advise I can give you is to draw it on the wall, and then step back and see what looks right. I really just eyeballed it and found a drawing on the wall that I liked, and then went with that. My husband built the framing for the top, and I think it’s actually a little wider than I wanted and had drawn, but it works. Always look at the rule of 3rds too. So 15” would be pretty close to 1/3 of 40”. Ultimately, it what looks good to you, so get a pencil and draw some options on the wall.
Good luck with your project & thanks for checking out the blog!
~Stacy
Daisy says
What hood did you use? Link please if available
Stacy says
Hi Daisy,
I haven’t been able to find our exact vent hood online anywhere. We ordered it from an appliance showroom. You can build this vent hood cover to cover any vent hood, but if you want something like ours, you need to search for a Vent Hood Insert.
Hope that helps & thanks for checking out the blog!
~Stacy
Heather says
it looks great!!! How many inches between your stove to your hood?
Stacy says
Hi Heather!
Thank you! Our vent insert had a recommended height, and it think that maxed at 34″, but I wanted it at least 36″ off the stove. Our old microwave/hood combo was really low, so I think I was compensating a bit. I love the extra space, and it doesn’t seem to compromise the vent function at all.
Thanks for checking out the blog!
~Stacy
Judy says
How do you turn your vent on and off ?
Stacy says
Hi Judy!
Our vent insert controls are on the bottom of the insert, which is not covered up at all.
Thanks for checking out the blog!
~Stacy
Porsha says
I noticed there is trim along the backside of the vent hood but I don’t see what kind you used in the descriptions. Was it just a flat piece of trim? If so what size and kind?
Stacy says
Hi Porsha!
The vent insert is mounted on a 2×4, which is actually 1 1/2” thick, so I just put a piece of 1×2 over it to cover it up and bring the back level with the bottoms of the sides and front. The bottoms of the sides and front also cover up the 2×4 frame.
I hope that helps & thanks for checking out the blog!
~Stacy
LaTerrica says
I was trying to see how able to cut the light and the vent on and off?
Stacy says
Hi LaTerrica!
Our vent hood insert controls are all on the bottom. None of the cover covers up the bottom of the insert, so everything is accessible.
Thanks for checking out the blog!
~Stacy
Sabrina says
Hi Stacy, your stain color says Provençal but the link takes me to Cherry? Which should I choose? Thanks!
Stacy says
Hi Sabrina!
This link is for all of the colors, and it defaults to the top color. If you look where it says cherry underneath the sizes, that is a pull down box, and Provincial is one of the choices near the top of the list.
I hope that helps and thanks for checking out the blog!
~Stacy
Michele says
Thanks for sharing this project. So helpful. Can you tell me what vent insert you used? We are trying to decide which one we should buy.
Stacy says
Hi Michele!
We used a 36″ insert made by Best. It was really expensive, and there are much cheaper options out there. I think Best and Boran are the same company, and Boran is the expert in home ventilation, so I would stick to one of those brands.
Hope that helps!
~Stacy
Hannah says
Love the vent hood, I was wondering if you could tell me the height of your ceiling and the dimensions of the hood. Thank you so much!
Stacy says
Hi Hannah!
Thanks you so much! Our ceilings are 10′ tall. I don’t have any dimensions, because I mimicked the angles and dimensions of our particular vent hood insert. So I don’t know how much my dimensions would help you. We have a 36″ wide vent insert, so overall, the bottom is 40.5″ wide. The depth is 23.5″. I wanted the chimney part to be about 1/3 of the total height, and I just eyeballed it. It’s about 14″ tall or so. I really just made it up as I went along. I hope that helps!
Thanks for checking out the blog!
~Stacy
Jesse says
Is the depth the same top to bottom?
Stacy says
Hi Jesse,
No, the bottom is about 22” from the wall, and the top is about 12” from the wall. The support frame is angled on all three sides, and the boards are laid on that frame. Only the top chimney and the 1×8 on the bottom are parallel to the wall.
I hope that helps and thanks for checking out the blog!
~Stacy
Jen says
Love this!
I was curious, however, how you would go about turning the vent on once it’s covered up with wood?
Stacy says
Hi Jen!
Our controls are on the underside, so they are totally exposed. If your controls are on the front, be sure to add enough space to the depth to get your finger in there.
~Stacy
sylvia Sandlin says
This looks very, very, very nice, however, not everybody can do this…LOL This is a very big job requiring measuring skills all the correct tools and knowledge of essential carpentry. This is where DIY is getting off track.
Stacy says
Hi Sylvia,
Thanks for your comments. I would say this job is a 3 out of 5 on the DIY difficulty scale, and that’s only because there’s not a lot of tutorials available and its specific to the vent underneath. Most people who enjoy DIY either have the tools or are able to get the tools they need by purchasing or borrowing them. Measuring skills are taught in every public school in the country. Other than that, you just need patience and to check for level on each step. That’s it!
Have a great day!
~Stacy
Laura says
I don’t think it takes a ton of skill, and use of various tools, etc are things that you can learn along the way. I can’t see how this beautiful example of work (DOing) is “off track”. If it’s too big for you, that does not define it as a non-DIY project.
The lowest common denominator of skills and interest in learning new techniques does not define the DIY universe – and thank goodness for that! Where’s the challenge if we don’t pick up a new skill or two and expand our skill set and confidence along the way!