Our garage is full of stuff. Is your garage like that? If you’ve seen any of my DIY videos on my Instagram Stories, you know my garage can get overwhelmingly messy. There’s no room to work on projects. I’ve been trying to find ways to fix this problem for years. Building a DIY Cedar Garden Shed was the answer!
Anyone who’s been around the blog for a while knows we’re pretty frugal. One of the ways we save money is by doing our own lawn maintenance. With that comes a lot of equipment. Several years ago, I found some Ana White plans for a lean to cedar shed on Pinterest, and I knew that we would be building one someday for all of our lawn equipment.
This project was much easier than I anticipated it being. We had never built anything like this before in all of our DIY projects. It was a bit intimidating. Having a plan helped tremendously.
***PSA – Check with your local authorities about whether or not you need a permit for this project. For our shed, the building department said that since it was under 120 square feet and more than 3′ from the property line, Code didn’t require a permit. However, our city has an amendment that removes that exception, so we were forced to pull a permit.
How Our DIY Cedar Garden Shed is Different
Our DIY Cedar Garden Shed is a bit different than the Ana White version. First, our shed size is 9.5′ wide by 3′ deep. So we had to adjust our supplies and cut list accordingly. Our shed has two small walls on the front side. Similar cedar shed kits were over $1600 online.
Second, we wanted to build our shed with 2×4 studs instead of the 2x2s used in Ana’s version. We live in tornado alley, and while tornados are very rare here, they do happen. 2×4’s provide a little extra stability. We also have our shed on a concrete slab foundation. We hired the concrete part out along with some other landscape work we had done at the same time.
I spent a few days before the build adjusting the plans in my Remodel Binder. This made the actual build go much faster. Plans & cut lists are key!
The only downside to building the garden shed now is the cost of materials. Wood prices are insanely high right now. Last year, this would have cost less than half of what we spent this year. More about the cost at the end of the post.
The Materials
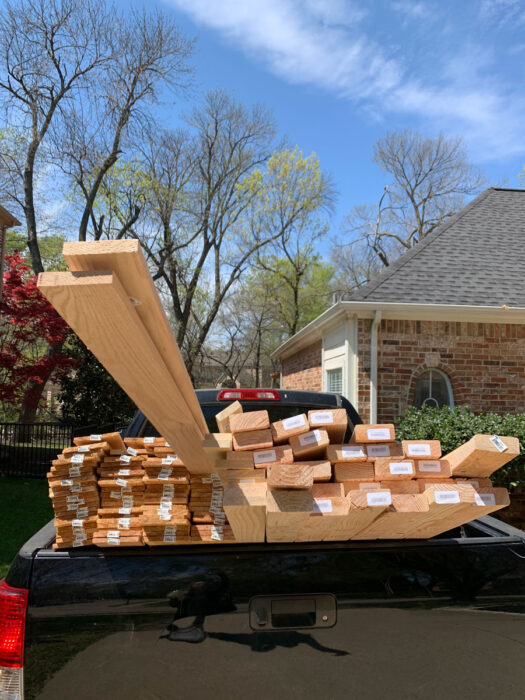
Here’s the materials list for our garden shed:
- 2×4 studs
- 2x4x8’6″ studs (3)
- Cedar Fence Pickets
- 1x5s
- 1x4s
- 1x2s
- OSB Plywood
- Framing Nails (sub 3″ screws), Finishing Nails
- Shingles, Felt, Roofing Nails, Flashing
- Gate Hardware
The Tools
The Tools that we used for this project include:
- Miter Saw
- Circular Saw
- Hammer, Level & Measuring Tape
- Drill
- Framing Nailer (can use screws/drill instead)
- Finishing Nailer
- Brad Nailer
- Air Compressor
- Speed Square
- Ram Set (optional)
- Kreg Jig
We built the walls and roof framing on the driveway, and then assembled the shed on the site. You can totally build all of the walls in one day and then assemble the next day. Building the walls was quick with two people. We did all 5 walls in about 4 hours.
The Back Wall
We started our Garden Shed build by building the back wall, since this wall needed to be completely finished before install because it would be up against the house. Looking back, we should have done this wall in 2 pieces, because it was very heavy to move once assembled.
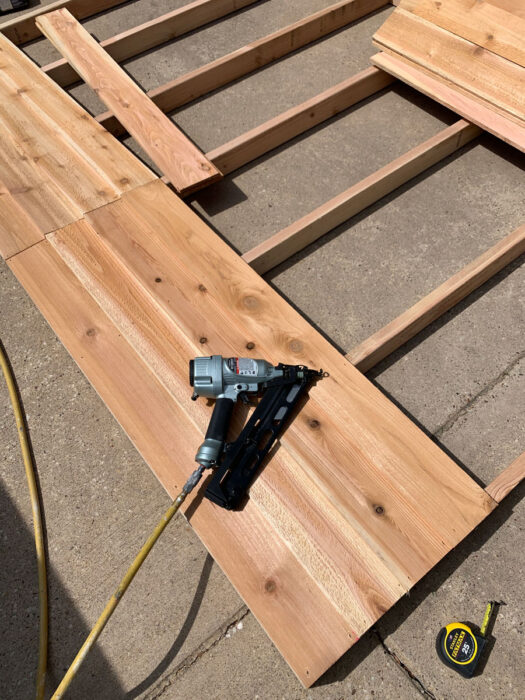
We started with our framing. We used two of the longer studs to act as our top and bottom. These studs are what you would use for a wall in a room that has 9′ ceilings. We then placed a stud on each end and one dead center. The rest were equally distanced on either side. They are pretty close to 16″ apart, just a smidge smaller. We used our framing nail gun to attach these, making sure everything was square with our speed square before assembling.
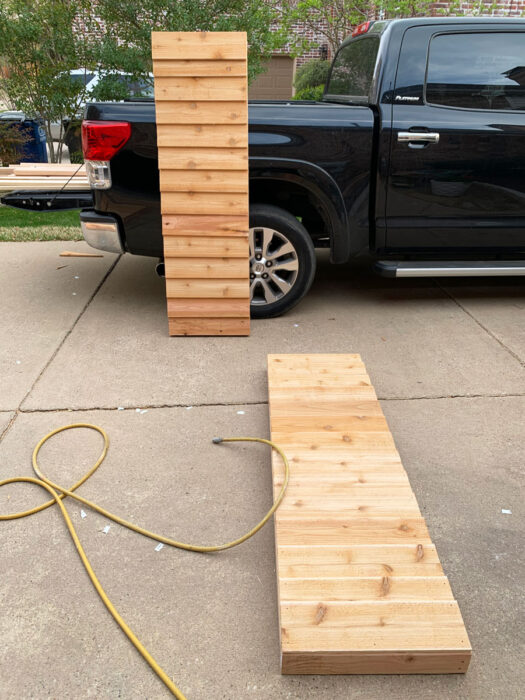
Once the frame was complete, it was time to start the cedar siding. I used my miter saw to trim the fence boards down to the length I needed to cover up my frame, making sure to cut the dog ear part off. Then, I started attaching the bottom board horizontal across my frame and nailed it to the frame with 1 1/4″ nails and my finishing nailer. I had two columns that both attached to the center stud.

After the bottom boards were on, I overlapped my cedar fence pickets by 1/2″ inch on both sides, and then nailed them in place. Repeat up the wall. It took about 16 pickets from top to bottom, times two since I had two columns.
We’re staining this shed, so I went ahead and stained the back wall.
The Other Walls
The Side Walls have a 15 degree angle on the top, but other than that, the process was the same as for the back wall. Just make sure you mirror your walls. I put the cedar on with the two high points next to each other to make it easier to put the siding on the correct sides.
The Front Walls were super easy. These walls went quickly.
Now all of your walls are complete!
Assembling the Garden Shed
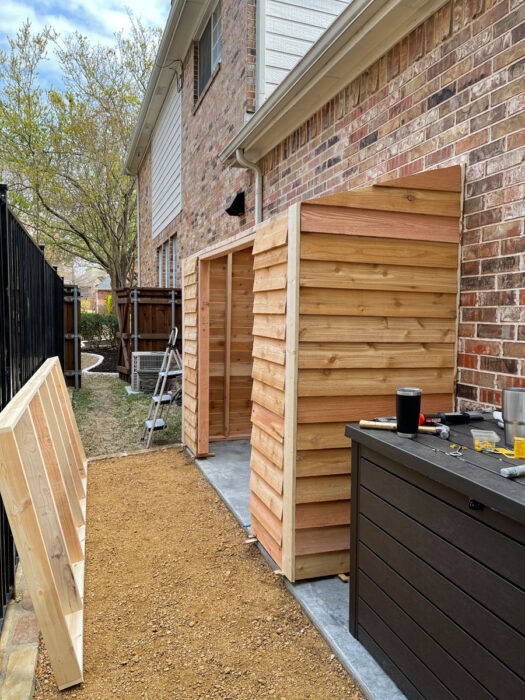
The next day, we started assembling the garden shed. We started with the back wall & supported it with angled studs while we got the side walls up. We squared up the corners and attached the walls together with our framing nailer. Then, we repeated this process for the two front walls.
After the two front walls were installed, we put up a 2×4 that spanned the top from side wall to side wall. We also put in framing for the door.
Shed Roof
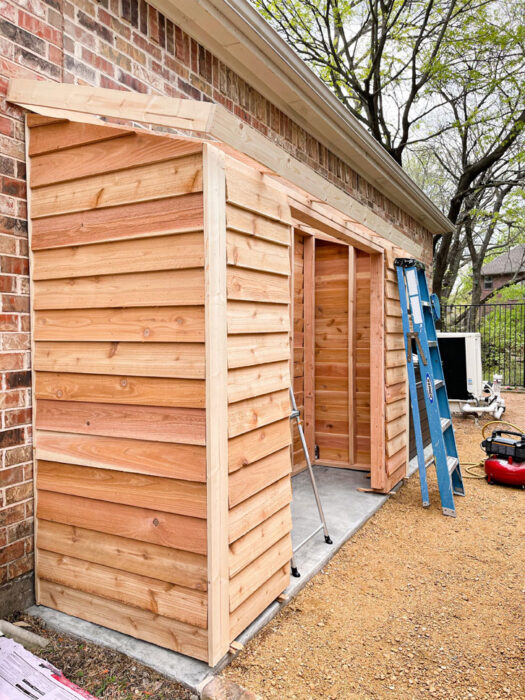
We made the shed roof out of 1x4s with 2×4 studs for rafters. Before we added the OSB sheet to the top, we went ahead and added scraps of cedar fence pickets to act as eaves at the bottom of the roof frame. That way, critters and bugs can’t get inside the shed.

We attached the OSB with our framing nailer, then used felt paper, shingles and flashing.
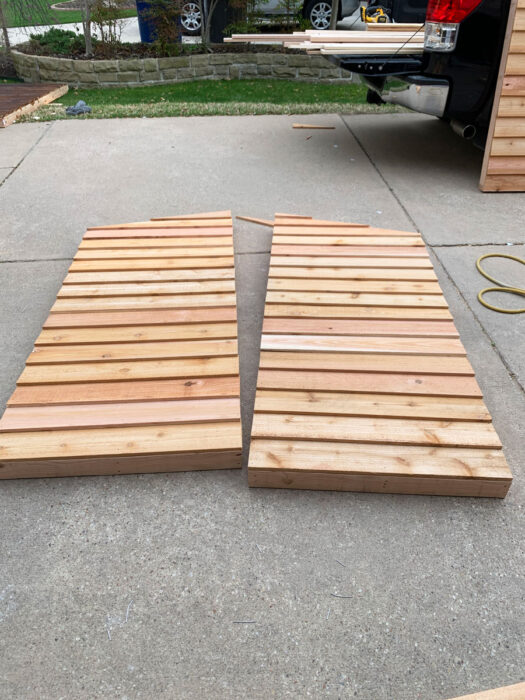
Building the Doors
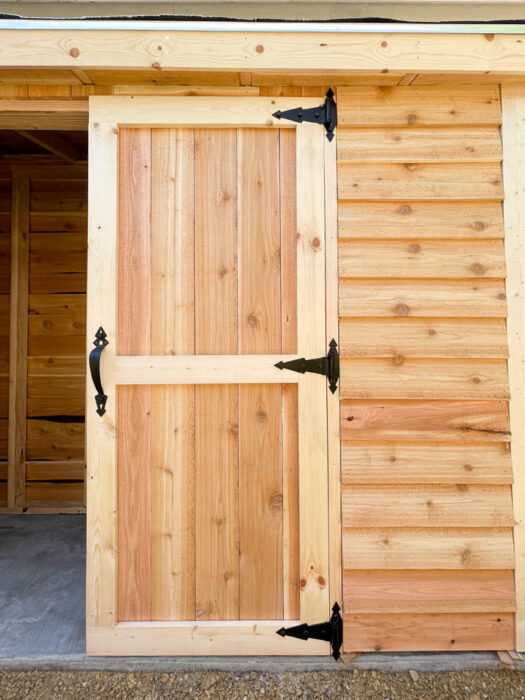
Building the two doors was probably the hardest part of the whole project. The measurements have to be exact so that your gaps aren’t too big or too small. I actually had to build the doors 3 different times before we got it right.
Building the doors isn’t hard, its making the measurements work. I got to the point where I could build the doors in 15 minutes or so. I used my Kreg Jig to make pocket holes to hold the frames together, and then just nailed cedar fence boards to the backs with my brad nailer.
Hanging the Doors & Shed Hardware
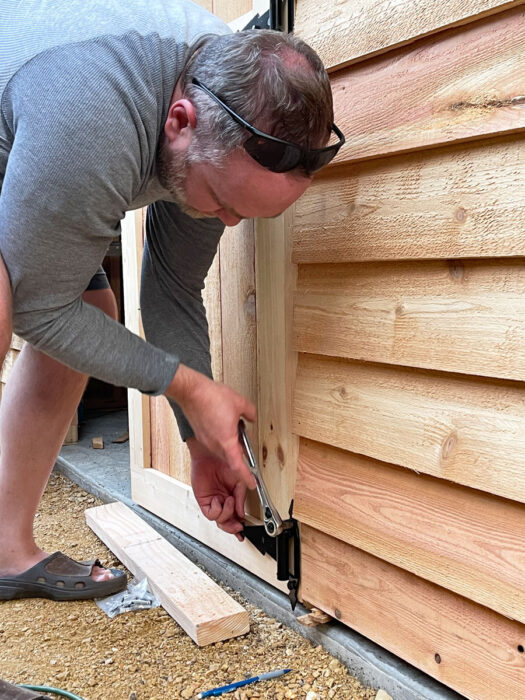
Installing the hardware for the shed makes it pretty, but it’s pretty tricky. It’s also definitely a two person job. I bought everything at Lowes a la carte. All of the sets didn’t have single pieces to match. I picked up 3 pair of hinges, two handles and a latch set.
We bought a key lock to keep everything secure.
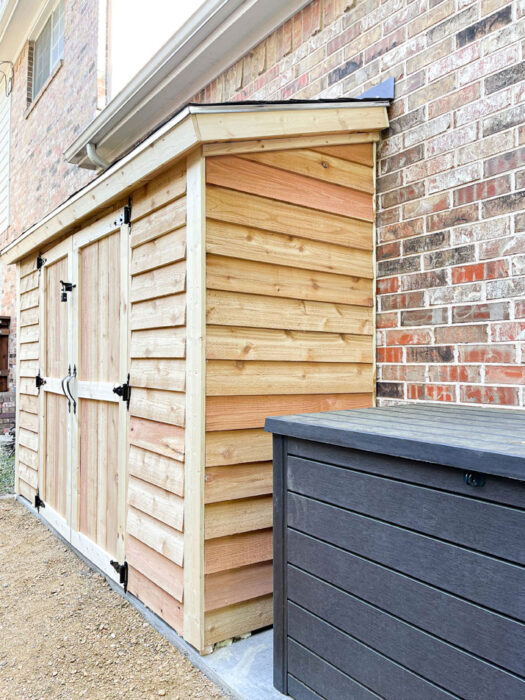
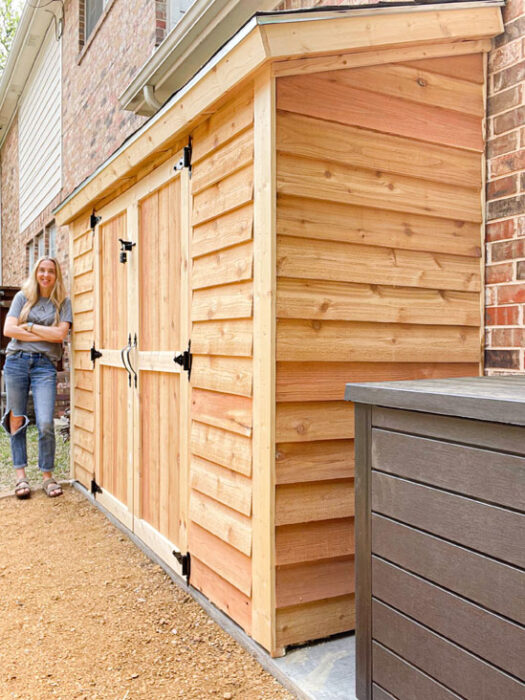
The Complete DIY Cedar Garden Shed
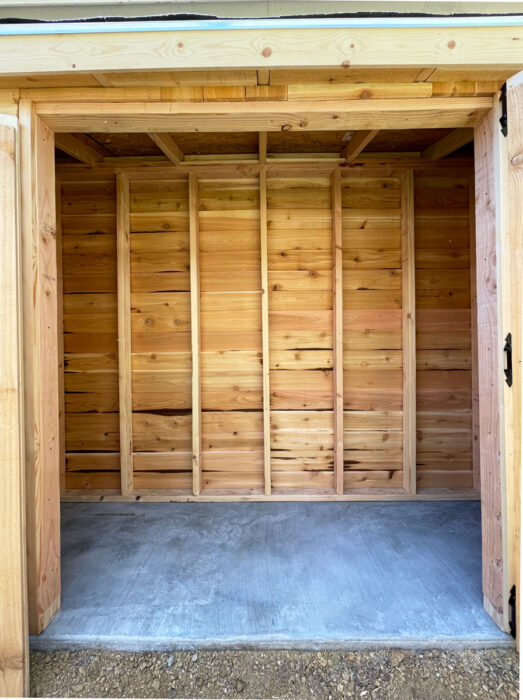
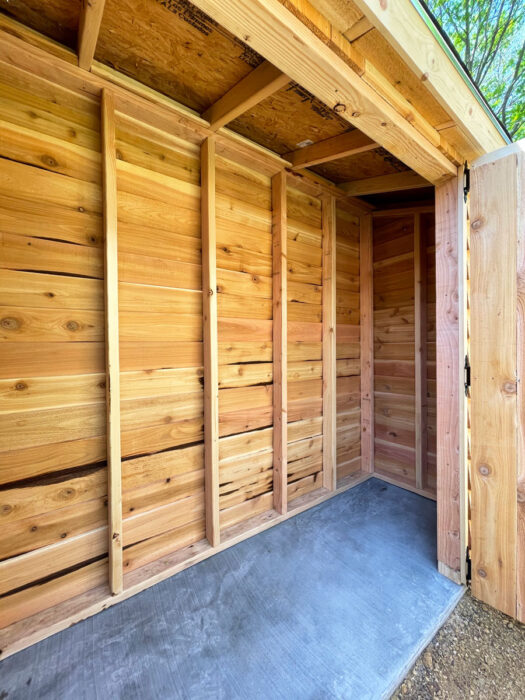
We’re really loving our DIY Cedar Garden Shed! We were able to move ALL of the lawn and garden equipment and products from our garage to the shed. It’s made a HUGE difference in our lives.
Overall, the shed cost more than we would have hoped, thanks to the increase in the cost of lumber. We spent about $855 to make this 9.5×3′ garden shed. A smaller shed, and using 2x2s would probably make the cost much less.
Here’s the breakdown:
- Studs: $229
- 1x lumber: $126
- Cedar Fence Pickets: $286
- Roofing Materials: $157
- Hardware: $58
It still beats the cost of a shed kit. We got exactly what we wanted, and it didn’t take us that long. If you have all day, you could do this in a weekend. We spent about 4 hours a day across three days building this shed.
Stay tuned for how we organized the inside! You won’t want to miss that – its so good!
Make sure you’re following me on Instagram for our latest DIY projects! Don’t forget to see our cedar raised garden bed with bunny gates & the rest of our backyard!
What do you think of our DIY Cedar Garden Shed? I’ve been thinking about this project for many years, but I was pretty intimidated. Let me tell you, it wasn’t hard at all. Having a plan mapped out helped us go really fast on this build.
Let me know how you would use a shed like this in the comments! I can’t wait to hear how a shed like this would change your life too!
See more of our complete home remodel on our My Home Remodel page!


Scott Fiedler says
I’d like to build this shed this spring – it’s exactly what we need. However, your material list did not include any quantities. Is that something you can provide? It’s not enough to know the types of boards used, quantities are needed. We could then create a cut list. Cedar is very expensive, so don’t want to over-purchase.
Stacy says
Hi,
I do not provide a cut list because everyone’s project is a bit different. I adapted mine from the Ana White plans that I linked to in the post.
Hope that helps!
~Stacy
Murr says
Nice shed! Congrats on getting D to help! Haha you guys are making me look bad on the projects.
Stacy says
Ha! Thanks Josh!
KT says
Is the back wall attached to your house or is your shed completely free standing? Looks great. Thanks!
Stacy says
Hello,
The shed is not attached to the house. It is secured to the slab with nails via powder actuated nail gun.
Hope that helps!
~Stacy
Aileen Biuckley says
Ana – you said you spent some time adjusting the plans to make the shed bigger. It is the perfect size for the space we have. Do you mind sharing your final plans and the cut list? Thanks!
Stacy says
Hi Aileen,
I don’t have the exact cut list or final plans anymore. I really just used the measurements of my space, and then used her plans and adjusted them for the measurements of my shed. Knowing the actual measurements of the studs I was using vs the nominal helps too. It wasn’t too hard to do.
I’m sorry I don’t have a better answer for you. Good luck with your project!
~Stacy
Jen says
Stacy, do you have pictures of how you organized the inside? You did a great job!
Stacy says
Hi Jen!
Thanks! I have a few on my Instagram. I plan on writing a post about the inside, but I’m currently on a hiatus while I help with a family emergency.
Stay tuned!
~Stacy
Niki says
What is the gray storage adjacent to this shed?
Stacy says
Hi Niki!
That is our deck box where we keep our patio furniture cushions and some pool floats. Here’s an affiliate link https://rstyle.me/+dtwLXm3obcoRzCW9r_j1NQ This was the best price for the size that I found. We love it!
~Stacy
Colleen says
Perfect thank you!!! I will look at the Ana White plans and will adjust from there!
Stacy says
Good luck!
Colleen DeBoer says
This is exactly what I’ve been wanting to do and very close to the size we want (we want 10×4). Do you have the amount of each piece of lumber you need along with cut sizes? Great job!
Stacy says
Hi Colleen,
That’s so exciting! Sheds are amazing!
I did not list the exact cuts and measurements that I used because everyone’s space is different. Because I used plans from that Ana White build plan that I linked in my blog post, her cut list was my starting point. I just adjusted based on her cut list and the materials I was using.
Good luck with your project!
~Stacy
Jayne says
Wow, you saved so much money by building this shed yourself. I’d love to do this at the back of our house for all my pots and gardening tools and maybe build a potting bench next to it! Thanks so much for the tutorial!
Stacy says
Thank you Jayne! That would be perfect! You’re so welcome!
~Stacy