I know, Week 13? Kitchens and Laundry Rooms take forever to remodel. The good news is, we’re closing in on a fully functioning kitchen again. It’s been about 5 weeks since the last update, so let’s check in on the Kitchen Remodel progress & some Laundry Room Remodel Progress too!
In case you’ve missed them up to now, here are all of the Kitchen & Laundry Room Renovation Blog Posts:
Also, make sure you’re following me on Instagram to see the latest in our DIY Home Remodel!

When I last updated you on the kitchen remodel progress, the walls & ceilings were painted, most of the cabinets were in, and some of the drawer fronts & doors had been painted and installed. We were even starting to move some things back in and organize cabinets.
Painting Cabinet Doors & Drawer Fronts

Right after that post, I discovered an issue with the cabinet doors, and they all had to be removed, sanded down and painted one last time. You see, I had 5 or so doors and drawer fronts that we had sanded by hand a bit to aggressively, and the scratches kept showing through the paint. This is with sanding with 320 to try to get the scratches out. Nothing was working to remove the scratches, so I bought a random orbital sander and sanded those doors down to the primer to paint again. After painting them again with my new paint sprayer, those doors were so smooth and looked amazing! The problem was, they looked different than all of the other completed doors.
To make them all look uniform-ish, I removed all of the completed doors & drawer fronts, sanded them with the sander and 320 discs, and put one more coat of paint on the fronts. I also let them bake in the attic where no one would touch them for about a week. My hope was that the extreme temperature in the attic would bake the paint a bit and help it cure faster. My paint has a 30 day cure time, and a 16 hour recoat time, which make this process really long. Especially for 60 doors.
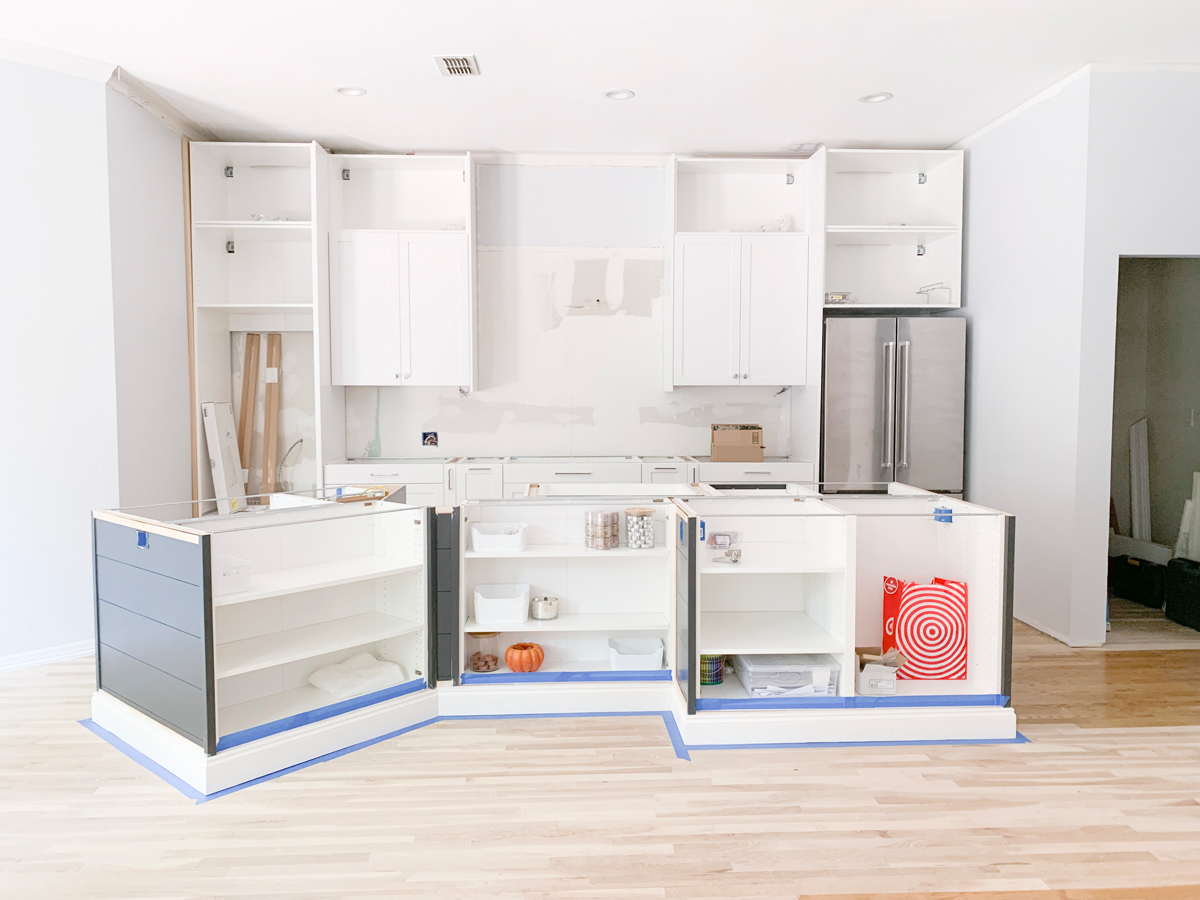
While we were waiting for the doors to be reinstalled, we finished installing all of the cover panels, filler pieces, and trim on the island. I wanted all of that in and painted before the countertops showed up. I also fixed an issue we had with the sink cabinet and used pretty peel & stick tiles to cover it up.
Sink Cabinet Tiles

The cabinet under the sink was really hard for Doug to cut the plumbing holes correctly. Our plumbing curved a bit, and in the confined space, he wasn’t able to get the holes where he needed them without creating massive holes in the bottom of the cabinet. He tried to fix it by installing a little piece of 1/4″ wood that had closer cuts, but it still left 3/4″ worth of void under the sink.

To fix that, I filled the cavity with little random pieces of 3/4″ wood, and then covered it all with these peel & stick tiles. The tiles are about 1/8″ thick, so you can’t even feel the difference. Everything is now the same level. It’s also pretty! I’m going to do a post on this super-easy project soon.
Shiplap Island Panels

For the island cover panels, I decided to use some leftover faux shiplap from our master bedroom project. I had more than enough leftovers in my scrap pile, so this was a great way to get some character on the island without spending a lot of money.

This time, I decided to install the shiplap with the red side facing out instead of the primed side. The Lowe’s guy must have cut the boards with the wrong side out, because my red side had much less chipping at the edges than the prime side did. That was the biggest complaint I had with the Faux Shiplap we did in the master. I don’t have the same problems with the island that I did with the Master Bedroom Wall.
Trimming IKEA Cabinets

We found some 1 1/4″ corner round to use as filler pieces and island trim. This was about $16 for every 8′ piece, but I really liked the finished look.

We trimmed it down using a table saw to be able to use it as filler around the cabinets. Our doors from Scherr’s are 7/8″ thick, so using this corner round would allow us to have it mounted flush with the front of the doors instead of recessed like we did with the bar we built. Now I want to re-trim the bar!
Painting the Trim

To paint the cover panels, I used Kilz Premium primer and Benjamin Moore Advance Paint. I decided to use mohair blend rollers, because I had read that they offered a smoother finish than sponge rollers meant for cabinets. I found the finish to be great, but the mohair rollers shed a bit. You might want to rub the roller cover aggressively or wash & dry them before you use it to knock off any loose bits.
The corner round I found to take the paint better if I did two coats of primer first, FYI. The orangey-red grain really bleeds through on that stuff.

For the island paint, I did 3 coats of paint after one coat of primer to get better coverage. The first two coats I painted by hand, and the third coat I rolled. I liked how this covered better than the rolling method I did in the master bedroom. The master still needs another coat, actually.
The Laundry Room

In the laundry room, we finally got the pantry cabinets installed and the cover panels in and painted. The tile guys came back and finished the floor tile. I also installed most of the baseboards & the toekicks and painted the trim around the window.
The Pantry

We’ve started the pantry, but only installed the IKEA cabinets and primed & painted the walls and ceiling. We’ll be building custom shelving in here after the kitchen is functional again.
The Budget
So far, the budget is ok. We’re doing this whole renovation in cash, and everything has gone pretty much according to plan except for the floor & the countertops. Those ate up my contingency fund. But, we’ve gotten to the point where we can start returning materials that we didn’t use, so that’s giving us a little cushion in the budget. The new flooring & refinishing are going to have to wait until January though.
Originally, I had wanted to spend no more than $10,000 on the laundry room, and that’s pretty much what it has cost. The kitchen I was hoping to spend no more than $55k, but we’re looking at about $62k all in. Not too bad for all of the work to get to this point. This does not include the floor refinishing. That is its own project. This does include the floor patching in the kitchen.


We got a lot done in the 3 weeks since the last update! The next step is countertops, plumbing, and appliances. If you’ve been following along on Instagram, you’ll know that is already done! We still have a lot of things to do on the list (painting cabinet doors, building the pantry, crown molding, backsplash tile, etc), but having a functional kitchen again is amazing! I’m going to try to do another quick update post in the next couple of weeks!
What’s your favorite part of this renovation so far? Do you have any questions about IKEA kitchens or cabinets or anything we did here? Please leave a comment and let me know!
The remodel is done! Check out the rest of the posts to watch our vision come to life!
- It’s Kitchen Remodel Time! The Budget, The Plans & The Laundry Room
- 3 Weeks Into Kitchen Remodel
- 9 Weeks Into Kitchen Remodel
- IKEA Kitchen Remodel Reveal!
- DIY Walk In Farmhouse Pantry Progress & Reveal!
- Laundry Room Remodel Reveal!

Check out all of the Stacy’s Savings Total Home Makeover posts!
Leave a Reply