• Home
  • About
  • DIY
    • My Home Remodel
  • Organizing
    • Cleaning
    • Home Maintenance
  • Home Decor
  • Frugal Living
    • Save Money
  • Shop
    • Shop My Home
    • Amazon Storefront
    • LTK Shop
  • Contact

Stacy's Savings

Budget-Friendly Home Design & DIY

Easy DIY Hand Painted Sign For Less Than $10!

Home Decor · September 9, 2015

This post contains affiliate links. More information is available in my Affiliate Disclosure.

Since the kid’s bathroom remodel is done now, I thought I’d use this week’s DIY post to showcase how I made some art for less than $10. Art can be so expensive. This DIY Hand Painted Sign was an easy project that only took me a couple hours. Here’s how I did it.

Ideas for My DIY Hand Painted Sign

diy quote art

There wall across from my Son’s vanity is a big, blank space of nothing.  I wanted to change that by having a large piece of art to hang above the hook rack that I built.  Its hidden mostly by the open door, but when the door is closed, its something special.

I really love the idea of song lyrics as art.  We have several prints in my Son’s room that I ordered from Etsy, with lyrics from Classic Rock, Lullabyes, and even a Rap song. I looked around on Pinterest and Etsy, and decided I was going to use “So Fresh & So Clean Clean”. I love that song, and what little kid doesn’t want some Outkast in their bathroom?  Am I right?

I saw some prints on Etsy, but I really didn’t like the idea of having a frame with glass hanging over this wall, because the wall goes straight to the floor.  If it got knocked off and broken, I didn’t want little bare feet stepping on glass.

I looked around at HomeGoods, which has had a ton of quote art lately, but they didn’t have anything on the scale that I was looking for.  While I was looking around, I found this post by Leana from A Small Snippet where she made her own hand-painted quotes on canvas using a tracing method.  I thought that looked easy enough, and that’s when I decided this was going to be a DIY.

DIY Hand Painted Sign Materials

diy quote art

About a month ago, Michael’s was having a huge sale, so I went there to get my supplies.  I picked up a 2 pack of 18″x24″ canvas for just $5 (they were mismarked, but the store honored the price on the shelf tag). I also got a set of Camel Hair Assorted Sized Paint Brushes for $4.79 after my 40% off coupon.

Printing the Lyrics

diy quote art

A few weeks ago, I mocked up a version of what I was thinking in my head. I used a free font called BodoniFLF, which is a basic, modern, serif font.  The next day I saved it as a PDF and printed it out. It printed on 6 different sheets of paper. Staples or FedEx will print it out on a larger piece of paper, but I’m cheap & this is free.

diy quote art

Because my print out was on 6 different sheets of paper, there were some margins.  I used my paper trimmer to trim down the margins.

diy quote art

Then I carefully lined up the letters and taped them together.  I used my measuring tape to make sure the vertical spacing was correct for my DIY Hand Painted Sign.

Tracing the Lyrics

diy quote art

After that, I flipped my print out upside down and started tracing the letters.  I have a white desk, so it was easier to see the letters.  If you don’t have a white table, you might do this over some posterboard.

diy quote art

Here it is with the tracing done.

Transferring the Letters to the Canvas

After the tracing was done, I cut down my print out so that I could position it on the canvas.  I used my measuring tape again to make sure the letters were the same distance from the left side of the canvas up and down, and then the same distance from the top and bottom.  Then, I taped it to the canvas.

I started tracing the right side of the letters on the canvas of my DIY Hand Painted Sign.  I carefully peeled up the corners of the tape to see if my earlier tracings on the back were rubbing off on the canvas like they were supposed to, and they were!  When I finished tracing them for the 2nd time, this time on the front, and removed the print out, I was left with this:

preparing to paint my diy hand painted sign

Kind of hard to see here, but it was definitely visible in person.

I very carefully went over a few areas that didn’t transfer well, and then it was time to paint!  Luckily, the kids were going down for their afternoon naps.

Painting the Lyrics

painting my diy hand painted sign

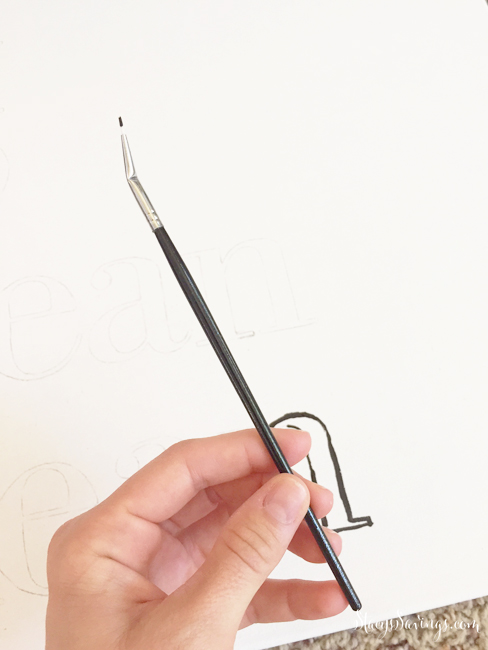
I had some black craft paint in my scrapbook supplies, so I put some in a disposable bowl and chose the Liner brush from my new set.  The first letter was ok, but I thought I could do better with a different brush from my Nail Art Brush Set.  The Liner brush was too thick.
diy quote art

I ended up using an angled striper brush.  It was exactly what I needed.

I outlined each letter with the nail art brush, then filled it in with the Mini-Mop brush from my art set.  I’m no artist at all, in fact, I don’t remember the last time I painted on a canvas.  Elementary School, maybe?  I went to Elementary School in the Late 80’s, so its been a while. The outlining was easier for me if I could pull down vs going up or side to side, so I was constantly turning the canvas. That way, I was almost always pulling my brush down.

I had a couple oopsies, but this particular paint cleaned up well with a wet paper towel or baby wipe. I had 3 mess ups, and you can’t even tell. The paint dried matte, and I LOVE IT! I’m not usually a fan of matte finishes, but this is freaking fantastic.  I love my DIY Hand Painted Sign!

DIY Hand Painted Sign

Here’s what my DIY Hand Painted Sign looked like when I was done:

diy hand painted sign
diy hand painted sign with diy frame

Since the walls in the bathroom are white, and the canvas is whiteish off-white, I decided to stain some Lattice that I had in the garage and use that as a frame.

diy quote art

I just measured my cuts, mitred the edges, stained them, and nailed them into the canvas with my brad nailer.

diy hand painted sign

Easy Peasy Finished Art for the Bathroom!  Done!

I really like it.  It’s not perfect, and if you get up really close, you can tell, but its hand-painted.  Its supposed to look like that.  The painting portion took me about an hour to finish.  I had to touch up some spots after it was dry, but that only took 10 minutes.

DIY Hand Painted Sign Budget

This DIY Hand Painted Sign project cost me less than $10, but if you didn’t have the craft paint, extra brush, lattice or stain, it might run you another $10 for all of that.

I was apprehensive about starting this DIY Hand Painted Sign project and what it would look like, but I LOVE the finished product!  It’s definitely a statement piece in the bathroom.  After finishing it, I truly felt like there “Ain’t nobody dope as me.”

How fun is this? Make sure you’re following me on Instagram so you can see my latest Budget-Friendly DIYS!

Have you ever done any DIY art?  Are you totally into the inspirational quotes that are everywhere now?  

You might also enjoy

Hearth-and-Hand-January-2018Hearth & Hand With Magnolia at Target January 2018 Finds!
It's time to decorate for the holidays! See my favorite decor from tried and true pieces to new favorites on my wish list!My Favorite Holiday Decor!
laundry room organizationDIY Laundry Room Shelf – Under $25!
« The Kid’s Bathroom Remodel is DONE!
Stacy’s Savings 2015 Weekly Savings Challenge Final Results »

Comments

  1. margaret peg m says

    November 3, 2015 at 10:23 pm

    hi, i think this idea would be great for a handmade Christmas gift…just tailor the saying for the recipient. i really think i will try this w/ a few fun quotes for my granddaughters!

    Reply

Leave a Reply Cancel reply

Your email address will not be published. Required fields are marked *

About Me

Hi y'all, I'm Stacy! I'm a wife & mom of 3 from North Texas who is currently renovating our 90's Builder-Grade Fixer Upper with DIY Projects that incorporate Function, Organization and Style - all on a budget. At Stacy's Savings, you'll find ideas & strategies to save money transforming your home without sacrificing style. Never pay full price.

We are a participant in the Amazon Services LLC Associates Program, an affiliate advertising program designed to provide a means for us to earn fees by linking to Amazon.com and affiliated sites.

Follow Me

See what we think about our IKEA kitchen cabinets 2 years later. Its all on the blog.

IKEA Kitchen Cabinets Review – 2 Years Later

It's the Pantry Reveal! Check out how we designed and built a new walk-in butler's pantry complete with lots of shelving and a countertop!

Our DIY Custom Walk-In Pantry Progress and Reveal!

See how I organized my farmhouse pantry!

Our Farmhouse Pantry Organization Reveal!

Our completed garden shed!

DIY Cedar Garden Shed – No Kit & Built in a Weekend!

See how I built this DIY Farmhouse Vent Hood Cover for less than $200! Vent Hood | Vent Hood Ideas | Farmhouse | Joanna Gaines | Fixer Upper | DIY | Modern Farmhouse | Kitchen Remodel | Kitchen Renovation | White Kitchen | Rustic Vent Hood | Farmhouse Vent Hood | Farmhouse Vent Hood Ideas | Farmhouse Vent Hood DIY | Vent Hood Over Stove | Wooden Vent Hood

How I Built My DIY Farmhouse Vent Hood Cover

Browse

  • Privacy Policy
  • Affiliate Disclosure
  • Opt-out preferences

Get New Posts Delivered to Your Email!

Let’s Connect!

Happy 250th Birthday America! 🇺🇸 Happy 250th Birthday America! 🇺🇸
After an 11-year home remodel and a backyard renov After an 11-year home remodel and a backyard renovation last summer, we’ve spent a lot of time out here figuring out what actually makes pool days easier.

These are a few Amazon favorites we reach for again and again all summer long.

Do you have a poolside must-have I need to know about?

Shop everything in my Amazon Storefront, ShopMy & LTK.
School’s out for Summer & the pantry is ready! I School’s out for Summer & the pantry is ready!

I spent this week cleaning out & stocking the pantry, the pool bag, the craft cabinet & more. Let summer begin! ☀️😎
#ad | This is the only nail routine I’ve used for #ad | This is the only nail routine I’ve used for the past year.

I’ve always done my nails at home to save money, but I wanted something that actually lasted without damaging my nails.

The Dazzle Dry system dries in about 5 minutes, wears like gel (without the damage), and I can go over a week without chipping.

I’m using You’re Unforgettable from their Better Together spring collection, and I linked the full system + shades in my LTK so you can shop everything in one place.

@Shop.LTK #liketkit https://liketk.it/62QyO
@dazzle_dry #DazzleDryPartner
I’ve shared parts of this room before — but not th I’ve shared parts of this room before — but not the full evolution.

This is my 16-year-old son’s bedroom. I designed it back in the 2020 One Room Challenge with the goal of creating something we wouldn’t need to redo every few years.

Before that, it was a bright little boy’s room.
And when we first got the keys? Just a blank box.

Over time, we’ve upgraded it slowly — including replacing the carpet with hardwood last year to match the rest of the house.

The foundation hasn’t changed.
Just the seasons.

More books.
More Legos.
More personality.

Same room. Just evolving.

I’ll be sharing more spaces from our renovation — not in order, just as they come. Follow along for more. 🤍
This hallway was always one of those in-between sp This hallway was always one of those in-between spaces - finished enough, but never quite done.

Adding an art lamp was the final touch. It completely changed how this space feels, especially at night. ✨

Comment LIGHT below to receive a DM with the link to this post on my LTK ⬇ https://liketk.it/5QEdl
Design by SkyandStars.co

Copyright Stacy's Savings © 2026 · Log in

Manage Cookie Consent
To provide the best experiences, we use technologies like cookies to store and/or access device information. Consenting to these technologies will allow us to process data such as browsing behavior or unique IDs on this site. Not consenting or withdrawing consent, may adversely affect certain features and functions.

Besides, I wouldn't know how to access that info or what to do with it anyways! The Government makes us do this. ~Stacy
Functional Always active
The technical storage or access is strictly necessary for the legitimate purpose of enabling the use of a specific service explicitly requested by the subscriber or user, or for the sole purpose of carrying out the transmission of a communication over an electronic communications network.
Preferences
The technical storage or access is necessary for the legitimate purpose of storing preferences that are not requested by the subscriber or user.
Statistics
The technical storage or access that is used exclusively for statistical purposes. The technical storage or access that is used exclusively for anonymous statistical purposes. Without a subpoena, voluntary compliance on the part of your Internet Service Provider, or additional records from a third party, information stored or retrieved for this purpose alone cannot usually be used to identify you.
Marketing
The technical storage or access is required to create user profiles to send advertising, or to track the user on a website or across several websites for similar marketing purposes.
  • Manage options
  • Manage services
  • Manage {vendor_count} vendors
  • Read more about these purposes
View preferences
  • {title}
  • {title}
  • {title}