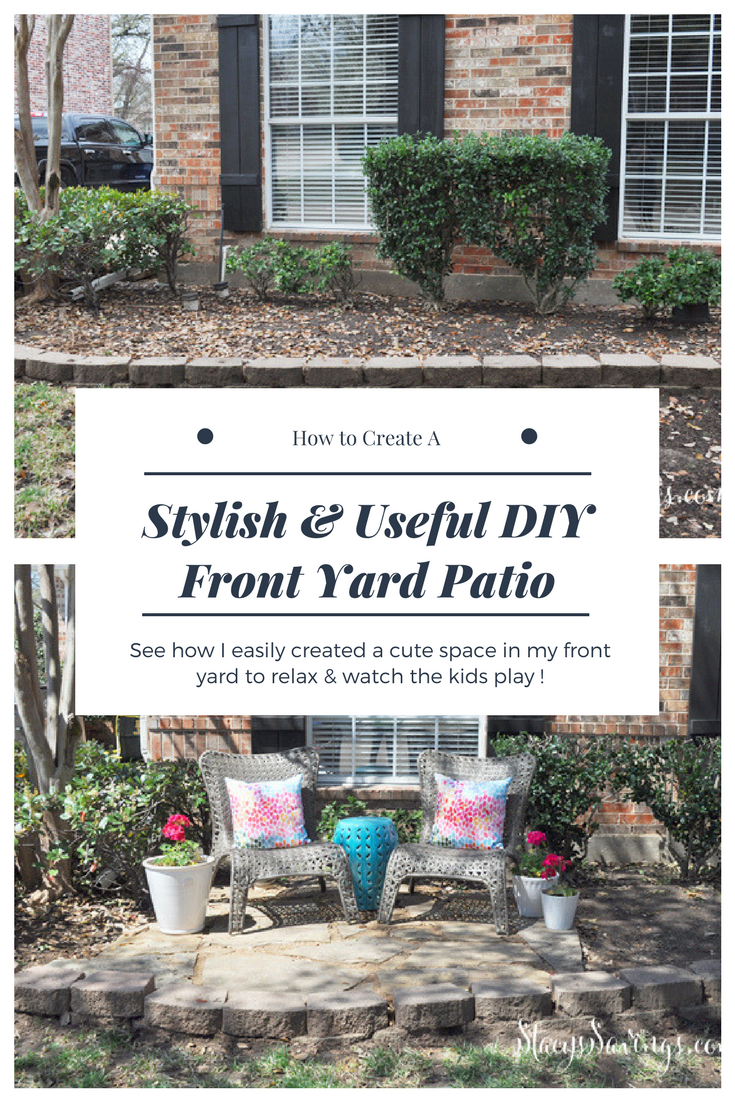
My kids spent a lot of time playing in the front yard last year. Mostly, because we have no backyard (but now we do!). They love to draw with sidewalk chalk on our large swing driveway, blow bubbles, go on walks, and ride their bikes with the neighbor kids. I have a bunch of tailgate chairs that I drag out, but I was sick of dragging out and putting up the chairs each time they went out to play. I wanted something more permanent and, of course, stylish. So I decided to build a little front yard patio and seating area in our flower bed.
Last year, I pulled up a bunch of large flagstones that previous owners had used for stepping stones in the back yard. I knew I didn’t want stepping stones in the backyard, but they were nice pieces, and I thought I could use them somewhere else in the landscape in the future. I kept my eyes open for options for a permanent seating area in the front yard, and earlier this Spring, everything came together for me to make my vision a reality!
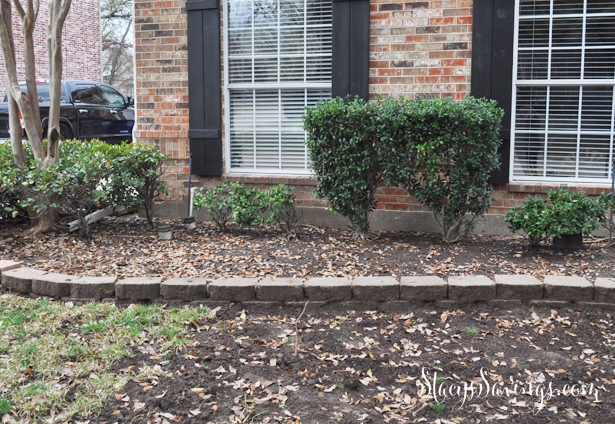
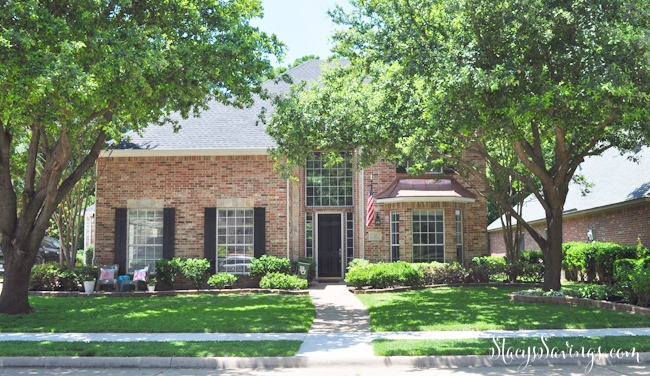
Here is what the whole front yard looked like before:
The Prep Work & Construction
As I’ve told you before, someday, we’re going to get all new landscaping & a new flowerbed border. Right now, we have very large flowerbeds with concrete retaining wall bricks from Lowe’s. The previous owners didn’t take care of the yard, and a lot of the shrubs were overgrown or dead. When we removed those, we were left with a huge empty space. I decided that the bed to the left had the perfect spot for the front yard patio that I was envisioning. It also had the sewer clean out pipes that I wanted to hide. Double-score.
I hand-tilled the area with a pick axe, and pulled out any annoying roots and weeds so that I could use my bow rake to level the area. Once that was done, I laid down a few layers of newspaper to act as a weed barrier. It will compost away in about 18 months, but by then, it’s job of keeping weeds from growing will be done. I picked up about 6 bags of paver base at Lowe’s and put those down on top of my newspaper. I spread that out gently with my bow rake, and then it was time for the flagstones.
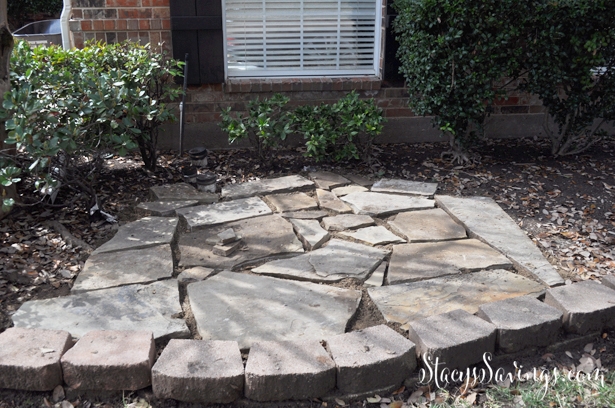
Laying the flagstones is my favorite part! It’s a giant puzzle! I love puzzles. Since the flagstones have uneven bottoms, I had to compensate by pushing around the base to make a perfect fit. I didn’t use my level at all, I just eyeballed it, but if you want it to be really perfect, using a level and a rubber mallet isn’t a bad idea.
When all of my flagstones were in, it was time to finish with some crushed granite. I used about one and a half bags of crushed granite. It is really easy to use, you just pour it on top of the flagstones, and sweep it into the cracks between the stones with your broom. Then, hose it off for a final clean up, and the front yard patio is done! Time to decorate!
Decorating

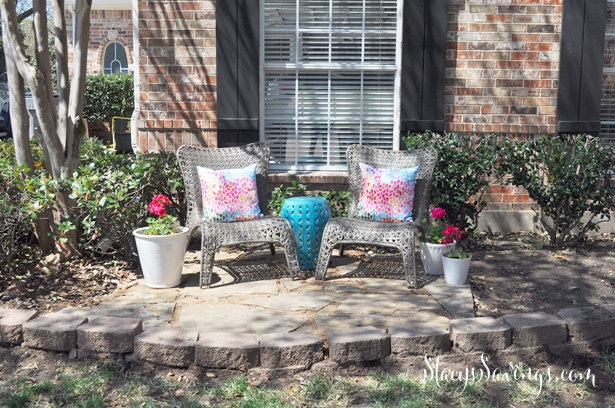
I saw these low-slung All-Weather Wicker Chairs at Lowe’s last year, and had been stalking them ever since. They never did go on sale (of course, except for the time that I wrote this blog post – for real. Ugh!), but I knew they were going to be perfect for what I wanted. I was looking for something low-profile and modern anyway. Then, I saw them being used on the Mid-Century Modern makeover on Fixer Upper! I always knew those were great chairs. Haha!
~ 2018 Update! Our chairs bit the dust this past Fall. After a few years of regular use, the seats weakened and broke. They are no longer available at Lowe’s. We bought these Adirondack Chairs from Wayfair during their Black Friday Blowout Sale, and we’ll be putting them together soon. Hopefully, they will last longer.
With the chairs in mind, I had been looking for pots, a garden stool, and outdoor pillows to finish my patio. Right after Christmas, HomeGoods started getting in garden stuff, and I picked up an aqua ceramic garden stool, and 3 white pots. I didn’t want the pots to all be the same, and I knew I wanted different levels, so I decided to find three different sizes that were all the same color. I knew I wanted white, because the plan was to put some hot pink flowers in them for some pop.
My little front yard patio was quickly becoming a reality except for one thing: outdoor pillows. Weeks were spent looking everywhere for the outdoor pillows that I was imagining in my head, and I was having no luck. I wanted something that had a white background, but that had multiple colors, including hot pink (from the flowers), aqua (from the stool), and green (from the hollies behind the patio). I finally stumbled across these DENY Designs Garima Dhawan Rain Pillows online. They were available in 3 different sizes, and they were on sale at the time! I ordered the 18″ size, and plopped them on my chairs. At first, I thought they were too big, but they grew on me. They’re perfect!
The Front Yard Patio Complete!
2015 Version
2018 Version
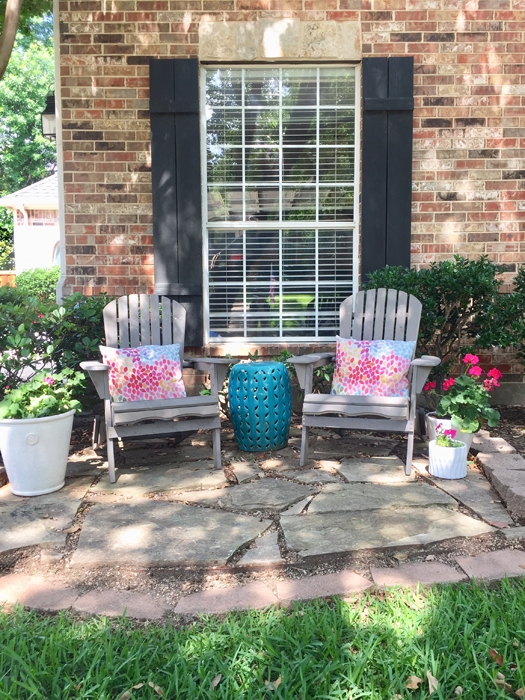
So now, I have my little front yard patio, AND I LOVE IT! See, you can’t even see those pesky little sewer cleanouts anymore. It’s so great to take a glass of water (or wine, or beer, whatever) out there and sit and do surveys or blog on my laptop or read magazines while the kids play. I’ve also met a ton of neighbors, and little seating areas have been popping up in front yards all over the neighborhood!
Here’s what it looks like from the street:
I love that little pop of color from the aqua garden stool!
The Driveway Patio
This sitting area was such a success, that I’ve already completed another one! I had this dead space next to the garage that was screaming for something, I just didn’t know what it was until I finished the front yard patio.
Here’s what it looked like before:
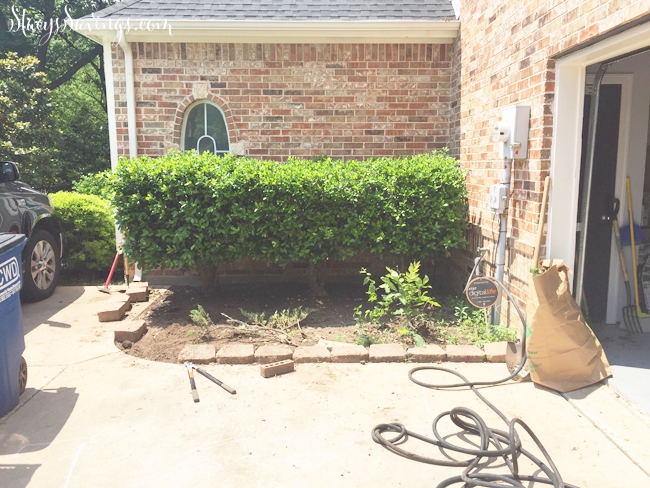
Lots of weeds, a dying Juniper, the hose was just everywhere. It was gross.
Here’s what it looks like after:
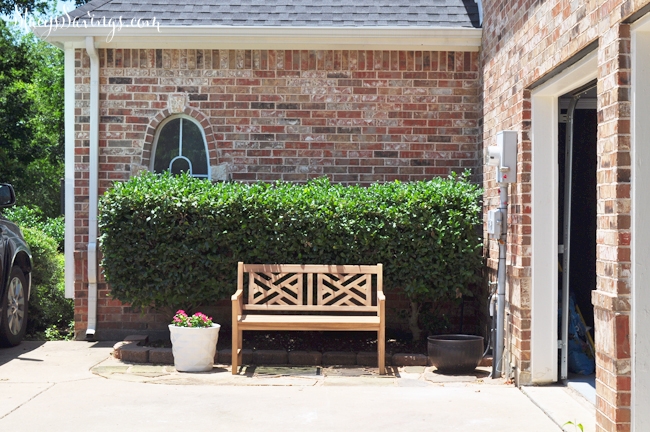
I picked up a large geometric white pot from HomeGoods for $29.99! I found a hose pot at Lowe’s for $29.98. I’d been searching for a Teak Chippendale Bench for a while, and found one at Sam’s Club for less than $200! That’s half the price of the others I had seen, so I couldn’t pass it up.
The Financials
I used up all of my leftover flagstones from the backyard for this patio, as well as some that my neighbor gave me for free. Then, I needed about 5 bags of paver base and 2 bags of granite. This patio cost me about $280, with the bench being most of that. I want to get the 16″ pillows that match the ones on the chairs in the front patio, but they are currently out of stock. I ended up buying the matching pillows! I’ll get a new picture for you this spring! I might add some lanterns or more pots in the future, and the hollies need to be trimmed, but I like the way it looks for now.
The front yard patio makeover cost me about $300, which isn’t cheap, but it would have been a lot more had I not already had the flagstones. The chairs were $120 of that. The paver base and crushed granite was about $25, and the rest was decor & plants. We had a gift card that helped offset that a bit, but not much. Once I had everything it only took me a couple of hours to put together by myself (mostly).
The best part about this new front yard patio is that I don’t really have any maintenance to do, other than replanting the pots each season. I could have planted new bushes or shrubs there, but that would have cost me more than $300, and I would have had to maintain it all of the time. So I feel like by turning this into hardscape, I’m saving money every year!
Here’s the list for the front yard:
Get Sidewalk FixedRemove Magnolia & Trim TreesRe-sod YardInstall Flagpole HangerRepair & Paint Front DoorChange Out Door HardwareChange Out Light FixturesCreate Seating Area- New Flowerbed Borders
- Replace Landscaping
New Copper DormerDarker Roof ShinglesReplace & Add Gutters
It’s coming along! I don’t know that we’ll get to much more of this list in 2015. Maybe the Door Hardware. The rest is going to be pretty expensive.
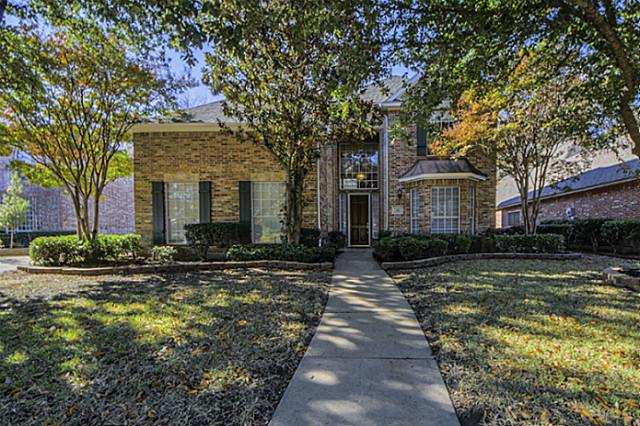
One more time, because everyone loves a good Before & After:
So much better!
Here’s an image to Pin for later if you’re into that sort of thing.
Do you have a sitting area in your front yard? Is it a relaxing retreat? As with the rest of the house updates, I wanted this front yard patio to serve a purpose by also look good doing it. I think I accomplished that. Its so relaxing, that I’m using it while I write this post! What do you think? Tell us in the comments!
Check out all of the Stacy’s Savings Total Home Makeover posts here!


Susan says
Hi! This looks great! Thinking about something similar in front of our house. The front gets all the shade & that’s how we see neighbors! How big was your area? Thinking we want the same – just enough for 2 chairs & a garden stool. Thx
Stacy says
Hi Susan!
Thanks! It is our favorite spot to people watch!
Our space is about 6’ wide and 5’ deep.
Hope that helps & thanks for checking out the blog!
~Stacy
jo meyeer says
I was wondering what you did for drainage.. And was it necessary to do a slope to maintain drainage. We had all that snow this late winter and then a heavy rain and the water came in.
I was thinking of doing something like this too,
I have been wondering it id make it worse for water not draining and coming into the basement or help it run off better provided a low key slant.with some paver rocks.
Stacy says
Hi Jo!
Thanks for your question! I hate to be the bearer of bad news, but I can’t answer it. You see, I live in Texas, and we don’t have basements or snow.
Since the flagstone sit a little bit higher than the flower bed, and the patio is encased in retaining wall rocks, I didn’t really have to think about drainage or sloping. In your case, you definitely would need to think about that. I would consult with a local landscape architect and see what they say. I’m sure its fairly easy, but would be much easier knowing the details of what needs to be done up front.
Good luck with your project!
Stacy
Marie says
This is so gorgeous I love it so much. What a great idea. We could defo do this out front of our house..