Recessed outlets are one of my very favorite things in my house. In fact, when we moved in, I installed recessed outlets anywhere I knew I was going to put furniture against the wall. Recently, I installed larger recessed outlets with additional outlets in our Master Bedroom Refresh. I know electrical work can be intimidating, but replacing outlets is super easy. So today, I’m going to show you how to do it and why you need a recessed outlet in every room of your home.
What is a Recessed Outlet?
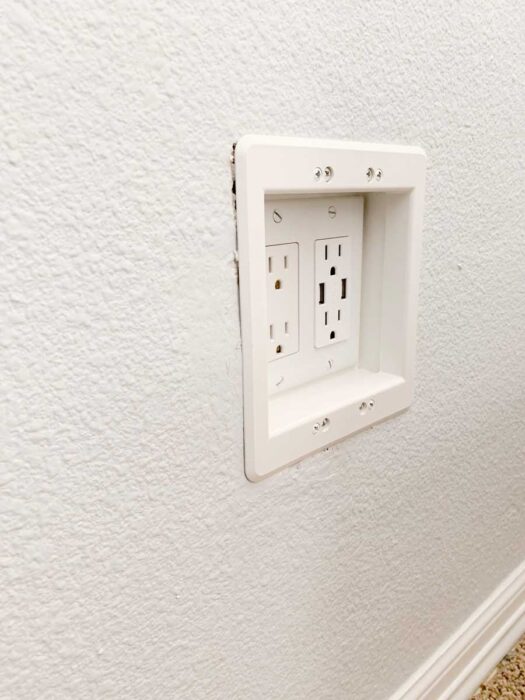
A recessed outlet is exactly what it sounds like: an electrical outlet that is recessed into the wall. This allows the plug to be back in the wall cavity, so that you can push your furniture all the way up to the wall (or baseboard). Basically, the only part that sticks out from the wall is the cord, which is bendable. If you have a large chest, armoire or dresser, you need a recessed outlet behind it so you can close the gap between the furniture & the wall.
These are my favorite recessed outlets for when you’re replacing a normal outlet. They are great for lamps or anything with a normal plug.
Changing out the outlet is very easy. If you aren’t comfortable with electrical work, by all means, call an electrician.
How to Replace an Electrical Outlet
Swapping out an electrical outlet for a recessed version is exactly the same as swapping out regular outlets. So if you have almond colored outlets, and you want to change to white (please do that), its the same process.
Supplies

For this project you’ll need the following supplies:
Recessed Outlet or Recessed Box
USB Port Outlet or Smart Outlet
Rectangle Outlet
Drywall Knife
Needle Nose Pliers
Electrical Snips
Electrical Connectors
Extra Wire
Electrical Tape
Phillips Head Screwdriver
Hammer
Gloves
Protective Glasses
Voltage Tester

The first step: TURN OFF THE POWER AT THE BREAKER BOX. I can’t emphasize this enough. Turn it off. Go to the room where the outlet you want to swap is, and turn everything on. Plug a lamp into every empty outlet and turn it on. Then, when you flip the breaker for that room, the outlets & lights on that circuit will go off. When that happens, count the number of items on that circuit. We’ll discuss why later.
If you have two outlets in the same box that are on different circuits, you’ll need to flip both of those breakers off before proceeding. Also, test your outlets for power with a voltage tester.
Removing the Existing Outlet

With the power shut off (you did that right?), remove the screws holding the wallplate in place & set aside the wallplate. Next, unscrew the screws holding the outlet to the box in the wall.
After the outlet is unscrewed, take a picture of the connections. You’ll want to replicate those connections on the new outlet. It’s always best to take a picture so you know what goes where. We have a red wire because this outlet can also be powered by a switch. You probably won’t have a red wire.
Connecting the Recessed Outlet
I like to do the connections one at a time. I start with the white wire, disconnect it from the existing outlet, then connect it in the same position on the new recessed outlet. Then I do the ground wire, and finally the black wire. The connections on the new box should now look exactly like your picture of the connections on the old outlet.
Completing the Recessed Outlet Installation

Finally, tuck your wires back in the box, and shove the outlet into the box. The recessed outlet is going to be more difficult to get in the box because its taking up some of the room of the junction box. Its doable, just go slow so you don’t disconnect anything in the box or loosen the connections.. Make sure your wires are bent in the box in a way that gives enough room for the recessed outlet to fit in the box.
Once your screws that hold in the recessed outlet can meet the holes in the junction box, use your drill to help get it in the wall. I’m not going to lie, recessed outlets take a little muscle power to install.
So that’s how you replace an outlet with a recessed outlet. Easy Peasy.
Adding an Additional Outlet & Larger Recessed Box

Last week I told you about our mini Master Bedroom Makeover. One of the things I did in there to make our lives better/easier is double the amount of outlets on either side of the bed. We had been using extension cords to plug everything in to one outlet. I wanted to clean that up. I also used larger recessed outlet boxes to house it all since these outlets are behind the nightstands.
Lately, I’ve been replacing some of the recessed outlets I had originally installed in favor of these larger recessed outlet boxes. I like these because they allow you to recess larger box plugs, like those on our Amazon Echo, for example. Those don’t fit in the recessed outlets I showed you earlier in this post.
With this larger box comes a little extra work, but it’s not difficult. Since I was going to have to cut the drywall to get this larger recessed box in the wall, I decided to add an extra outlet to each box so that we’d have 4 plugs on either side of the bed instead of just 2. Oh and that extra outlet I added also has USB ports in it. You can also get outlets that have USB & USB-C outlets as well.
PSA – Remember when I told you to count how many items were powered by your circuit? This is why. You don’t want more than 8 items per circuit. Check the electrical code for your specific area. My circuit only had 6 items, so I was good to add the 2 extra outlets.
Removing the Existing Outlet
Installing this larger outlet and/or an extra outlet starts with shutting off the power, unscrewing the outlet, and taking a picture exactly like we did with the recessed outlet earlier. Then, remove the old outlet.

The new recessed box will be a larger junction box that you will install the normal outlets into. These aren’t the same recessed outlets as above. You can use the old outlet that you just took out of the wall. These recessed junction boxes provide a larger cavity in the wall to accommodate bigger plugs.
Next, consult the directions on your larger recessed box, and see what size hole you need to fit your box. Mine was 6″ x 5.5″. I located the stud that my junction box was on (it was on the left), and used my drywall knife to make a corresponding hole from the stud over. This leaves you a larger box with the old junction box accessible on 2 sides.
Removing the Old Junction Box
Make sure you have your gloves and protective eyewear on, because it’s time to remove the old junction box. The box is nailed into the stud on the top and the bottom using large framing nails. To remove this, I use a hammer and break the box into pieces. The pieces will be sharp and go flying, so be careful. Remove the framing nails with a hammer. Now, you’re ready to install your new recessed box.
Installing the Recessed Box

Following the instructions that came with the box, knockout the holes on the top for your wiring to enter the box. You may need a hole knocked out for power to exit the box as well if there are two sets of wire coming in your old box.
Install the trim box provided. This will be the part you see on the outside of the wall. Once that is in place, use a screwdriver to tighten the four screws that hold the fins on. These fins will be what holds the box secured to your drywall. Be sure not to over tighten because you can break the drywall.
Adding an Extra Outlet
In my project, I wanted to add an additional outlet to each side of the bed. In order to do that, I needed to create what are called pigtails to connect my outlets to the power coming into the box. To do this, I took some short 5-6″ pieces of wire (make sure you use the same gauge wire as the rest of your house uses), and uncovered both ends.

I used one end of each of the white/black/ground wires that I just cut and made my connects on the outlets themselves. This makes it easier to install later. You have more space to make the connections when the pigtails aren’t already connected to the wire. A pair of needle nose pliers makes this job easier.

Once my pigtails were connected to the outlets, I used push in connectors to attach the pigtails to the wire in the box. Push in connectors are super easy to use, much easier than electrical caps. I used a piece of electrical tape around my connections as an added layer of protection.
You’ve now got 2 outlets powered where you used to have one. If you choose to use USB port outlets, there’s nothing different. It’s just like a regular outlet.
Installing the Outlets

The last step is to install the outlets. The hardest part here is bending the wire behind your outlets, especially if you’re using an outlet with USB ports or some kind of smart outlet. Those outlets have larger boxes behind them, so there’s not as much clearance for your wires. In my case, I tried to tuck all of the wire & connections behind my “normal” plug because the USB one has a thicker box.
Screw your outlets in place and install the decorative wall plate that came with your recessed box. In my case, I had to run to Lowes really fast and pick up 2 rectangle outlets (also called decorator receptacles) in order to fit my wall plate. The wall plate that came with the recessed box is slightly smaller than what you can find on the shelf at your local Home Improvement Store. It was easier for me to get outlets that fit the wall plate than it was to get wall plates to fit my recessed box.
Installing the larger recessed box and additional outlet took me about 20 minutes, but this is about the 3rd time I’ve done it. Bending the wire is the most frustrating part.
Final Thoughts

We’re loving having the extra outlets on each side of the bed, and the USB ports are so convenient! The unsightly extension cord situation is gone. It’s so nice! I’ve already got my eye on a few other places in the house to add USB outlets to, like the kitchen island & our office.

I love the extra space that using recessed outlets gives us. Being able to put your furniture right up against the wall is amazing! Where do you want to put a recessed outlet? Tell me in the comments!


Leave a Reply